开始
上一次只是移植了rt-thread nano的内核,但rt-thread的finsh/shell,是一大很有特点的功能,没有finsh/shell的rt-thread是不完整的,所以,这次开始添加finsh/shell功能。
要实现finsh/shell功能,首先,要实现串口的功能。
添加uart.c与uart.h两个文件到工程中。
添加相应的串口初始化函数。
可以选择增加printf的支持,写上int fputc(int ch, FILE *f)函数;
uart.c文件代码如下:
#include "gd32f3x0.h"
#include "gd32f310k_start.h"
#include "systick.h"
#include <rtthread.h>
#include "uart.h"
static rcu_periph_enum COM_CLK[COMn] = {EVAL_COM_CLK};
static uint32_t COM_TX_PIN[COMn] = {EVAL_COM_TX_PIN};
static uint32_t COM_RX_PIN[COMn] = {EVAL_COM_RX_PIN};
void usart_init(uint32_t com)
{
uint32_t COM_ID = 0U;
if(EVAL_COM == com){
COM_ID = 0U;
}else{
}
rcu_periph_clock_enable(EVAL_COM_GPIO_CLK);
rcu_periph_clock_enable(COM_CLK[COM_ID]);
gpio_af_set(EVAL_COM_GPIO_PORT, EVAL_COM_AF, COM_TX_PIN[COM_ID]);
gpio_af_set(EVAL_COM_GPIO_PORT, EVAL_COM_AF, COM_RX_PIN[COM_ID]);
gpio_mode_set(EVAL_COM_GPIO_PORT, GPIO_MODE_AF, GPIO_PUPD_PULLUP, COM_TX_PIN[COM_ID]);
gpio_output_options_set(EVAL_COM_GPIO_PORT, GPIO_OTYPE_PP, GPIO_OSPEED_10MHZ, COM_TX_PIN[COM_ID]);
gpio_mode_set(EVAL_COM_GPIO_PORT, GPIO_MODE_AF, GPIO_PUPD_PULLUP, COM_RX_PIN[COM_ID]);
gpio_output_options_set(EVAL_COM_GPIO_PORT, GPIO_OTYPE_PP, GPIO_OSPEED_10MHZ, COM_RX_PIN[COM_ID]);
usart_deinit(com);
usart_baudrate_set(com, 115200U);
usart_receive_config(com, USART_RECEIVE_ENABLE);
usart_transmit_config(com, USART_TRANSMIT_ENABLE);
usart_enable(com);
}
int fputc(int ch, FILE *f)
{
usart_data_transmit(EVAL_COM, (uint8_t)ch);
while(RESET == usart_flag_get(EVAL_COM, USART_FLAG_TBE));
return ch;
}
uart.h代码如下:
#ifndef UART_H
#define UART_H
#ifdef __cplusplus
extern "C" {
#endif
#include "gd32f3x0.h"
#include <stdio.h>
#define COMn 1U
#define EVAL_COM USART0
#define EVAL_COM_CLK RCU_USART0
#define EVAL_COM_TX_PIN GPIO_PIN_9
#define EVAL_COM_RX_PIN GPIO_PIN_10
#define EVAL_COM_GPIO_PORT GPIOA
#define EVAL_COM_GPIO_CLK RCU_GPIOA
#define EVAL_COM_AF GPIO_AF_1
void usart_init(uint32_t com);
#ifdef __cplusplus
}
#endif
#endif
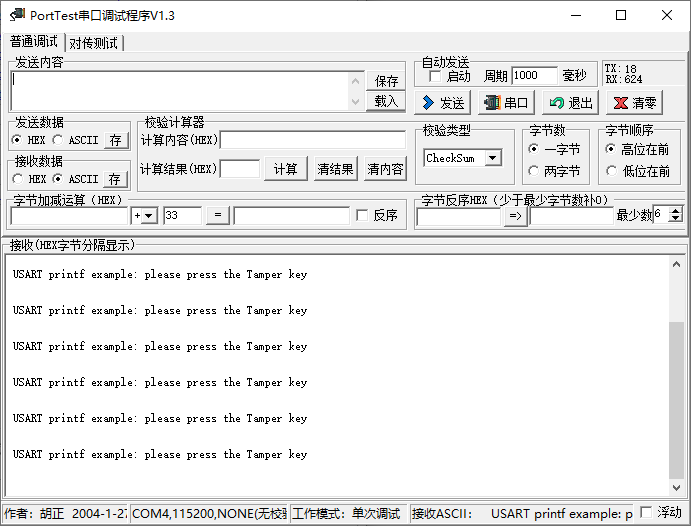
使用printf 测试串口功能

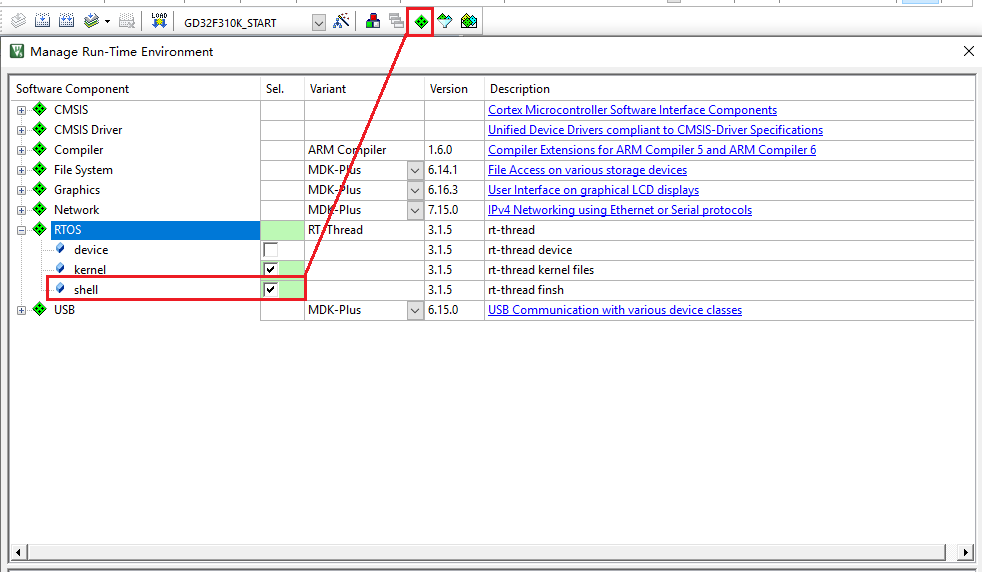
添加finsh组件

rtconfig.h中,去掉#include "finsh_config.h"的注释,这个在添加了组件后,是不会自动去掉的。

增加三个了函数的实际函数。
board.c
void rt_hw_console_output(const char *str)
static int uart_init(void)
static int uart_init(void)
{
usart_init(EVAL_COM);
return 0;
}
INIT_BOARD_EXPORT(uart_init);
void rt_hw_console_output(const char *str)
{
rt_size_t i = 0, size = 0;
char a = '\r';
size = rt_strlen(str);
for (i = 0; i < size; i++){
if (*(str + i) == '\n'){
usart_data_transmit(EVAL_COM,a);
while(RESET == usart_flag_get(EVAL_COM, USART_FLAG_TBE));
}
usart_data_transmit(EVAL_COM, *(str + i));
while(RESET == usart_flag_get(EVAL_COM, USART_FLAG_TBE));
}
}
finsh_port.c
RT_WEAK char rt_hw_console_getchar(void)
RT_WEAK char rt_hw_console_getchar(void)
{
int ch = -1;
if(RESET != usart_flag_get(EVAL_COM,USART_FLAG_RBNE))
{
ch=usart_data_receive(EVAL_COM);
}
else
{
if(RESET !=usart_flag_get(EVAL_COM,USART_FLAG_ORERR))
usart_flag_clear(EVAL_COM,USART_FLAG_ORERR);
rt_thread_mdelay(10);
}
return ch;
}
注意,这里的rt_thread_mdelay(10);是必须要有的,因为shell也是做为一个进程在OS中运行的,RTOS的进程不能一直占用CPU,所以,都是要添加延时的。
去掉board.c中static int uart_init(void)函数中的
#error "TODO 2: Enable the hardware uart and config baudrate."
去掉finsh_port.c中RT_WEAK char rt_hw_console_getchar(void)函数中的
#error "TODO 4: Read a char from the uart and assign it to 'ch'."
并添加相应 的头文件 ,#include "uart.h"
编译后烧写到板子上,串口输出如下,并使用了ps命令的结果。

下面就是要进行进程stack的优化了,从ps命令的显示可以看出,每个进程占用的stack的大小,这样就可以方便的进行调整,从而不浪费掉STACK,毕竟,这个芯片的RAM本来就很小,只有8K。
优化后的结果。

在如上的这种优化下,整个工程的RAM与ROM使用情况如下:

调试时,可以先给进程分配一个比较大的stack,等功能调试好后,通过ps看一下使用情况,再进行相应的调整,当然,要适当注意一下字节的对齐情况。
原作者:ifconfig
 /9
/9 