之前测试过,直接在电脑端,通过串口工具,测试TKB-623开发板通过串口手法数据:TKB-623评估板双机通讯测试_程序开发,效果不错。
这次更进一步,使用ESP32结合TKB-623评估板,来发送信息。
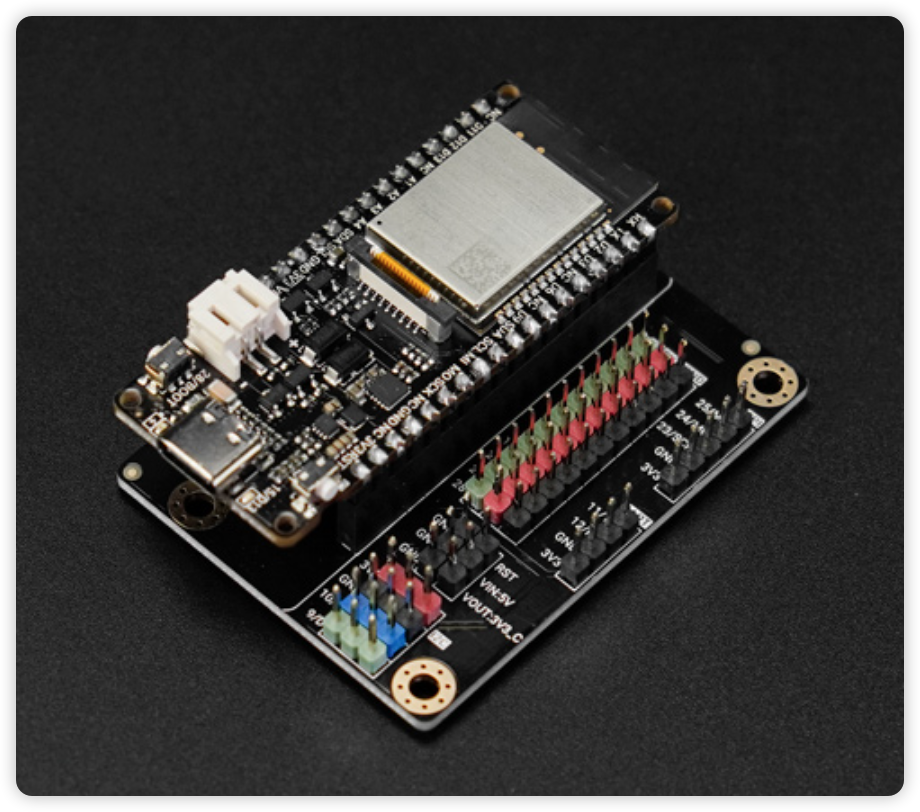
一、硬件准备
ESP32开发板,我使用的是DFRobot ESP32-C5开发板+扩展板套装:
扩展板的接口如下:
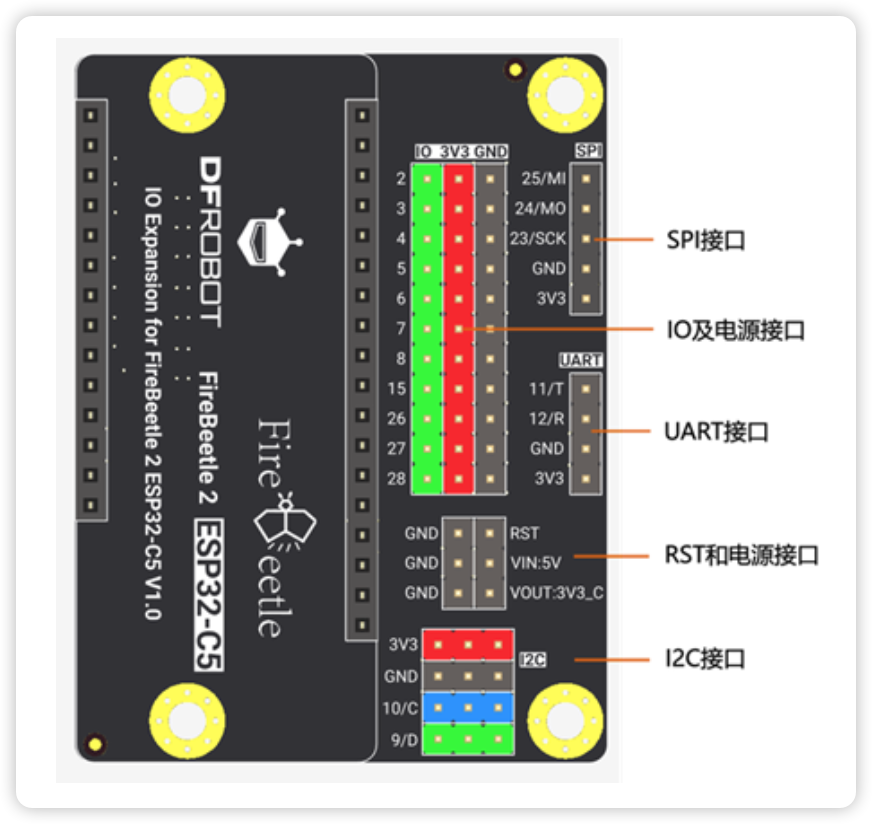
不过,其中的UART接口与UART0关联,所以选择了SPI接口部分的引脚。
根据TBK-623的引脚定义:
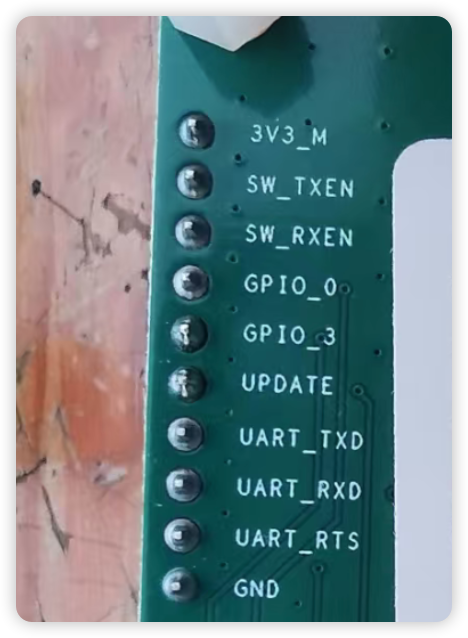
具体关联如下:
| ESP32-C5 |
TKB-623 |
|---|
| SPI-24 |
UART_RXD |
| SPI-23 |
UART_TXD |
| SPI-3V3 |
3V3_M |
| SPIGND |
GND |
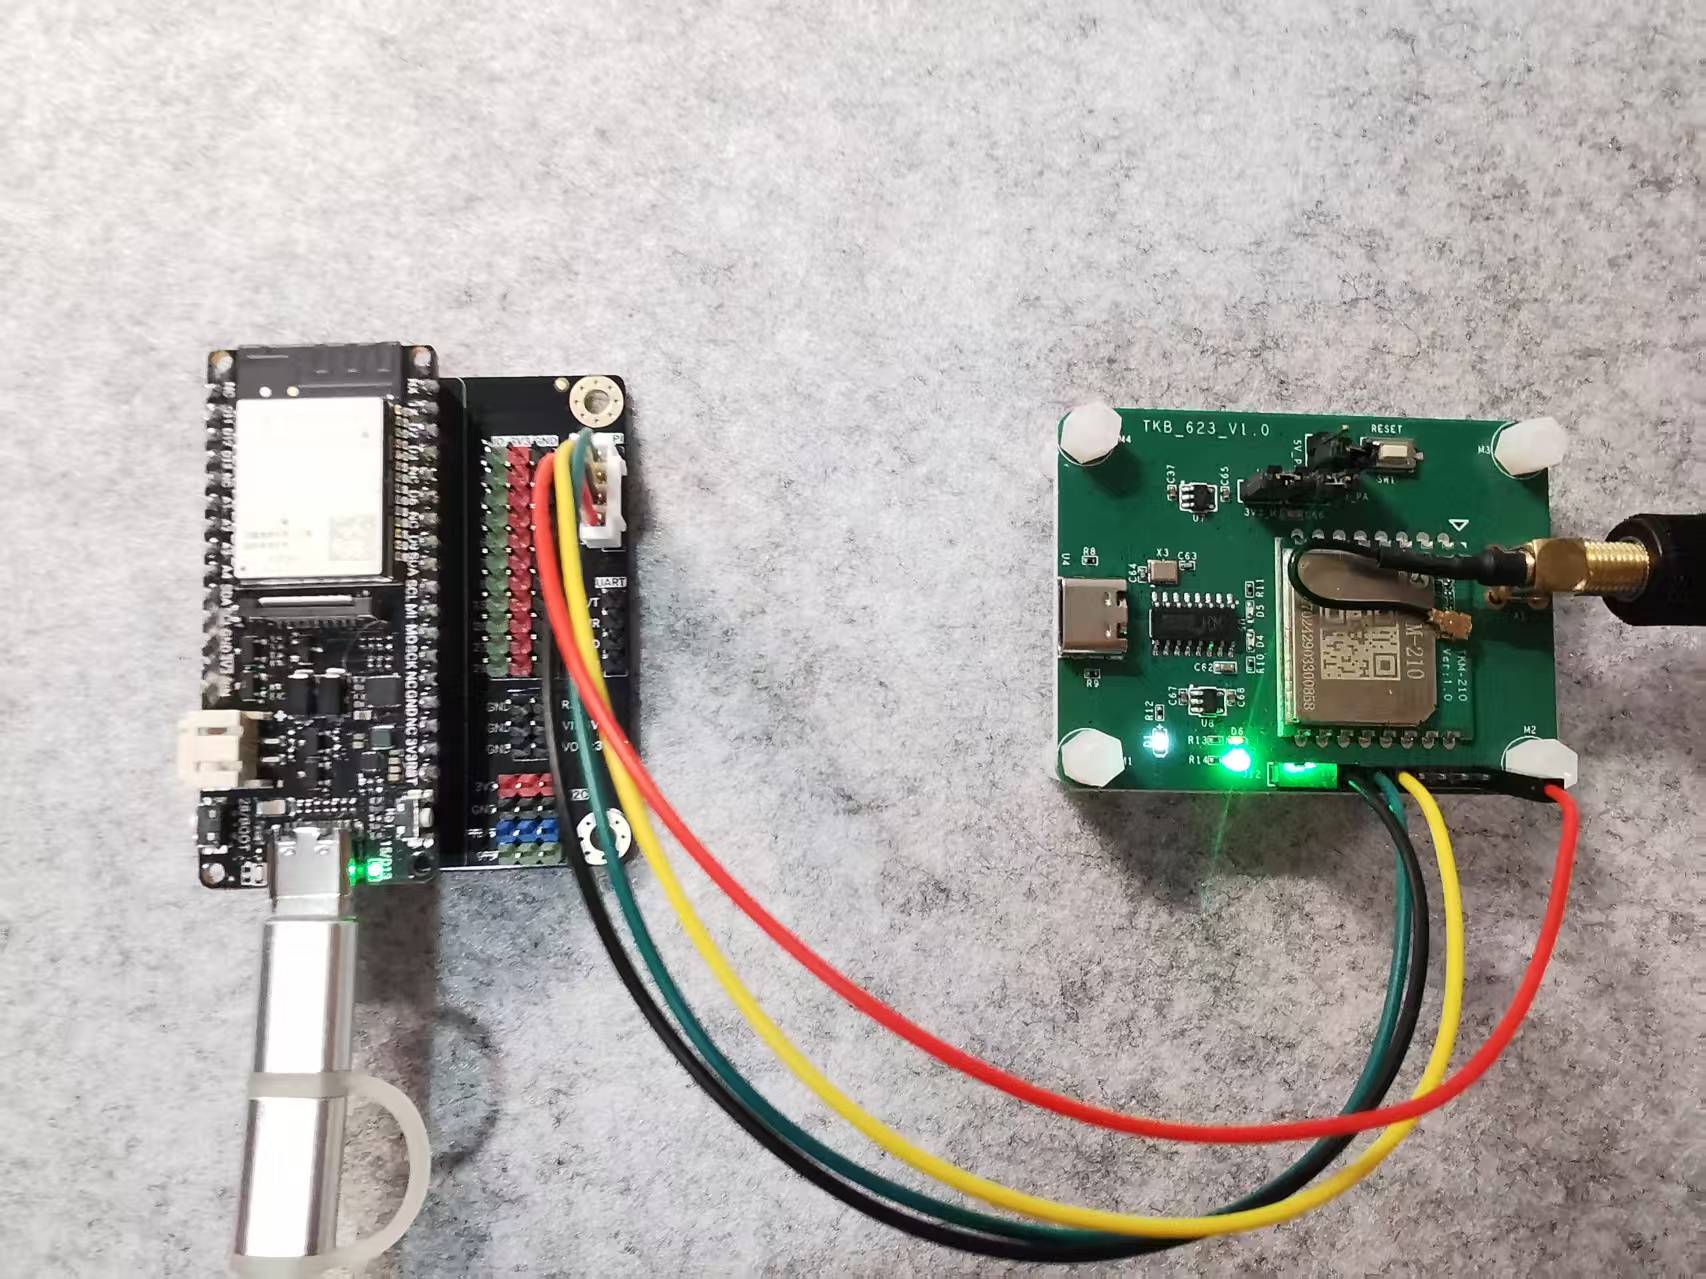
实际连线如下:
二、程序逻辑
参考道生物联提供的文档,可以了解AT指令的基本用法:
在这次测试中,TKB-623使用变长突发模式,具体的配置如下:
根据基本想法,以及对ESP32和TBK-623的了解,借助AI工具,逐步完善想法和最终流程。
ESP32做为数据发送端,使用Arduino开发,具体的程序流程如下:
接收端还是在电脑上运行,具体的程序流程如下:
发送端和接收端的数据交换过程如下:
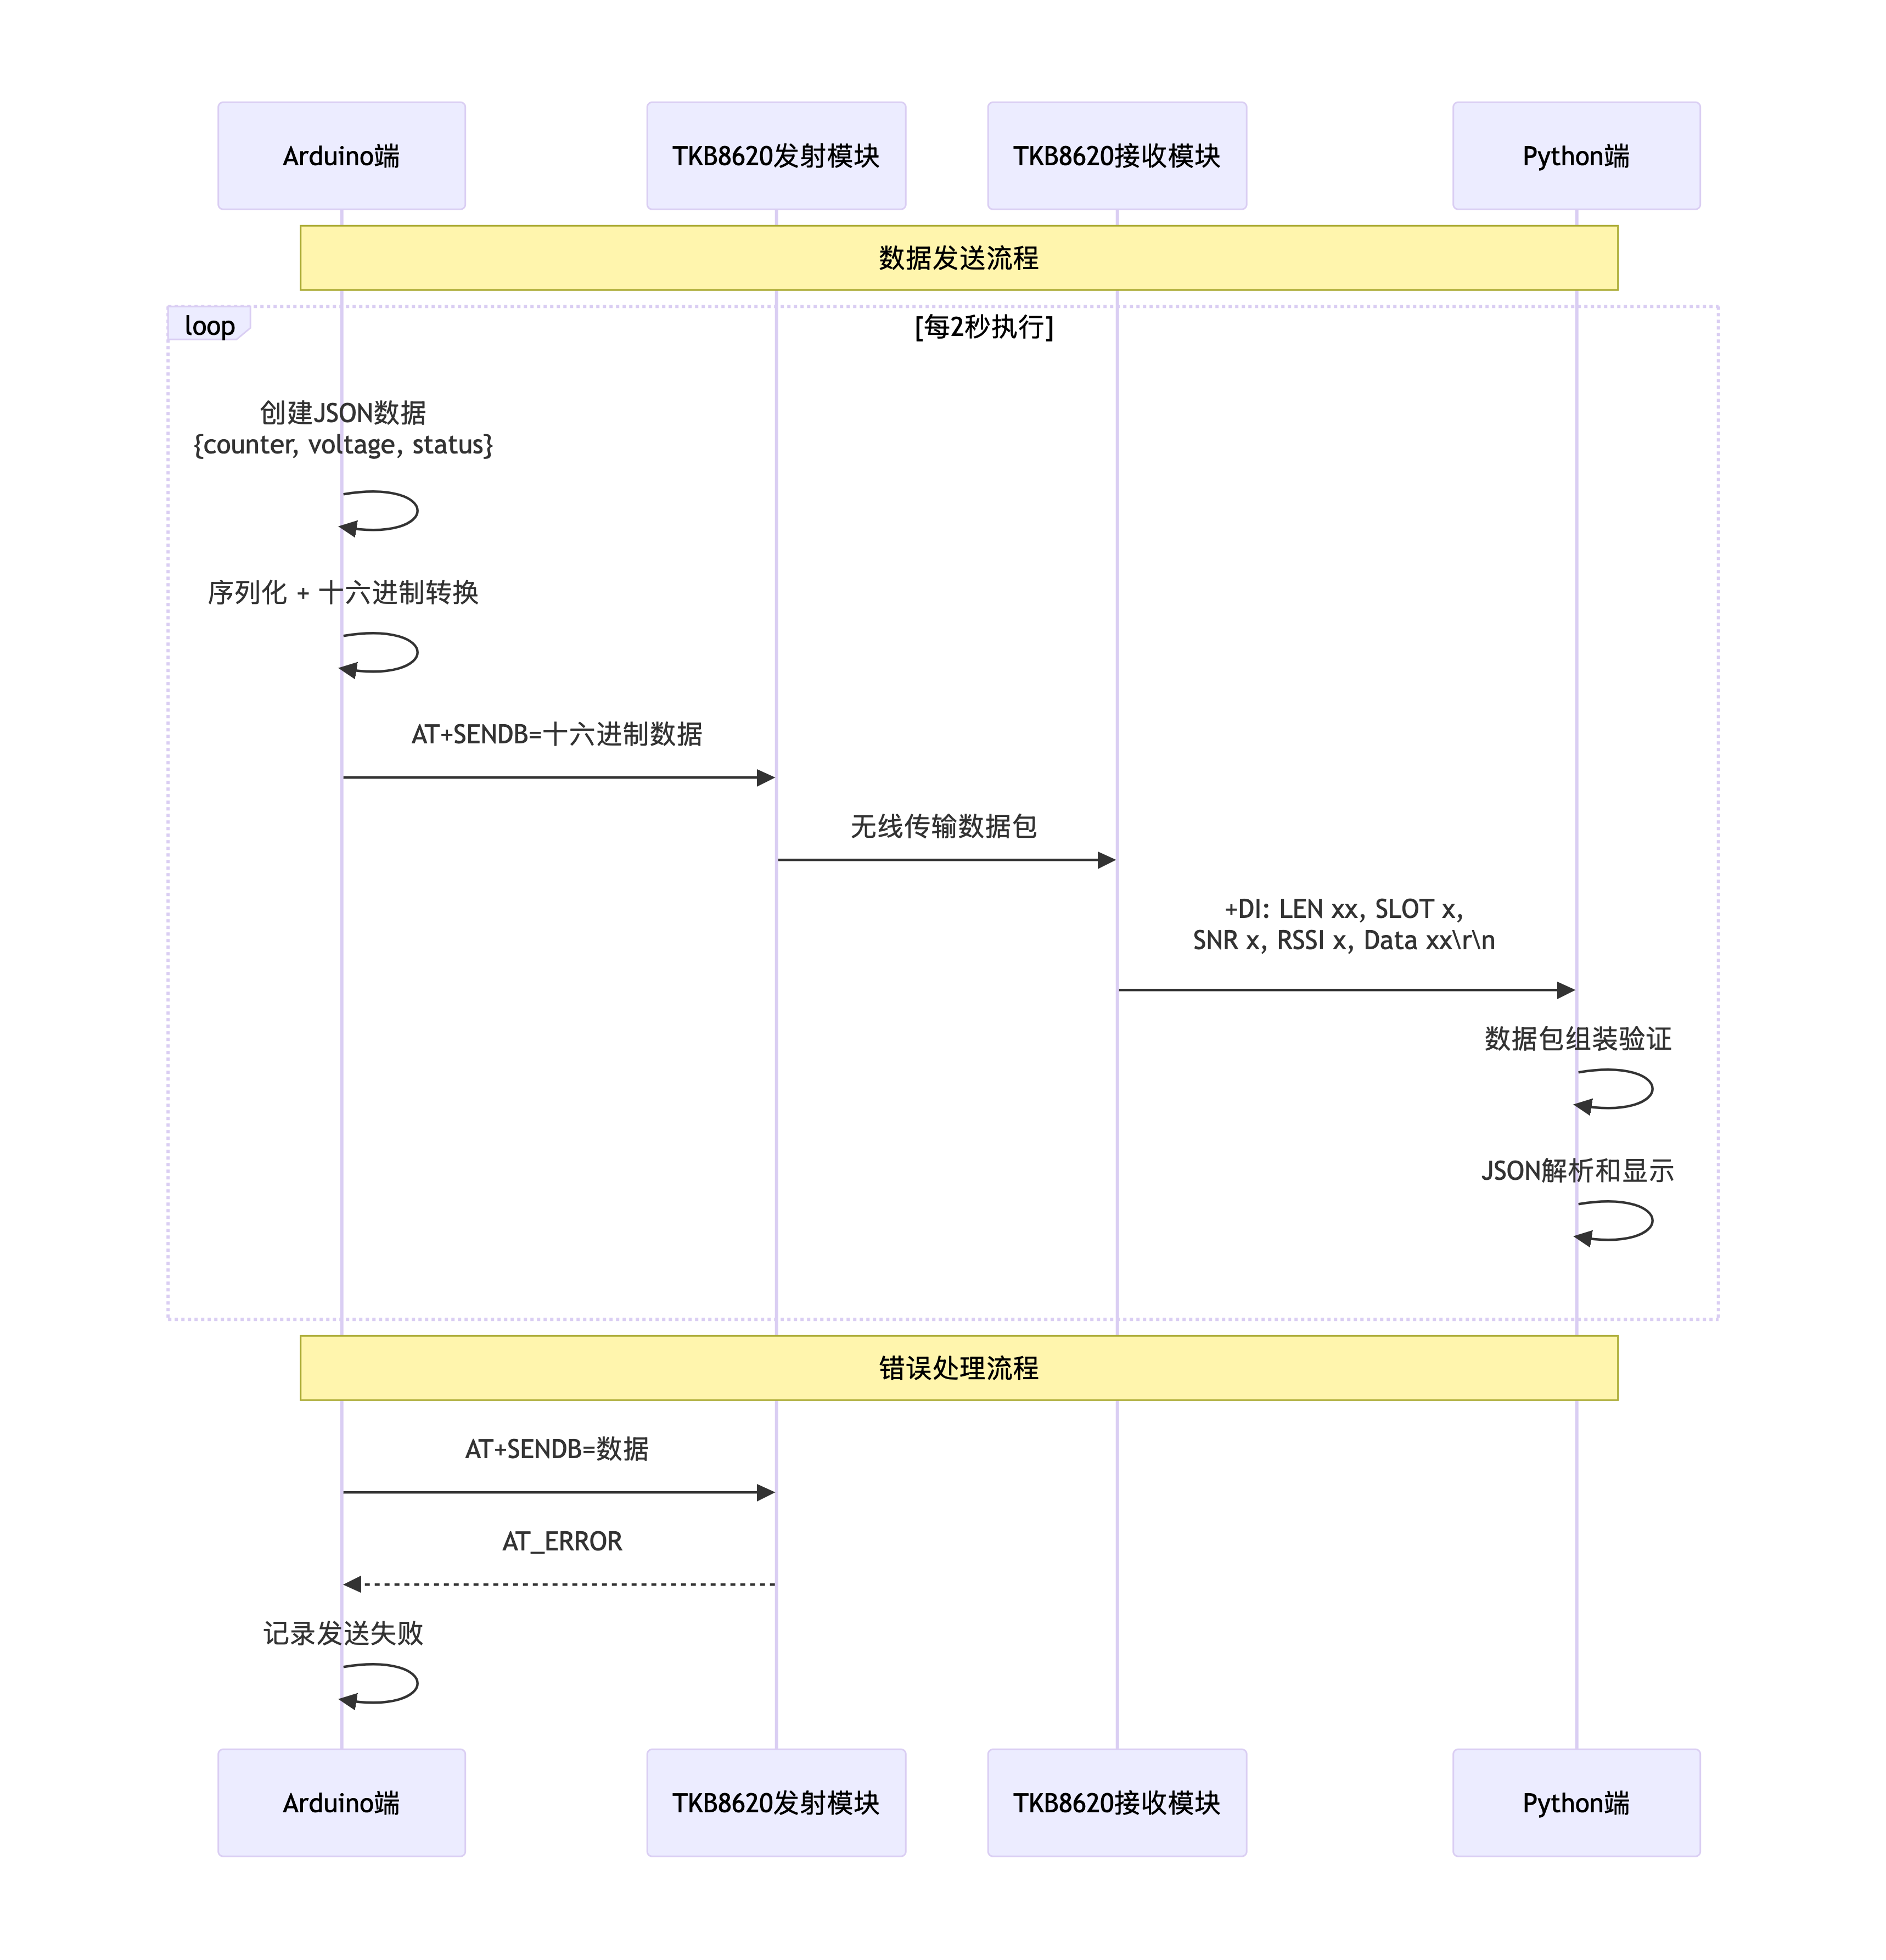
实际的逻辑流程很简单,就是根据要求,组装数据,发送数据,解码数据。
三、ESP32程序代码
根据设计的程序逻辑流程,最终的代码如下。
Arduino代码:
#include <ArduinoJson.h>
#define TK8620_TX 24
#define TK8620_RX 23
HardwareSerial TK8620(1);
unsigned long packetCount = 0;
unsigned long lastSendTime = 0;
const unsigned long sendInterval = 2000;
void setup() {
Serial.begin(115200);
TK8620.begin(115200, SERIAL_8N1, TK8620_RX, TK8620_TX);
delay(1000);
Serial.println("==========================================");
Serial.println("ESP32 TK8620 JSON 发送器初始化...");
Serial.println("工作模式: 变长突发模式");
Serial.println("引脚配置:");
Serial.print(" TK8620 TX -> ESP32 引脚 ");
Serial.println(TK8620_TX);
Serial.print(" TK8620 RX -> ESP32 引脚 ");
Serial.println(TK8620_RX);
Serial.print(" 使用硬件串口: ");
Serial.println(1);
Serial.println("==========================================");
delay(2000);
TK8620.flush();
while(TK8620.available()) {
TK8620.read();
}
configureTK8620();
Serial.println("✅ 初始化完成,开始发送数据...");
Serial.print("? 发送间隔: ");
Serial.print(sendInterval / 1000);
Serial.println(" 秒");
delay(1000);
}
void loop() {
if (millis() - lastSendTime >= sendInterval) {
sendJSONData();
lastSendTime = millis();
packetCount++;
}
checkIncomingData();
delay(100);
}
void configureTK8620() {
Serial.println("? 配置TK8620模块为变长突发模式...");
bool success = true;
Serial.println("? 发送AT测试命令...");
if (sendATCommandWithRetry("AT", 1000)) {
Serial.println("✅ AT测试成功");
} else {
Serial.println("❌ AT测试失败");
success = false;
}
delay(500);
if (!sendATCommandWithRetry("AT+WORKMODE=21", 3)) {
success = false;
Serial.println("❌ 工作模式设置失败");
}
delay(500);
if (!sendATCommandWithRetry("AT+FREQ=490300000,490300000,490300000", 3)) {
success = false;
Serial.println("❌ 频率设置失败");
}
delay(500);
if (!sendATCommandWithRetry("AT+TXP=15", 3)) {
success = false;
Serial.println("❌ 发射功率设置失败");
}
delay(500);
if (!sendATCommandWithRetry("AT+RATE=6", 3)) {
success = false;
Serial.println("❌ 通信速率设置失败");
}
delay(500);
if (!sendATCommandWithRetry("AT+ADDRFILTER=0", 3)) {
success = false;
Serial.println("❌ 地址过滤设置失败");
}
delay(500);
if (success) {
Serial.println("✅ TK8620变长突发模式配置完成");
} else {
Serial.println("⚠️ TK8620配置有部分失败,但将继续运行");
}
}
bool sendATCommandWithRetry(const char* command, int retries) {
for (int i = 0; i < retries; i++) {
if (sendATCommand(command)) {
return true;
}
Serial.print("? 重试命令 (");
Serial.print(i + 1);
Serial.print("/");
Serial.print(retries);
Serial.println(")...");
delay(500);
}
return false;
}
bool sendATCommand(const char* command) {
while(TK8620.available()) {
TK8620.read();
}
TK8620.println(command);
Serial.print("? 发送AT: ");
Serial.println(command);
String response = readSerialResponse();
if (response.length() > 0) {
Serial.print("? 原始响应: ");
for (unsigned int i = 0; i < response.length(); i++) {
char c = response[i];
if (c == '\r') {
Serial.print("\\r");
} else if (c == '\n') {
Serial.print("\\n");
} else {
Serial.print(c);
}
}
Serial.println();
if (response.indexOf("AT_OK") >= 0) {
Serial.println("✅ 检测到AT_OK");
return true;
} else if (response.indexOf("OK") >= 0) {
Serial.println("✅ 检测到OK");
return true;
} else if (response.indexOf("ERROR") >= 0) {
Serial.println("❌ 检测到ERROR");
}
} else {
Serial.println("❌ 无响应");
}
return false;
}
String readSerialResponse() {
String response = "";
unsigned long startTime = millis();
while (millis() - startTime < 3000) {
if (TK8620.available()) {
break;
}
delay(10);
}
while (millis() - startTime < 3000) {
if (TK8620.available()) {
char c = TK8620.read();
response += c;
if (response.indexOf("AT_OK") >= 0 || response.indexOf("AT_ERROR") >= 0) {
delay(100);
break;
}
unsigned long lastDataTime = millis();
while (millis() - lastDataTime < 200) {
if (TK8620.available()) {
break;
}
delay(10);
}
if (millis() - lastDataTime >= 200) {
break;
}
} else {
delay(10);
}
}
return response;
}
void sendJSONData() {
StaticJsonDocument<200> doc;
doc["counter"] = packetCount;
doc["voltage"] = 3.0 + (random(0, 31) / 100.0);
doc["status"] = 0;
String jsonString;
serializeJson(doc, jsonString);
Serial.println("\n? 准备发送数据包:");
Serial.print(" 数据包 #");
Serial.println(packetCount);
Serial.print(" 原始JSON: ");
Serial.println(jsonString);
String hexData = stringToHex(jsonString);
Serial.print(" 十六进制数据: ");
Serial.println(hexData);
String atCommand = "AT+SENDB=" + hexData;
TK8620.println(atCommand);
Serial.print("? 发送AT命令: ");
Serial.println(atCommand);
String response = readSerialResponse();
if (response.indexOf("AT_OK") >= 0) {
Serial.println("✅ 发送成功!");
} else {
Serial.println("❌ 发送失败!");
Serial.print(" 响应: ");
Serial.println(response);
}
Serial.println("------------------------------------------");
}
String stringToHex(const String& input) {
String hexString = "";
for (size_t i = 0; i < input.length(); i++) {
char hex[3];
sprintf(hex, "%02X", (unsigned char)input[i]);
hexString += hex;
}
return hexString;
}
void checkIncomingData() {
if (TK8620.available()) {
String response = readSerialResponse();
if (response.length() > 0) {
if (response.indexOf("+DI:") >= 0) {
Serial.println("? 收到无线数据:");
Serial.println(response);
} else if (response.indexOf("AT_OK") >= 0 || response.indexOf("AT_ERROR") >= 0) {
} else if (response.length() > 5) {
Serial.print("? 模块响应: ");
Serial.println(response);
}
}
}
}
程序中,使用了ArduinoJson扩展库,在Arduino IDE中,直接搜索安装即可:

因为目前只是简单的测试信息的深奥,所以发送的数据比较简单:

其中电压数据,用随机生成的方式模拟。
下一步,将会连接真实的传感器获取数据。
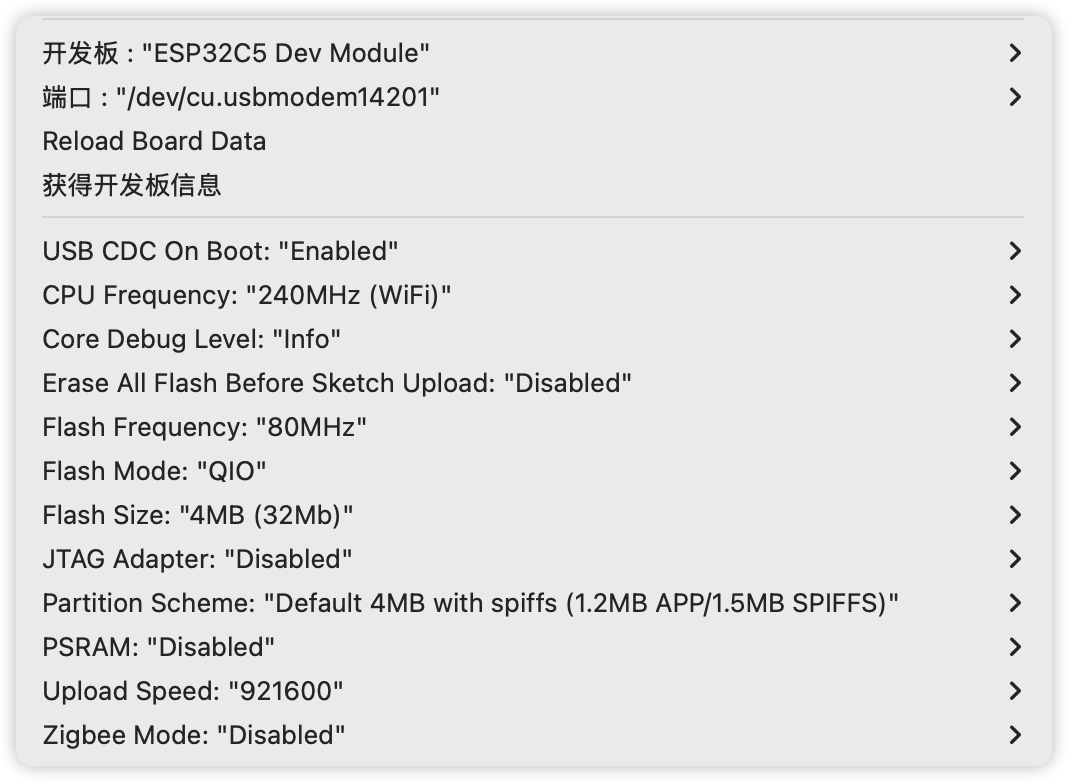
编写完成后,使用如下的配置编译烧录即可:
四、电脑端代码
电脑端的代码如下:
import serial
import time
import re
from datetime import datetime
import json
class TKB8620Receiver:
def __init__(self, port, baudrate=115200):
self.ser = serial.Serial(
port=port,
baudrate=baudrate,
bytesize=serial.EIGHTBITS,
parity=serial.PARITY_NONE,
stopbits=serial.STOPBITS_ONE,
timeout=1
)
self.running = False
self.received_count = 0
self.data_buffer = ""
self.current_packet = ""
self.expected_length = 0
self.packet_start_time = 0
def configure_module(self):
"""配置TKB8620模块为变长突发模式"""
config_commands = [
"AT+WORKMODE=21",
"AT+FREQ=490300000,490300000,490300000",
"AT+TXP=15",
"AT+RATE=6",
"AT+ADDRFILTER=0"
]
print("? 正在配置TKB8620接收模块为变长突发模式...")
success_count = 0
for cmd in config_commands:
print(f"? 发送: {cmd}")
response = self.send_command(cmd)
if "AT_OK" in response or "OK" in response:
print(f"✅ 成功: {response.strip()}")
success_count += 1
else:
print(f"❌ 失败: {response.strip()}")
time.sleep(0.5)
print(f"\n? 配置完成: {success_count}/{len(config_commands)} 个命令成功")
self.ser.reset_input_buffer()
def send_command(self, command):
"""发送AT命令"""
self.ser.write((command + "\r\n").encode())
time.sleep(0.3)
return self.read_response()
def read_response(self):
"""读取串口响应"""
response = ""
start_time = time.time()
while time.time() - start_time < 2.0:
if self.ser.in_waiting > 0:
chunk = self.ser.read(self.ser.in_waiting).decode('utf-8', errors='ignore')
response += chunk
if "AT_OK" in response or "AT_ERROR" in response:
break
time.sleep(0.01)
return response
def start_receiving(self):
"""开始接收数据"""
self.configure_module()
self.running = True
self.received_count = 0
self.data_buffer = ""
self.current_packet = ""
self.expected_length = 0
print("\n? 开始接收JSON数据(变长突发模式)...")
print("⏹️ 按 Ctrl+C 停止接收")
print("=" * 60)
try:
while self.running:
if self.ser.in_waiting > 0:
data = self.ser.read(self.ser.in_waiting).decode('utf-8', errors='ignore')
if data:
self.data_buffer += data
self._process_data_buffer()
if (self.current_packet and
time.time() - self.packet_start_time > 5.0):
print("⏰ 数据包组装超时,重置状态")
self.current_packet = ""
self.expected_length = 0
time.sleep(0.01)
except KeyboardInterrupt:
self.stop()
def _process_data_buffer(self):
"""处理数据缓冲区,寻找完整的数据包"""
while self.data_buffer:
if not self.current_packet:
di_start = self.data_buffer.find("+DI:")
if di_start == -1:
self.data_buffer = ""
return
self.data_buffer = self.data_buffer[di_start:]
self.current_packet = "+DI:"
self.data_buffer = self.data_buffer[4:]
self.packet_start_time = time.time()
continue
line_end = self.data_buffer.find("\r\n")
if line_end == -1:
self.current_packet += self.data_buffer
self.data_buffer = ""
break
line_content = self.data_buffer[:line_end]
self.current_packet += line_content
self.data_buffer = self.data_buffer[line_end + 2:]
if self._is_packet_complete():
self._process_complete_packet(self.current_packet)
self.current_packet = ""
self.expected_length = 0
def _is_packet_complete(self):
"""检查数据包是否完整"""
packet_info = self._parse_packet_header(self.current_packet)
if not packet_info:
return False
actual_data_length = len(packet_info['hex_data'])
expected_data_length = packet_info['data_length'] * 2
return actual_data_length >= expected_data_length
def _parse_packet_header(self, packet):
"""解析数据包头部信息"""
pattern = r"LEN\s+(\d+),\s*SLOT\s+(\d+),\s*SNR\s+(-?\d+),\s*RSSI\s+(-?\d+),\s*Data\s+([0-9A-Fa-f]+)"
match = re.search(pattern, packet)
if match:
return {
'data_length': int(match.group(1)),
'slot': int(match.group(2)),
'snr': int(match.group(3)),
'rssi': int(match.group(4)),
'hex_data': match.group(5)
}
return None
def _process_complete_packet(self, packet):
"""处理完整的数据包"""
packet_info = self._parse_packet_header(packet)
if not packet_info:
print(f"❌ 无法解析数据包: {packet}")
return
hex_data = packet_info['hex_data']
expected_length = packet_info['data_length'] * 2
if len(hex_data) != expected_length:
print(f"⚠️ 数据长度不匹配: 期望{expected_length}字符,实际{len(hex_data)}字符")
if len(hex_data) > expected_length:
hex_data = hex_data[:expected_length]
else:
print(f"❌ 数据过短,无法处理")
return
current_time_str = datetime.now().strftime("%H:%M:%S")
print(f"\n? [{current_time_str}] 收到完整数据包:")
print(f" LEN: {packet_info['data_length']} bytes")
print(f" SLOT: {packet_info['slot']}")
print(f" SNR: {packet_info['snr']} dB")
print(f" RSSI: {packet_info['rssi']} dBm")
print(f" Data: {hex_data[:50]}{'...' if len(hex_data) > 50 else ''}")
self._process_hex_data(hex_data, packet_info)
def _process_hex_data(self, hex_data, packet_info):
"""处理十六进制数据"""
try:
json_string = bytes.fromhex(hex_data).decode('utf-8', errors='replace')
self._process_json_data(json_string, packet_info)
except Exception as e:
print(f"❌ 十六进制转换错误: {e}")
print(f" 有问题的十六进制数据: {hex_data}")
def _process_json_data(self, json_string, packet_info):
"""处理JSON数据"""
try:
data_obj = json.loads(json_string)
self.received_count += 1
current_time_str = datetime.now().strftime("%H:%M:%S")
print(f"✨ [{current_time_str}] 成功解析数据包 #{self.received_count}")
print("? 完整JSON数据:")
print(f" {json_string}")
print("? 解析后的数据:")
print(f" 计数器: {data_obj.get('counter', 'N/A')}")
print(f" 电压: {data_obj.get('voltage', 'N/A')}V")
print(f" 状态: {data_obj.get('status', 'N/A')}")
print("? 无线质量:")
print(f" SNR: {packet_info['snr']} dB")
print(f" RSSI: {packet_info['rssi']} dBm")
print(f" 数据长度: {packet_info['data_length']} bytes")
except json.JSONDecodeError as e:
print(f"❌ JSON解析错误: {e}")
print(f" 有问题的JSON: {json_string}")
def stop(self):
"""停止接收"""
self.running = False
if self.ser.is_open:
self.ser.close()
print(f"\n? 接收停止,总共收到 {self.received_count} 个完整数据包")
def main():
PORT = "/dev/cu.usbserial-1410"
print("? ESP32-TKB8620 数据接收器 (优化版)")
print("=" * 50)
print(f"? 串口: {PORT}")
print("? 配置参数:")
print(" - 工作模式: 变长突发模式(21)")
print(" - 频率: 490.3MHz")
print(" - 发射功率: 15 (20dBm)")
print(" - 通信速率: 6 (1868bps)")
print(" - 地址过滤: 关闭")
print(" - 数据包超时: 5.0秒")
print("=" * 50)
try:
receiver = TKB8620Receiver(PORT)
receiver.start_receiving()
except serial.SerialException as e:
print(f"❌ 串口错误: {e}")
print("? 请检查:")
print(" 1. 串口号是否正确")
print(" 2. 串口是否被其他程序占用")
print(" 3. USB转TTL连接是否正常")
print(" 4. 模块电源是否正常")
except Exception as e:
print(f"❌ 错误: {e}")
finally:
if 'receiver' in locals():
receiver.stop()
if __name__ == "__main__":
main()
电脑端负责接收数据,然后解码并输出。
后续连接真实设备的时候,将会转发到mqtt服务端。
五、实际运行结果
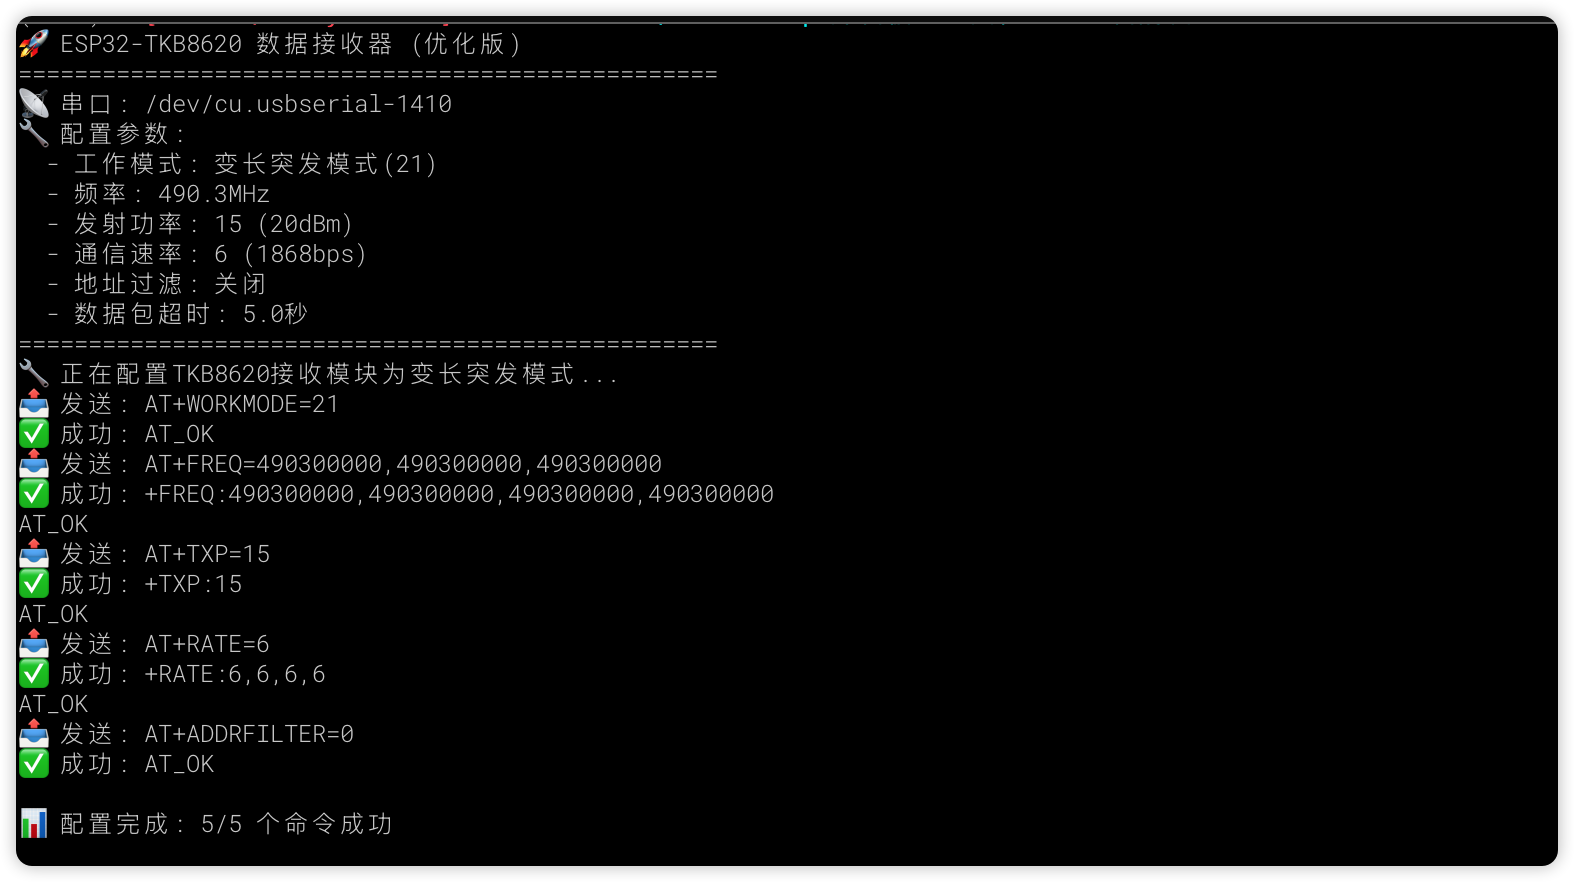
首先启动电脑端,会自动配置TKB-623,并输出如下的日志信息:
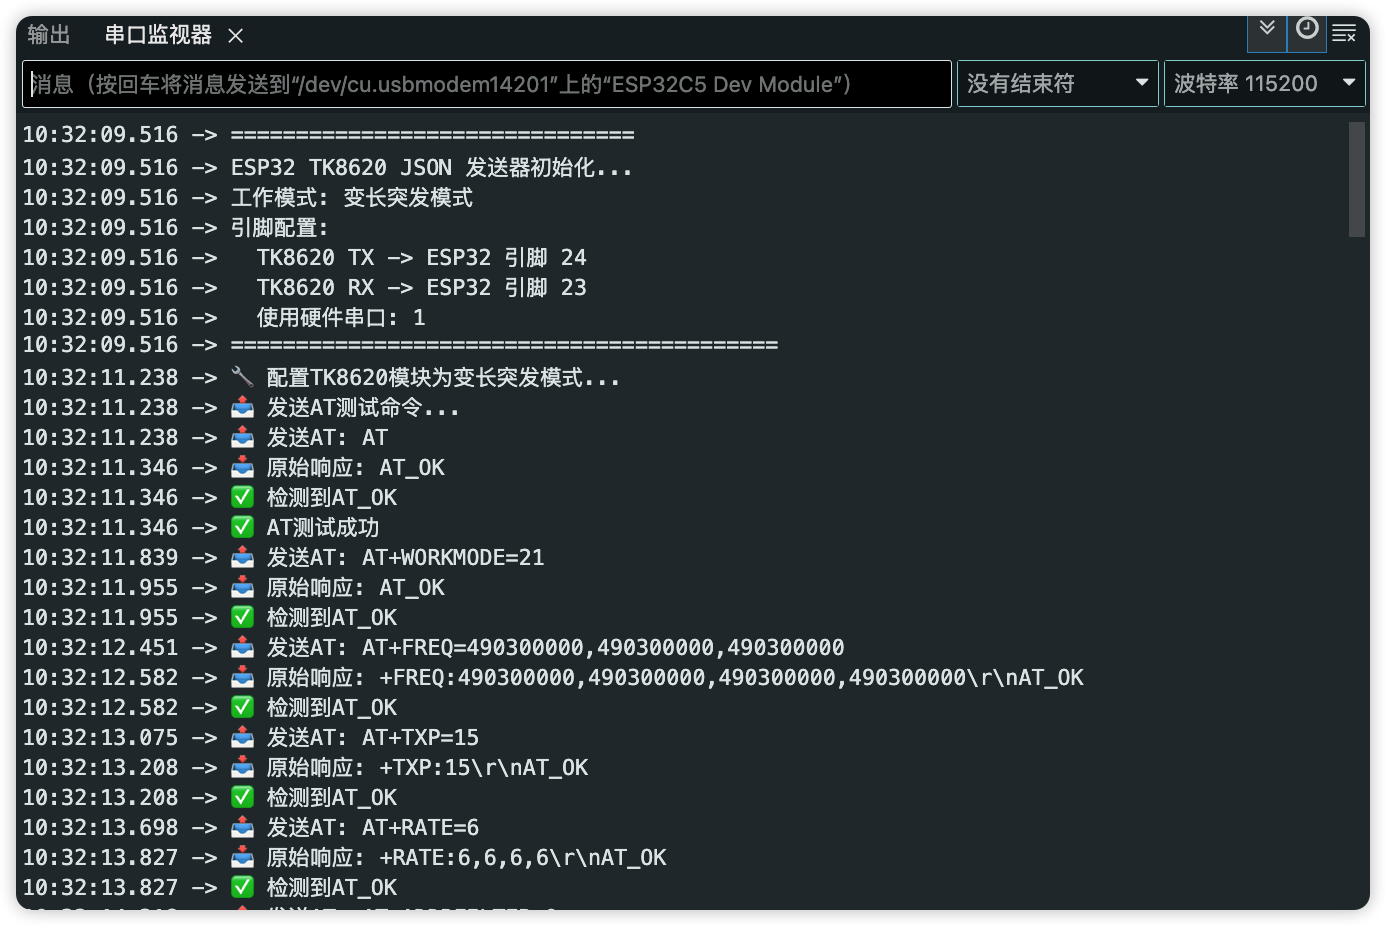
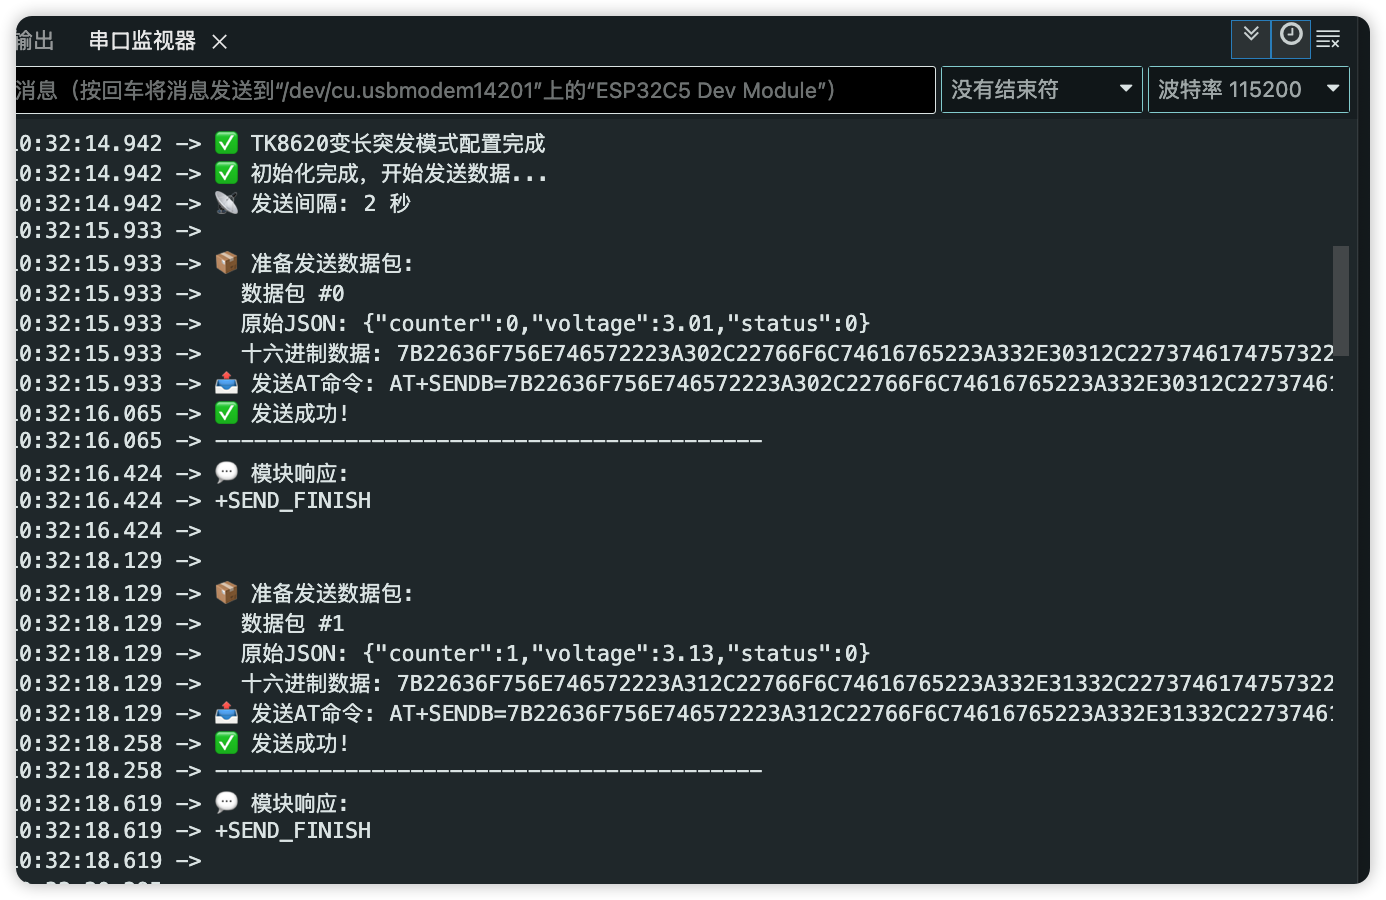
然后,启动ESP32,输出日志如下:
ESP32连接的TKB-623配置完成后,会自动发送测试数据:
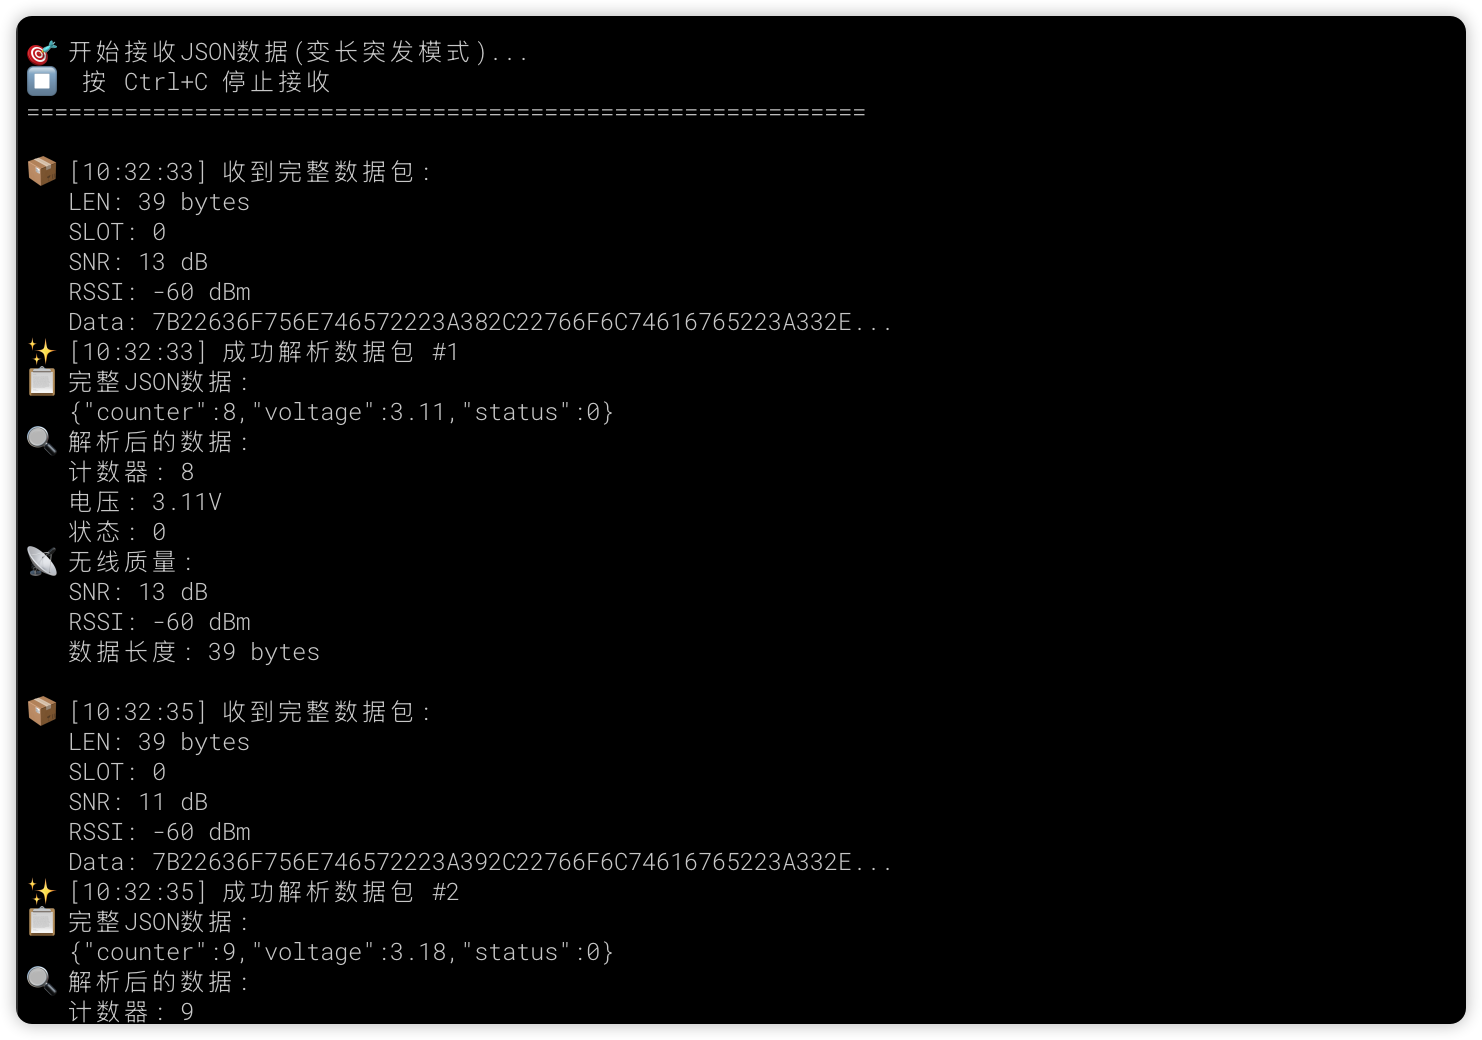
此时,电脑端将会收到数据并输出:
现在数据收发可以成功完成了,下一步,将会连接实际的传感器设备,采集数据并发送,实现远程监控。
 /9
/9 


 工商网监
湘ICP备2023018690号
工商网监
湘ICP备2023018690号


 832
832 淘帖
淘帖


