本次开发板的评测最终目标是做出来一个简约风格的天气APP。现在从0开始学习基于openharmony的鸿蒙开发。这次先完成主界面的排版和布局,把应用大体框架确定下来。
APP的主要是由行和列来组成的布局,用这两个布局需要提前规划一下APP布局,将一个界面分成几行、几列,然后每一行或列中要放什么内容。当然也有其他的布局,如层叠布局、弹性布局等,那些暂时用不到。
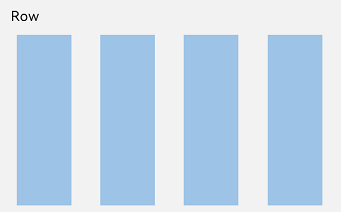
线性布局(LinearLayout)是开发中最常用的布局,通过线性容器Row和Column构建。线性布局是其他布局的基础,其子元素在线性方向上(水平方向和垂直方向)依次排列。线性布局的排列方向由所选容器组件决定,Row容器内子元素按照水平方向排列,Column容器内子元素按照垂直方向排列。根据不同的排列方向,开发者可选择使用Row或Column容器创建线性布局。
column布局: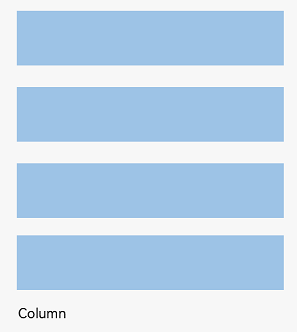
Row布局:
其用法可以参考API文档 https://docs.openharmony.cn/pages/v5.0/zh-cn/application-dev/ui/arkts-layout-development-linear.md
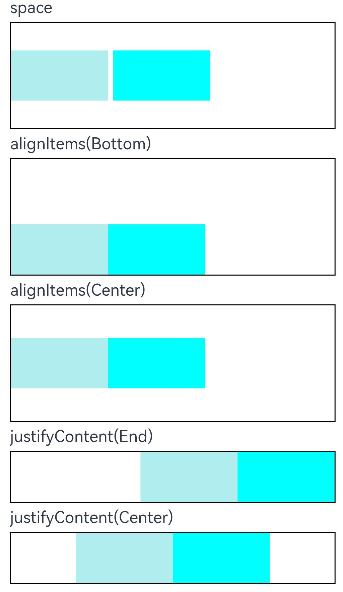
Row和Column常用的属性有:width height backgroundColor 等,这些是通用的属性。其特有的属性有:justifyContent和alignItems。
justifyContent 是设置子组件在水平方向上的对齐格式的属性。用法如
Text('justifyContent(End)').width('90%')
Row() {
    Row().width('30%').height(50).backgroundColor(0xAFEEEE)
    Row().width('30%').height(50).backgroundColor(0x00FFFF)
    }.width('90%').border({ width: 1 }).justifyContent(FlexAlign.End)
alignItems是设置子组件在垂直方向上的对齐格式。
用法如
Row() {
    Row().width('30%').height(50).backgroundColor(0xAFEEEE)
    Row().width('30%').height(50).backgroundColor(0x00FFFF)
    }.width('90%').alignItems(VerticalAlign.Center).height('15%').border({ width: 1 })
它们的更多属性及用法可以参考官方API文档 https://docs.openharmony.cn/pages/v5.0/zh-cn/application-dev/reference/apis-arkui/arkui-ts/ts-container-row.md
Button是按钮组件,通常用于响应用户的点击操作,其类型包括胶囊按钮、圆形按钮、普通按钮、圆角矩形按钮。Button做为容器使用时可以通过添加子组件实现包含文字、图片等元素的按钮
通过label和ButtonOptions创建不包含子组件的按钮。以ButtonOptions中的type和stateEffect为例。
接口:
Button(label?: ResourceStr, options?: { type?: ButtonType, stateEffect?: boolean })
其中,label用来设置按钮文字,type用于设置Button类型,stateEffect属性设置Button是否开启点击效果。
例如:
Button('Ok', { type: ButtonType.Normal, stateEffect: true })
  .borderRadius(8)
  .backgroundColor(0x317aff)
  .width(90)
  .height(40)
按钮Button有四种可选类型,分别为胶囊类型(Capsule)、圆形按钮(Circle)、普通按钮(Normal)和圆角矩形按钮(ROUNDED_RECTANGLE),通过type进行设置。
更详细的API可参考官方文档 https://docs.openharmony.cn/pages/v5.0/zh-cn/application-dev/reference/apis-arkui/arkui-ts/ts-basic-components-button.md
Text是文本组件,通常用于展示用户视图,如显示文章的文字内容,支持绑定自定义文本选择菜单,用户可根据需要选择不同功能,同时还可以扩展自定义菜单,丰富可用选项,进一步提升用户体验。Span则用于呈现显示行内文本。
接口:
Text(content?: string | Resource , value?: TextOptions)
使用方法例如
Text('hello world')
  .fontSize(30)
  .padding(10)
  .width(300)
也可以添加子组件,更详细的API参考官方文档 https://docs.openharmony.cn/pages/v5.0/zh-cn/application-dev/reference/apis-arkui/arkui-ts/ts-basic-components-text.md
开发者经常需要在应用中显示一些图片,例如:按钮中的icon、网络图片、本地图片等。在应用中显示图片需要使用Image组件实现,Image支持多种图片格式,包括png、jpg、bmp、svg、gif和heif。
通常使用Resource资源进行加载。资源格式可以跨包/跨模块引入图片,resources文件夹下的图片都可以通过$r资源接口读取到并转换到Resource格式。
用法(将图片资源放在media文件夹下)
Image($r('app.media.icon'))
用法(放在rawfile文件夹下)
Image($rawfile('example1.png'))
用法参考 https://docs.openharmony.cn/pages/v5.0/zh-cn/application-dev/ui/arkts-graphics-display.md
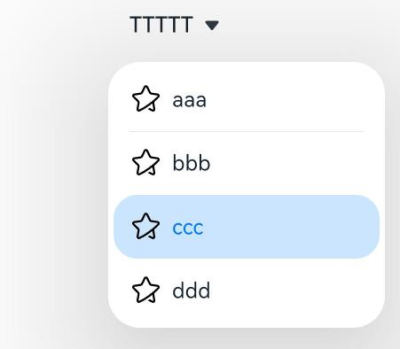
Select提供下拉选择菜单,可以让用户在多个选项之间选择。
Select([{ value: 'aaa', icon: $r("app.media.selection") },
        { value: 'bbb', icon: $r("app.media.selection") },
        { value: 'ccc', icon: $r("app.media.selection") },
        { value: 'ddd', icon: $r("app.media.selection") }])
        .selected(this.index)
        .value(this.text)
        .font({ size: 16, weight: 500 })
        .fontColor('#182431')
        .selectedOptionFont({ size: 16, weight: 400 })
        .optionFont({ size: 16, weight: 400 })
        .space(this.space)
        .arrowPosition(this.arrowPosition)
        .menuAlign(MenuAlignType.START, { dx: 0, dy: 0 })
        .optionWidth(200)
        .optionHeight(300)
        .onSelect((index: number, text?: string | undefined) => {
          console.info('Select:' + index);
          this.index = index;
          if (text) {
            this.text = text;
          }
        })
将这部分代码其单独放个文件,在pages/view/nowWeatherDataComponent.ets下。
@Component
export struct nowWeatherDataComponent {
  @State handlePopup: boolean = false
  @State popupMessage: string = ''

  @Link selectCity: CityModel;
  @Link cityArr: CityModel[];
  @Link weatherNow: NowWeatherModel;
  @Link weatherUiModel: WeatherUiModel;

  build() {
    Column({ space: 10 }) {
      // 标题栏显示城市名
      Row() {
        Text(this.selectCity.locationName)
          .fontSize(25)
      }
      .width('100%')
      .margin({ left: '10%', top: 5 })
      .justifyContent(FlexAlign.Start)

      // 城市选择栏
      Row() {
        Text('选择城市')
          .fontSize(18)
        Select(selectCityArray)
          .selected(0)
          .value(selectCityArray[0].value)
          .font({ size: 16, weight: 500 })
          .selectedOptionFont({ size: 16, weight: 400 })
          .optionFont({ size: 16, weight: 400 })
          .arrowPosition(ArrowPosition.END)
          .menuAlign(MenuAlignType.START, { dx: 0, dy: 0 })
          .optionWidth(200)
          .optionHeight(300)
          .onSelect((index: number, text?: string | undefined) => {
            // 根据text查找城市
            const selectedCity = this.cityArr.find(city => city.locationName === text)
            if (selectedCity) {
              this.selectCity = selectedCity;
            }
          })

        Button('查询')
          .width(70)
          .height(35)
          .fontSize(18)
          .onClick(() => {
            this.initData()
          })
      }
      .width('90%')
      .height(50)
      .justifyContent(FlexAlign.SpaceAround)
      .backgroundColor(Color.White)
      .borderRadius(15)
      .margin({ top: 5 })

      // 实时温度及当前天气情况栏
      Row() {
        // 当前温度
        Column() {
          Text(this.weatherUiModel.nowTemp.toString() + '°')
            .fontSize(60)
            .fontWeight(FontWeight.Bold)
        }

        //当前天气状况
        Column({space:5}) {
          Row({ space: 10 }) {
            Text(this.weatherUiModel.nowWeatherText)
              .fontSize(20)
            Image($rawfile((this.weatherUiModel.nowWeatherIcon.toString() + '.svg')))
              .size({ width: 24, height: 24 })
          }
          Row(){
            Image($r('app.media.icon_rain'))
              .width(16)
              .height(16)
            if(this.weatherUiModel.precip === 0.0){
              Text(this.weatherUiModel.precip.toFixed(1) + 'mm')
                .fontColor(Color.Gray)
            }
            else if(this.weatherUiModel.precip>0 && this.weatherUiModel.precip<10){
              Text(this.weatherUiModel.precip.toFixed(1) + 'mm')
                .fontColor('#ff4193ee')
            }
            else if(this.weatherUiModel.precip>=10 && this.weatherUiModel.precip<20){
              Text(this.weatherUiModel.precip.toFixed(1) + 'mm')
                .fontColor('#ff3176bc')
            }
            else {
              Text(this.weatherUiModel.precip.toFixed(1) + 'mm')
                .fontColor('#ff1162ac')
            }
          }
        }

        // 最高最低温度
        Column({ space: 10 }) {
          Row() {
            Image($r('app.media.icon_hot'))
              .width(16)
              .height(16)
            Text('最高' + this.weatherUiModel.tempMax.toString() + '°')
              .fontSize(20)
          }

          Row() {
            Image($r('app.media.icon_cold'))
              .width(16)
              .height(16)
            Text('最低' + this.weatherUiModel.tempMin.toString() + '°')
              .fontSize(20)
          }
        }
      }
      .backgroundColor(Color.White)
      .borderRadius(15)
      .width('90%')
      .height(100)
      .justifyContent(FlexAlign.SpaceAround)

      // 当前时间详细天气数据
      // 第一行
      Row() {
        // 体感温度
        Column({ space: 5 }) {
          Row() {
            Text('体感温度')
              .fontSize(15)
              .fontColor(Color.Gray)
            Image($r('app.media.icon_feeling'))
              .width(16)
              .height(16)
          }
          .padding({ top: 20 })

          Text(this.weatherUiModel.nowFeelTemp.toString() + '°')
            .fontSize(25)
            .padding({ top: 5 })
        }
        .backgroundColor(Color.White)
        .borderRadius(15)
        .width('48%')
        .height(120)
        .alignItems(HorizontalAlign.Start)
        .padding({ left: 15 })
        .onClick(() => {
          let ft = this.weatherUiModel.nowFeelTemp
          if (ft >= 30) {
            this.popupMessage = '体感炎热'
          } else if (ft < 30 && ft >= 20) {
            this.popupMessage = '体感舒适'
          } else if (ft < 20 && ft >= 10) {
            this.popupMessage = '体感凉爽'
          } else if (ft < 10 && ft >= 0) {
            this.popupMessage = '体感较冷'
          } else {
            this.popupMessage = '体感寒冷'
          }
          this.handlePopup = !this.handlePopup
        })
        .bindPopup(this.handlePopup, {
          message: this.popupMessage,
          onStateChange: (e) => {
            if (!e.isVisible) {
              this.handlePopup = false;
            }
          }
        })

        // 风向风速
        Column({ space: 5 }) {
          Row() {
            Text(this.weatherUiModel.nowWindDir + '风')
              .fontSize(15)
              .fontColor(Color.Gray)
            Image($r('app.media.icon_wind'))
              .width(16)
              .height(16)
          }
          .padding({ top: 20 })

          Text(this.weatherUiModel.nowWindSpeed + 'km/h')
            .fontSize(25)
            .padding({ top: 5 })
        }
        .backgroundColor(Color.White)
        .borderRadius(15)
        .width('48%')
        .height(120)
        .alignItems(HorizontalAlign.Start)
        .padding({ left: 15 })
      }
      .width('90%')
      .justifyContent(FlexAlign.SpaceBetween)

      // 第二行
      Row() {
        // 气压
        Column({ space: 5 }) {
          Row() {
            Text('气压')
              .fontSize(15)
              .fontColor(Color.Gray)
            Image($r('app.media.icon_pressure'))
              .width(16)
              .height(16)
          }
          .padding({ top: 20 })

          Text(this.weatherUiModel.nowPressure.toString() + 'hPa')
            .fontSize(25)
            .padding({ top: 5 })
        }
        .backgroundColor(Color.White)
        .borderRadius(15)
        .width('48%')
        .height(120)
        .alignItems(HorizontalAlign.Start)
        .padding({ left: 15 })

        // 能见度
        Column({ space: 5 }) {
          Row() {
            Text('能见度')
              .fontSize(15)
              .fontColor(Color.Gray)
            Image($r('app.media.icon_visual'))
              .width(16)
              .height(16)
          }
          .padding({ top: 20 })

          Text(this.weatherUiModel.nowVis.toString() + 'km')
            .fontSize(25)
            .padding({ top: 5 })
        }
        .backgroundColor(Color.White)
        .borderRadius(15)
        .width('48%')
        .height(120)
        .alignItems(HorizontalAlign.Start)
        .padding({ left: 15 })
      }
      .width('90%')
      .justifyContent(FlexAlign.SpaceBetween)
    }
    .width('100%')
  }
}
在Index.ets中调用这部分构建代码
// 实时天气数据
    nowWeatherDataComponent({
        selectCity: $selectCity,
        cityArr: $cityArr,
        weatherNow: $weatherNow,
        weatherUiModel: $weatherUiModel
    })
        .margin({bottom:10})
其中
selectCity: $selectCity,
cityArr: $cityArr,
weatherNow: $weatherNow,
weatherUiModel: $weatherUiModel
是向组件传递参数的,Index的build方法中有@State修饰的变量,在组件中就有@Link与其双向绑定的变量。
最终演示效果见文章顶部视频。目前只实现了UI框架,天气这些都是静态数据,下一步是要从网络获取实时天气数据。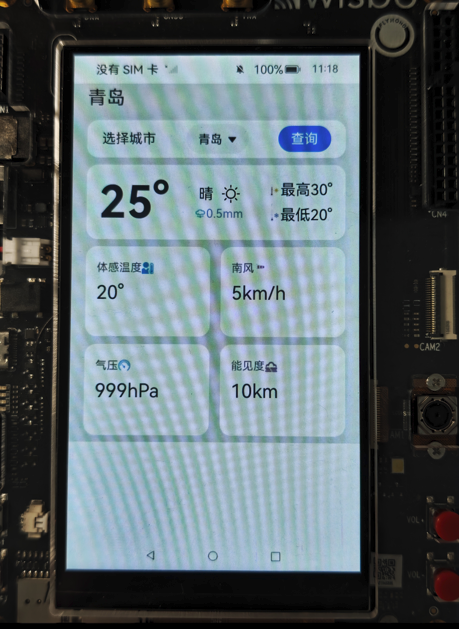
更多回帖

