在掏了几百个大洋后,买了一块Stm32H747-Disco的开发板,听说最近threadX很火,主要这个rtos的安全认证比较齐全,而且全家桶比较完善。双核配threadX,对于开发团队的话,完全可以一个人负责一个核,最后合一下就可以跑起来了,或者一个核跑业务逻辑,一个核跑安全的逻辑,可塑造性更强了。
下面就用板子第一次入门ThreadX了。
开发工具是Stm32CubeIDE,
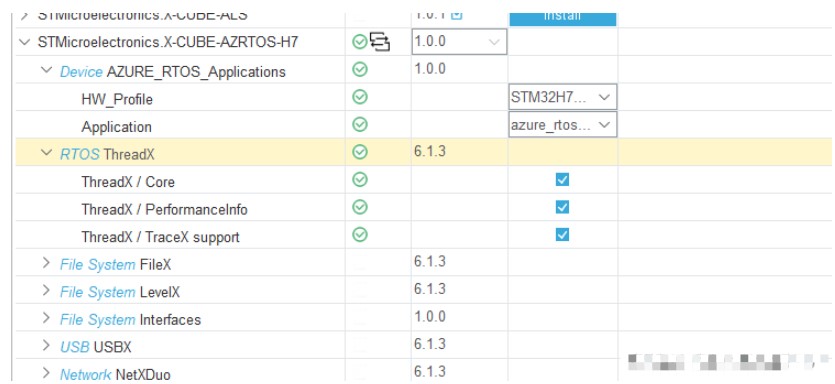
勾选一下threadX,然后基本不用移植了

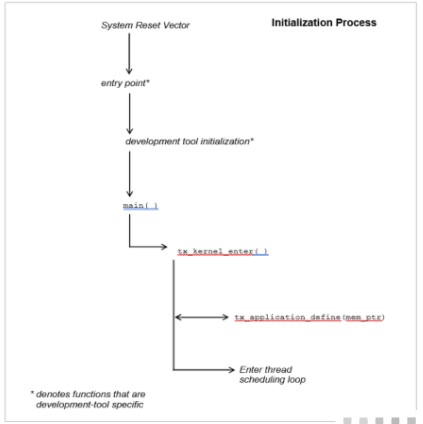
对于threadX来说,启动流程也很简单,这边贴一张官方的图

这边tx_kernel_enter()函数调用后,threadX就真正开始运行了,tx_application_define是tx_kernel_enter的回调函数,这个函数主要作用是 我们可以在里面创建任务,信号量,队列这些东东,(ps:这个和freertos还是有点区别的)
这边创建2个任务,使用时间片轮询
UINT ret = TX_SUCCESS;
TX_BYTE_POOL *byte_pool = (TX_BYTE_POOL*)memory_ptr;
/* USER CODE BEGIN App_ThreadX_Init */
CHAR *pointer;
/* Allocate the stack for thread 0. */
tx_byte_allocate(byte_pool, &pointer, DEMO_STACK_SIZE, TX_NO_WAIT);
/* Create the main thread. */
tx_thread_create(&thread_0, "thread 0", thread_0_entry, 0,
pointer, DEMO_STACK_SIZE,
1, 1, 1, TX_AUTO_START);
/* Allocate the stack for thread 1. */
tx_byte_allocate(byte_pool, &pointer, DEMO_STACK_SIZE, TX_NO_WAIT);
/* Create threads 1 and 2. These threads pass information through a ThreadX
message queue. It is also interesting to note that these threads have a time
slice. */
tx_thread_create(&thread_1, "thread 1", thread_1_entry, 1,
pointer, DEMO_STACK_SIZE,
1, 1, 1, TX_AUTO_START);
/* USER CODE END App_ThreadX_Init */
return ret;
线程函数比较简单,轮流点亮灯,tx_thread_sleep函数的形参是多少个时钟节拍,因为这边的系统时钟配置成了10ms,所以100ms和500ms灯亮灭一次
void thread_0_entry(ULONG thread_input)
{
/* This thread simply sits in while-forever-sleep loop. */
while(1)
{
HAL_GPIO_TogglePin(LED1_GPIO_Port,LED1_Pin);
/* Sleep for 10 ticks. */
tx_thread_sleep(10);
}
}
void thread_1_entry(ULONG thread_input)
{
/* This thread simply sends messages to a queue shared by thread 2. */
while(1)
{
HAL_GPIO_TogglePin(LED2_GPIO_Port,LED2_Pin);
/* Sleep for 10 ticks. */
tx_thread_sleep(50);
}
}
另外的话,stm32CubeIDE已经做的比较好,调出thread list就可以看到栈的使用情况

灯成功按我们逻辑亮灭,这里说明基本threadX已经跑起来啦
在掏了几百个大洋后,买了一块Stm32H747-Disco的开发板,听说最近threadX很火,主要这个rtos的安全认证比较齐全,而且全家桶比较完善。双核配threadX,对于开发团队的话,完全可以一个人负责一个核,最后合一下就可以跑起来了,或者一个核跑业务逻辑,一个核跑安全的逻辑,可塑造性更强了。
下面就用板子第一次入门ThreadX了。
开发工具是Stm32CubeIDE,
勾选一下threadX,然后基本不用移植了

对于threadX来说,启动流程也很简单,这边贴一张官方的图

这边tx_kernel_enter()函数调用后,threadX就真正开始运行了,tx_application_define是tx_kernel_enter的回调函数,这个函数主要作用是 我们可以在里面创建任务,信号量,队列这些东东,(ps:这个和freertos还是有点区别的)
这边创建2个任务,使用时间片轮询
UINT ret = TX_SUCCESS;
TX_BYTE_POOL *byte_pool = (TX_BYTE_POOL*)memory_ptr;
/* USER CODE BEGIN App_ThreadX_Init */
CHAR *pointer;
/* Allocate the stack for thread 0. */
tx_byte_allocate(byte_pool, &pointer, DEMO_STACK_SIZE, TX_NO_WAIT);
/* Create the main thread. */
tx_thread_create(&thread_0, "thread 0", thread_0_entry, 0,
pointer, DEMO_STACK_SIZE,
1, 1, 1, TX_AUTO_START);
/* Allocate the stack for thread 1. */
tx_byte_allocate(byte_pool, &pointer, DEMO_STACK_SIZE, TX_NO_WAIT);
/* Create threads 1 and 2. These threads pass information through a ThreadX
message queue. It is also interesting to note that these threads have a time
slice. */
tx_thread_create(&thread_1, "thread 1", thread_1_entry, 1,
pointer, DEMO_STACK_SIZE,
1, 1, 1, TX_AUTO_START);
/* USER CODE END App_ThreadX_Init */
return ret;
线程函数比较简单,轮流点亮灯,tx_thread_sleep函数的形参是多少个时钟节拍,因为这边的系统时钟配置成了10ms,所以100ms和500ms灯亮灭一次
void thread_0_entry(ULONG thread_input)
{
/* This thread simply sits in while-forever-sleep loop. */
while(1)
{
HAL_GPIO_TogglePin(LED1_GPIO_Port,LED1_Pin);
/* Sleep for 10 ticks. */
tx_thread_sleep(10);
}
}
void thread_1_entry(ULONG thread_input)
{
/* This thread simply sends messages to a queue shared by thread 2. */
while(1)
{
HAL_GPIO_TogglePin(LED2_GPIO_Port,LED2_Pin);
/* Sleep for 10 ticks. */
tx_thread_sleep(50);
}
}
另外的话,stm32CubeIDE已经做的比较好,调出thread list就可以看到栈的使用情况

灯成功按我们逻辑亮灭,这里说明基本threadX已经跑起来啦

 举报
举报


 举报
举报

