一、TinyMaix简介
TinyMaix是国内sipeed团队开发一个轻量级AI推理框架,官方介绍如下:
TinyMaix 是面向单片机的超轻量级的神经网络推理库,即 TinyML 推理库,可以让你在任意单片机上运行轻量级深度学习模型。
根据官方介绍,在仅有2K RAM的 Arduino UNO(ATmega328, 32KB Flash, 2KB RAM ) 上,都可以基于 TinyMaix 进行手写数字识别。对,你没有看错,2KB RAM 32KB Flash的设备上,都可以使用TinyMaix进行手写数字识别!TinyMaix官网提供了详细介绍,可以在本文末尾的参考链接中找到。
所以,在我们这次试用的主角RA-Eco-RA4M2-100PIN开发板上运行TinyMaix完全是没有任何压力的( 512KB Flash 128KB SRAM )。接下来,我将介绍如何在RA-Eco-RA4M2-100PIN开发板上运行TinyMaix进行手写数字识别。
1.1 TinyMaix开源项目
GitHub代码仓:https://github.com/sipeed/tinymaix
1.2 下载TinyMaix源码
接下来,克隆TinyMaix源码到到当前项目中:
git clone https://github.com/sipeed/TinyMaix.git
二、TinyMaix移植
TinyMaix是一个轻量级AI推理框架,他的核心功能就是支持AI模型的各种算子,可以简单理解为一个矩阵和向量计算库。对于计算库的移植,我们通常只需要解决编译问题即可,不涉及外设和周边元件。
2.1 创建TinyMaix移植项目
类似上一篇文章的CoreMark移植,按照如下步骤创建RASC项目:
- 使用RASC创建名为RA4M2_TinyMaix的项目;
- RASC界面中,切换到Pins标签页,选择“System:DEBUG->DEBUG0”,Pin Configuration中修改设置:
- Operation Mode修改为SWD;
- SWCLK修改为P300;
- SWDIO修改为P108;
- 按Ctrl+S保存;
- RASC界面中,继续在Pins标签页,选择“Connectivity:SCI->SCI9”,Pin Configuration中修改:
- Operation Mode修改为Asynchronous UART;
- TXD9修改为P109;
- RXD9修改为P110;
- 按Ctrl+S保存;
- RASC界面中,切换到Stacks标签页,点击“New Stack->Connectivity->UART”添加一个UART组件,添加后鼠标选中,然后在Properties标签页中,在Settings->Module中的:
- General中Channel修改为9;
- General中Name修改为g_uart9;
- Interrupts中Callback修改为uart9_callback;
- 按Ctrl+S保存;
- 点击右上角的Generate Project Content生成Keil项目;
2.2 添加TinyMaix源码
接下来,将TinyMaix的部分源码文件添加到当前项目中,具体为:
- 当前项目中创建TinyMaix目录;
- 将TinyMaix项目中的include和src目录复制到当前项目的TinyMaix目录中;
- 在Keil中,鼠标右键“Source Group 1”选中“Add Existing Files to Group 'Soure Group1'”,弹出添加文件对话框;
- 在添加文件对话框中,将TinyMaix/src子目录中的源文件全部添加到项目中("tm_layers.c" "tm_layers_fp8.c" "tm_layers_O1.c" "tm_model.c" "tm_stat.c" );
- 在Keil中,鼠标右键Target 1,选择“Options for Target 'Target 1'”,点击C/C++标签页;
- 在C/C++标签页中,点击Include Path栏右侧的“...”按钮,将TinyMaix/include子目录添加到搜索路径中,点OK保存配置;
完成这些步骤后,TinyMaix核心计算库就可以正常编译通过了。
三、TinyMaix测试准备
TinyMaix编译后,还需要添加测试代码才能看到效果。TinyMaix已经项目本身已有一些测试可同时用了,无需我们手动编写,例如手写数字识别。
TinyMaix本身纯CPU计算不依赖于任何外设功能,但TinyMaix基准测试依赖于:
- 日志打印,具体是printf输出
- 精准计时,精确到毫秒即可
下面分别介绍如何在RA-Eco-RA4M2-100PIN开发板上实现这两个基础功能。
3.1 SysTick计时
SysTick是ARM-Cortex内核自带的外设,CMSIS软件包对它进行了封装,使用起来非常方便。一般来说,我们在项目代码中使用SysTick只需要在代码中:
- 调用SysTick_Config函数设置SysTick中断频率;
- 编写SysTick_Handler函数实现SysTick中断处理;
上篇CoreMark移植的文章中,我们已经实现了基于SysTick的计时,可以直接复制到当前项目的src目录中:
- hal_systick.c
- hal_systick.h
其中,hal_systick.c文件内容如下:
#include <stdio.h>
#include "hal_data.h"
#include "hal_systick.h"
volatile uint32_t g_tick_count = 0;
void hal_systick_init()
{
SysTick_Config(SystemCoreClock / TICKS_PER_SECOND);
printf("SystemCoreClock=%d\n", SystemCoreClock);
}
void SysTick_Handler(void)
{
g_tick_count += 1;
}
uint32_t hal_systick_get()
{
return g_tick_count;
}
3.2 printf打印
上篇CoreMark移植的文章中,我们已经实现了pinrtf打印到UART9,可以直接复制到当前项目的src目录中:
其中,hal_uart9.c文件需要略加修改,修改后内容如下:
#include <stdio.h>
#include <stdbool.h>

#include "r_sci_uart.h"
#include "hal_data.h"

volatile bool uart_tx_done = false;

void hal_uart9_init()
{
    R_SCI_UART_Open(&g_uart9_ctrl, &g_uart9_cfg);
}

int fputc(int ch, FILE* f)
{
    (void) f;

    uart_tx_done = false;

    R_SCI_UART_Write(&g_uart9_ctrl, (uint8_t *)&ch, 1);

    while (uart_tx_done == false);

    return ch;
}

void uart9_callback(uart_callback_args_t* p_args)
{
   switch (p_args->event)
   {
      case UART_EVENT_RX_CHAR:
            break;
      case UART_EVENT_TX_COMPLETE:
            uart_tx_done = true;
            break;
      default:
            break;
   }
}
其中,debug_uart9_callback函数重命名为uart9_callback了。
3.4 修改tm_port.h文件
接下来修改TinyMaix/include中的tm_port.h文件,具体为其中的几个宏:
#include "hal_systick.h"
#define TM_DBGT_INIT()     uint32_t _start,_finish; uint32_t _time; _start = hal_systick_get();
#define TM_DBGT_START()    _start = hal_systick_get();
#define TM_DBGT(x)         {_finish = hal_systick_get();                  \
                            _time = _finish - _start;                    \
                            TM_PRINTF("===%s use %lu ms\n", (x), _time); \
                            _start = hal_systick_get();}
3.6 增大堆内存空间
TinyMaix运行时需要使用malloc申请堆内存,默认创建的RASC堆内存配置为0,会导致运行失败,因此需要增大堆内存空间。
增大堆内存空间的操作步骤如下:
- RASC中,点击BSP标签页,展开RA Common;
- 找到Heap size,将其修改为8192(实测8192可以正常运行,修改成更大值也可以,只要最终生成程序占用内存不超过SRAM都可以);
四、手写数字识别
4.1 添加示例源码
接下来添加手写数字示例源码到当前项目,具体步骤为:
- 在当前项目的TinyMaix子目录中,创建examples目录和tools子目录;
- 打开TinyMaix原始项目examples目录,依次执行如下操作:
- 将其中的minst子目录复制到RA4M2_TinyMaix项目的TinyMaix/examples子目录中;
- 删除其中我们用不到的CMakeLists.txt、mnist_train.ipynb文件;
- 将main.c重命名为mnist_main.c文件;
- 打开mnist_main.c文件,将其中的main函数重命名为mnist_main,并删除其中的参数,注释掉tm_stat调用;
- PS:这个目录中的.c文件提供了示例程序入口函数,以及测试图片(mnist数据集中的测试图片是28x28分辨率的灰度图)。
- 打开TinyMaix原始项目tools目录,依次执行如下操作:
- 将其中的tmdl子目录复制到RA4M2_TinyMaix项目的TinyMaix/tools子目录中;
- 删除其中我们用不到的除了mnist_开头的其他文件;
- PS:这个目录提供了手写数字识别模型;
- 在Keil中,鼠标右键“Source Group 1”选中“Add Existing Files to Group 'Soure Group1'”,弹出添加文件对话框;
- 在添加文件对话框中,将TinyMaix/examples子目录中的mnist_main.c添加到项目中;
4.2 运行示例程序
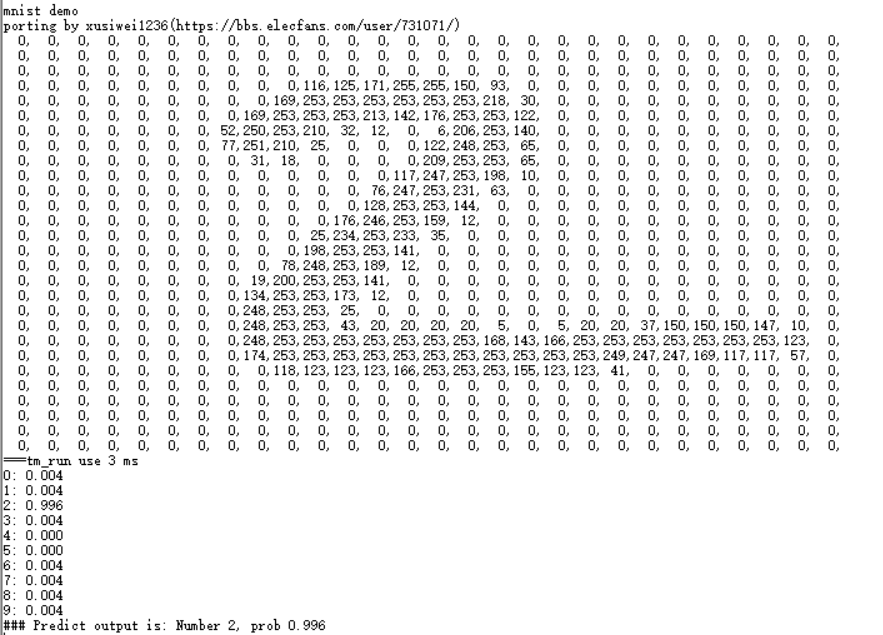
完成以上修改后,就可以在RA-Eco-RA4M2-100PIN开发板上运行手写数字识别示例了,具体输出如下图所示:

可以看到,成功识别了数字2,耗时3毫秒。
4.3 模型结构展示
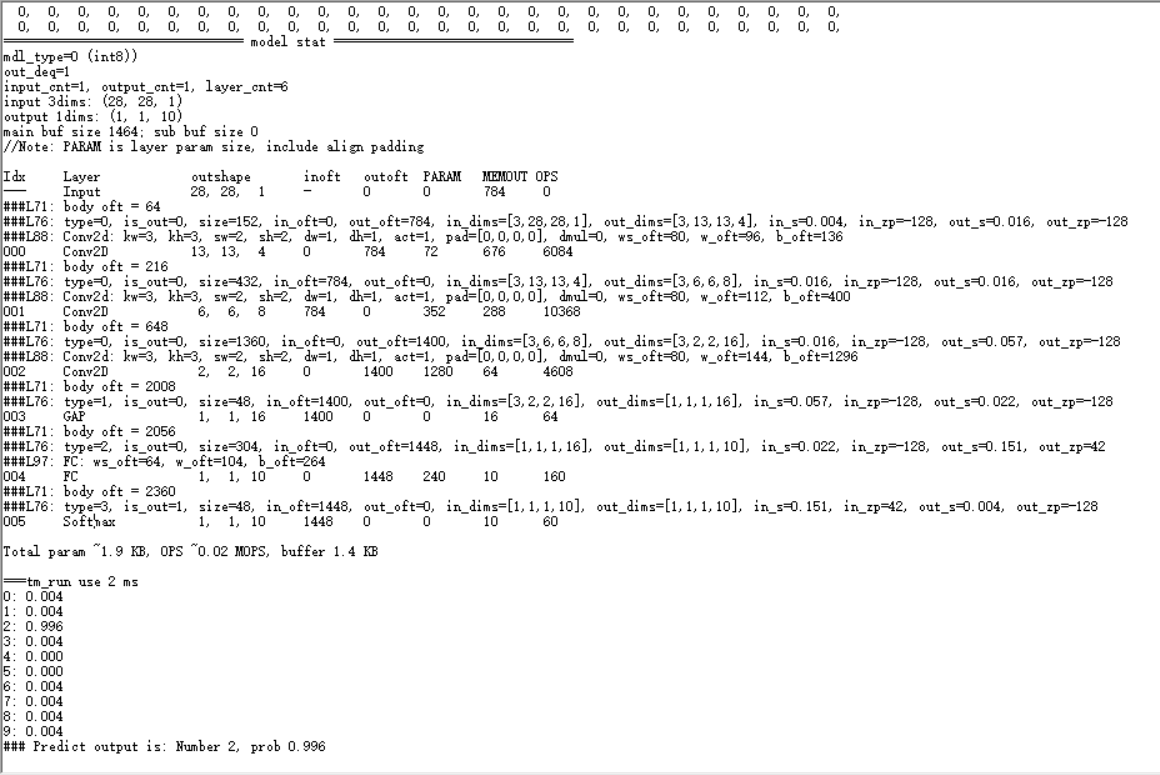
我们取消堆tm_stat调用的注释,重新编译、烧录后,运行时将会看到模型结构输出:

可以看到输入大小为28x28x1,经过6个中间操作之后,得到输出结果。输出是一个1x1x10(对应10个数字的置信度);
原始模型位于TinyMaix代码仓的,tools/tflie子目录下,mnist_valid_q.tflite文件,可以使用Netron查看模型结构:

4.4 示例源码解读
mnist_main.c文件中,开始的几行用于根据tm_port.h中定义的数据使用对应的模型:
#if TM_MDL_TYPE == TM_MDL_INT8
#include "../../tools/tmdl/mnist_valid_q.h"
#elif TM_MDL_TYPE == TM_MDL_FP32
#include "../../tools/tmdl/mnist_valid_f.h"
#elif TM_MDL_TYPE == TM_MDL_FP16
#include "../../tools/tmdl/mnist_valid_fp16.h"
#elif TM_MDL_TYPE == TM_MDL_FP8_143
#include "../../tools/tmdl/mnist_fp8_143.h"
#elif TM_MDL_TYPE == TM_MDL_FP8_152
#include "../../tools/tmdl/mnist_fp8_152.h"
#endif
这些.h文件是由tflite2tmdl.py脚本生成的TinyMaix模型,mnist_valid_f模型的转换命令为:
python3 tflite2tmdl.py tflite/mnist_valid_f.tflite tmdl/mbnet_fp8.tmdl fp8_152 1 28,28,1 10
接下来定义了一个数组,uint8_t mnist_pic[28*28],保存一张测试图片,数组每个元素对应一个像素的灰度值。
uint8_t mnist_pic[28*28]={
  0,  0,  0,  0,  0,  0,  0,  0,  0,  0,  0,  0,  0,  0,  0,  0,  0,  0,  0,  0,  0,  0,  0,  0,  0,  0,  0,  0,
  0,  0,  0,  0,  0,  0,  0,  0,  0,  0,  0,  0,  0,  0,  0,  0,  0,  0,  0,  0,  0,  0,  0,  0,  0,  0,  0,  0,
  0,  0,  0,  0,  0,  0,  0,  0,  0,  0,  0,  0,  0,  0,  0,  0,  0,  0,  0,  0,  0,  0,  0,  0,  0,  0,  0,  0,
  0,  0,  0,  0,  0,  0,  0,  0,  0,  0,116,125,171,255,255,150, 93,  0,  0,  0,  0,  0,  0,  0,  0,  0,  0,  0,
  0,  0,  0,  0,  0,  0,  0,  0,  0,169,253,253,253,253,253,253,218, 30,  0,  0,  0,  0,  0,  0,  0,  0,  0,  0,
  0,  0,  0,  0,  0,  0,  0,  0,169,253,253,253,213,142,176,253,253,122,  0,  0,  0,  0,  0,  0,  0,  0,  0,  0,
  0,  0,  0,  0,  0,  0,  0, 52,250,253,210, 32, 12,  0,  6,206,253,140,  0,  0,  0,  0,  0,  0,  0,  0,  0,  0,
  0,  0,  0,  0,  0,  0,  0, 77,251,210, 25,  0,  0,  0,122,248,253, 65,  0,  0,  0,  0,  0,  0,  0,  0,  0,  0,
  0,  0,  0,  0,  0,  0,  0,  0, 31, 18,  0,  0,  0,  0,209,253,253, 65,  0,  0,  0,  0,  0,  0,  0,  0,  0,  0,
  0,  0,  0,  0,  0,  0,  0,  0,  0,  0,  0,  0,  0,117,247,253,198, 10,  0,  0,  0,  0,  0,  0,  0,  0,  0,  0,
  0,  0,  0,  0,  0,  0,  0,  0,  0,  0,  0,  0, 76,247,253,231, 63,  0,  0,  0,  0,  0,  0,  0,  0,  0,  0,  0,
  0,  0,  0,  0,  0,  0,  0,  0,  0,  0,  0,  0,128,253,253,144,  0,  0,  0,  0,  0,  0,  0,  0,  0,  0,  0,  0,
  0,  0,  0,  0,  0,  0,  0,  0,  0,  0,  0,176,246,253,159, 12,  0,  0,  0,  0,  0,  0,  0,  0,  0,  0,  0,  0,
  0,  0,  0,  0,  0,  0,  0,  0,  0,  0, 25,234,253,233, 35,  0,  0,  0,  0,  0,  0,  0,  0,  0,  0,  0,  0,  0,
  0,  0,  0,  0,  0,  0,  0,  0,  0,  0,198,253,253,141,  0,  0,  0,  0,  0,  0,  0,  0,  0,  0,  0,  0,  0,  0,
  0,  0,  0,  0,  0,  0,  0,  0,  0, 78,248,253,189, 12,  0,  0,  0,  0,  0,  0,  0,  0,  0,  0,  0,  0,  0,  0,
  0,  0,  0,  0,  0,  0,  0,  0, 19,200,253,253,141,  0,  0,  0,  0,  0,  0,  0,  0,  0,  0,  0,  0,  0,  0,  0,
  0,  0,  0,  0,  0,  0,  0,  0,134,253,253,173, 12,  0,  0,  0,  0,  0,  0,  0,  0,  0,  0,  0,  0,  0,  0,  0,
  0,  0,  0,  0,  0,  0,  0,  0,248,253,253, 25,  0,  0,  0,  0,  0,  0,  0,  0,  0,  0,  0,  0,  0,  0,  0,  0,
  0,  0,  0,  0,  0,  0,  0,  0,248,253,253, 43, 20, 20, 20, 20,  5,  0,  5, 20, 20, 37,150,150,150,147, 10,  0,
  0,  0,  0,  0,  0,  0,  0,  0,248,253,253,253,253,253,253,253,168,143,166,253,253,253,253,253,253,253,123,  0,
  0,  0,  0,  0,  0,  0,  0,  0,174,253,253,253,253,253,253,253,253,253,253,253,249,247,247,169,117,117, 57,  0,
  0,  0,  0,  0,  0,  0,  0,  0,  0,118,123,123,123,166,253,253,253,155,123,123, 41,  0,  0,  0,  0,  0,  0,  0,
  0,  0,  0,  0,  0,  0,  0,  0,  0,  0,  0,  0,  0,  0,  0,  0,  0,  0,  0,  0,  0,  0,  0,  0,  0,  0,  0,  0,
  0,  0,  0,  0,  0,  0,  0,  0,  0,  0,  0,  0,  0,  0,  0,  0,  0,  0,  0,  0,  0,  0,  0,  0,  0,  0,  0,  0,
  0,  0,  0,  0,  0,  0,  0,  0,  0,  0,  0,  0,  0,  0,  0,  0,  0,  0,  0,  0,  0,  0,  0,  0,  0,  0,  0,  0,
  0,  0,  0,  0,  0,  0,  0,  0,  0,  0,  0,  0,  0,  0,  0,  0,  0,  0,  0,  0,  0,  0,  0,  0,  0,  0,  0,  0,
  0,  0,  0,  0,  0,  0,  0,  0,  0,  0,  0,  0,  0,  0,  0,  0,  0,  0,  0,  0,  0,  0,  0,  0,  0,  0,  0,  0,
};
接下来,mnist_main中使用模型,主要使用了一下几个TinyMaix的API:
- tm_stat 打印模型结构等信息;
- tm_load 将模型加载到内存;
- tm_preprocess 输入数据预处理;
- tm_run 模型推理,得到输出;
- tm_unload 模型卸载,释放内存;
使用起来还是非常简单的,跟读细节可以参考TinyMaix介绍页。
本篇内容就到这里了,感谢阅读。
本文完整项目代码仓(感兴趣的同学可以下载下来自行实验):https://gitee.com/swxu/ra4m2-tiny-maix
五、参考链接
- 【TinyMaix介绍】 TinyMaix 超轻量级推理框架: https://wiki.sipeed.com/news/others/tinymaix_cnx/tinymaix_cnx.html
- **【RA4M2用户手册】**RA4M2 Group User's Manual: Hardware: https://www.renesas.cn/cn/zh/document/man/ra4m2-group-users-manual-hardware?r=1469026
- **【RASC用户指南】**RA SC User Guide for MDK and IAR https://renesas.github.io/fsp/_s_t_a_r_t__d_e_v.html#RASC-MDK-IAR-user-guide
- **【Keil官方文档】**关于重定义库函数使用
printf的说明:https://developer.arm.com/documentation/dui0475/c/the-arm-c-and-c---libraries/redefining-low-level-library-functions-to-enable-direct-use-of-high-level-library-functions
- 【野火 瑞萨RA系列FSP库开发实战指南】 SCI UART——串口通信:https://doc.embedfire.com/mcu/renesas/fsp_ra/zh/latest/doc/chapter19/chapter19.html
- 【野火 瑞萨RA系列FSP库开发实战指南】 SysTick——系统定时器:https://doc.embedfire.com/mcu/renesas/fsp_ra/zh/latest/doc/chapter17/chapter17.html
 /9
/9 