本次主要研究CW32饭盒派的ADC采样测试 。
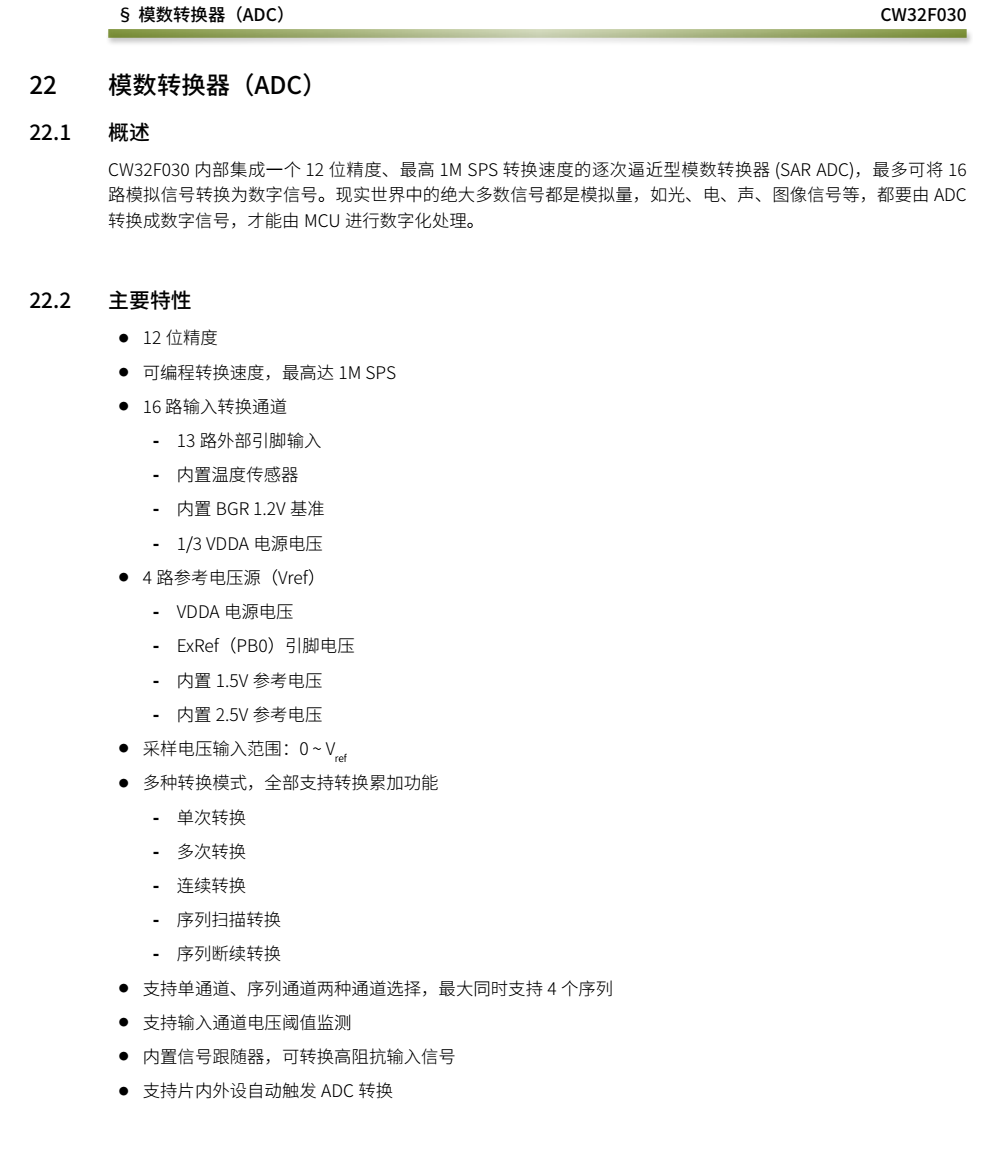
下面是CW32的ADC介绍。

下面就是ADC多通道采样初始化:
采样PB0端口,内置温度传感器,内置1.2V电压基准,内置VDDA/3的电压。
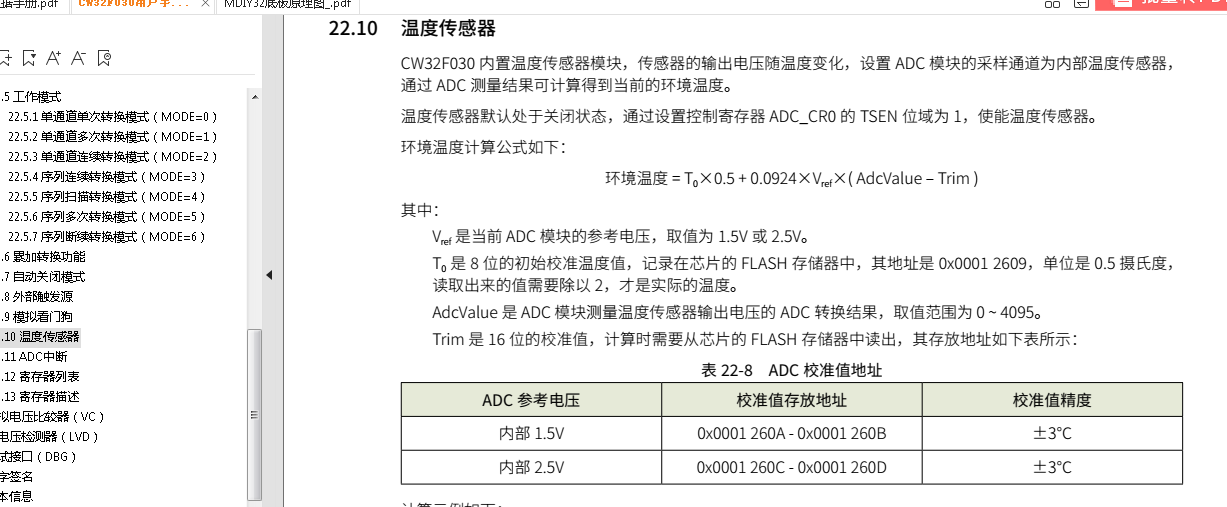
使用内部参考电压2.5V,因为内部温度传感器只能用内部2.5V和1.5V基准,于是选择了内部2.5V基准电压。注意要开启采样通道电压跟随器。
使用中断方式读取数据,使用软件启动转换。
void ADC_Configuration(void)
{
ADC_SerialChTypeDef ADC_sInitStruct;
__RCC_ADC_CLK_ENABLE();
__RCC_GPIOB_CLK_ENABLE();
PB00_ANALOG_ENABLE();
ADC_sInitStruct.ADC_SqrEns = ADC_SqrEns03;
ADC_sInitStruct.ADC_Sqr0Chmux = ADC_ExInputCH8;
ADC_sInitStruct.ADC_Sqr1Chmux = ADC_VddaDiV3Input;
ADC_sInitStruct.ADC_Sqr2Chmux = ADC_TsInput;
ADC_sInitStruct.ADC_Sqr3Chmux = ADC_Vref1P2Input;
ADC_sInitStruct.ADC_InitStruct.ADC_AccEn = ADC_AccDisable;
ADC_sInitStruct.ADC_InitStruct.ADC_Align = ADC_AlignRight;
ADC_sInitStruct.ADC_InitStruct.ADC_ClkDiv = ADC_Clk_Div64;
ADC_sInitStruct.ADC_InitStruct.ADC_DMAEn = ADC_DmaDisable;
ADC_sInitStruct.ADC_InitStruct.ADC_SampleTime = ADC_SampTime5Clk;
ADC_sInitStruct.ADC_InitStruct.ADC_InBufEn = ADC_BufEnable;
ADC_sInitStruct.ADC_InitStruct.ADC_VrefSel = ADC_Vref_BGR2p5;
ADC_sInitStruct.ADC_InitStruct.ADC_TsEn = ADC_TsEnable;
ADC_sInitStruct.ADC_InitStruct.ADC_OpMode = ADC_SerialChScanMode;
ADC_SerialChScanModeCfg(&ADC_sInitStruct);
ADC_ClrAccResult();
ADC_ITConfig(ADC_IT_EOC|ADC_IT_EOS,ENABLE);
ADC_EnableNvic(0);
ADC_Enable();
ADC_SoftwareStartConvCmd(ENABLE);
}
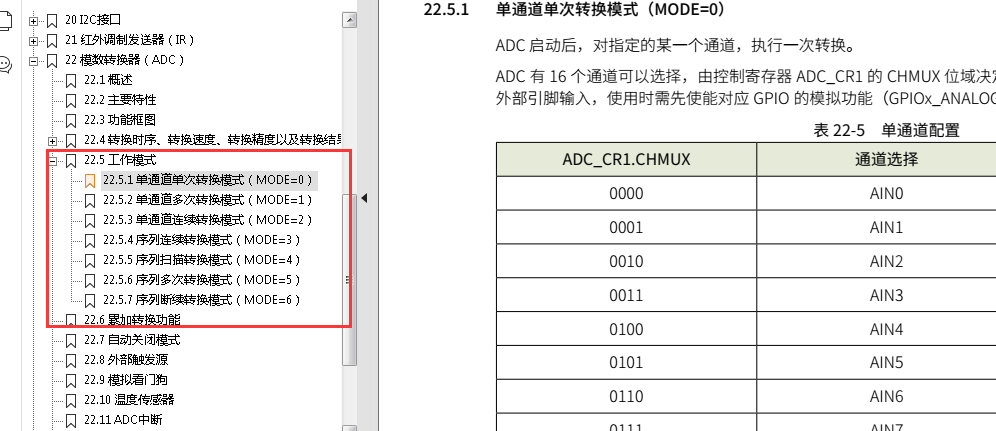
ADC有7种转换模式:

本次使用的是多通道序列扫描转换模式。每启动一次,4个通道依次转换一次。

下面是中断读取采样数据:
uint16_t adcvalue[4];
uint16_t adcok = 0;
void ADC_IRQHandler(void)
{
    if(ADC_GetITStatus(ADC_IT_EOC))
    {
        ADC_ClearITPendingBit(ADC_IT_EOC);

    }
    if(ADC_GetITStatus(ADC_IT_EOS))
    {
        ADC_ClearITPendingBit(ADC_IT_EOS);
        adcok = 1;
        ADC_GetSqr0Result(&adcvalue[0]);
        ADC_GetSqr1Result(&adcvalue[1]);
        ADC_GetSqr2Result(&adcvalue[2]);
        ADC_GetSqr3Result(&adcvalue[3]);


    }
}
在main函数中测试打印的数据:
#define ADC_T0_ADDR 0x00012609
#define ADC_TRIM_ADDR1 0x0001260A
#define ADC_TRIM_ADDR2 0x0001260C
int main(void)
{
volatile uint8_t * ptr_t0;
volatile uint16_t * ptr_trim;
float temp;
RCC_Configuration();
SysTick_Config(SystemCoreClock/1000);
GPIO_Configuration(CW_GPIOA, GPIO_PIN_7 | GPIO_PIN_8, 0x3);
UART_Configuration();
ADC_Configuration();
Lcd_Init();
Lcd_Fill(0,0,LCD_X_MAX-1,LCD_Y_MAX-1,GLCD_COLOR_RED);
Delay_ms(100);
Lcd_Fill(0,0,LCD_X_MAX-1,LCD_Y_MAX-1,GLCD_COLOR_GREEN);
Delay_ms(100);
Lcd_Fill(0,0,LCD_X_MAX-1,LCD_Y_MAX-1,GLCD_COLOR_BLUE);
Delay_ms(100);
Lcd_Fill(0,0,LCD_X_MAX-1,LCD_Y_MAX-1,GLCD_COLOR_BLACK);
Delay_ms(100);
Lcd_Fill(0,0,LCD_X_MAX-1,LCD_Y_MAX-1,GLCD_COLOR_WHITE);
Delay_ms(100);
ptr_t0 = (uint8_t *)ADC_T0_ADDR;
ptr_trim = (uint16_t *)ADC_TRIM_ADDR1;
printf("ADC_T0 :%d \r\n",*ptr_t0);
printf("ADC_TRIM:%d \r\n",*ptr_trim);
ptr_trim = (uint16_t *)ADC_TRIM_ADDR2;
printf("ADC_TRIM:%d \r\n",*ptr_trim);
while (1)
{
uart_shell_loop();
if(adcok)
{
printf("ADC0:%d \r\n",adcvalue[0]);
printf("ADC1:%d \r\n",adcvalue[1]);
printf("ADC2:%d \r\n",adcvalue[2]);
printf("ADC3:%d \r\n",adcvalue[3]);
temp = adcvalue[0] * 2500 / 4096;
printf("PB0=%d mV \r\n",(uint16_t)temp);
temp = adcvalue[1] * 2500 / 4096;
printf("VDDA=%d mV \r\n",(uint16_t)temp);
temp = adcvalue[3] * 2500 / 4096;
printf("VREF12=%d mV \r\n",(uint16_t)temp);
temp = ((*ptr_t0 * 0.5) + 0.0924 * 2.5 * (adcvalue[2] - (*ptr_trim )))*100;
printf("temp:%d.%d C\r\n\r\n",(uint16_t)temp/100,(uint16_t)temp%100);
adcok = 0;
}
}
}
内部温度计算:

下面是打印结果:看采样结果还是很准确稳定的。

 电子发烧友论坛
 /6
/6 


 淘帖
淘帖 425198


