0.环境
软件:
操作系统:20.04.1-Ubuntu x86_64 x86_64 x86_64 GNU/Linux
编译工具:gcc-arm-none-eabi-10.3-2021.10
代码编辑工具:visual studio code
代码生成:stm32cubemx-linux版本
下载:如在linux下使用串口下载方式,可使用stm32flash工具
串口调试:可使用minicom进行调试
硬件:
芯片:stm32f103c8t6(64KB FLASH+20KB SRAM)
时钟:均使用内部时钟
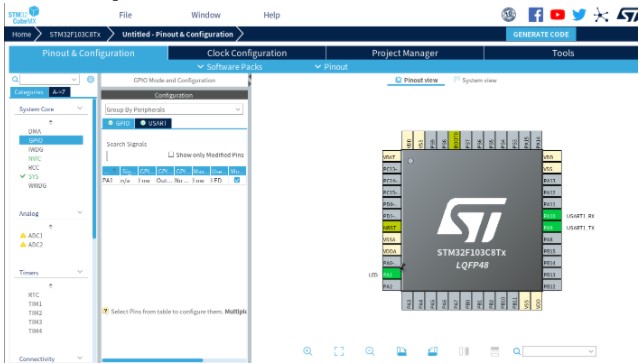
外设:本实验中以 GPIOA1为LED显示,GPIOA9-10为UART1作为shell端口
1.stm32CubeMX配置
1.打开cubeMX->File->new project,搜索并选择STM32F103C8
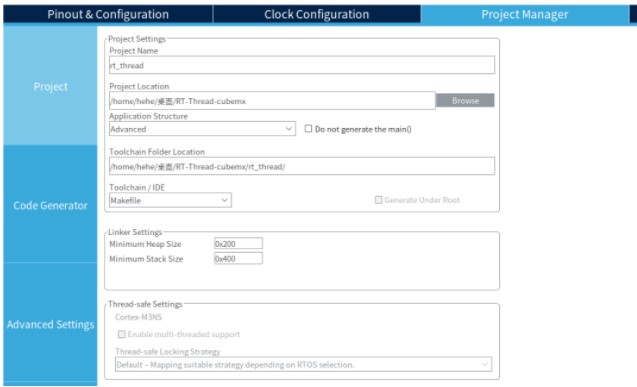
2.Project Manager配置
	主要配置IDE为makefile
	设置生成独立的.h.c文件

3.Clock configuration 这里全部使用内部时钟,使内部时钟最大化

4.Pinout&Configuration 配置LED引脚和USART1,USART1开启全局中断

5.保存并生成代码 目录结构如下:tree -L 2
.
├── Core
│   ├── Inc
│   └── Src
├── Drivers
│   ├── CMSIS
│   └── STM32F1xx_HAL_Driver
├── Makefile
├── rt_thread.ioc
├── startup_stm32f103xb.s
└── STM32F103C8Tx_FLASH.ld
2.下载并移动rt-thread nano
本例中使用3.1.5版本,解压至本项目文件夹中 新建bsp目录,移动board.c、rtconfig.h 为使内容看起来更清晰,删除了代码无关的部分文件 因个人喜好并不喜欢目录过深,因此在根目录下新建了bsp,也可以使用rtthread中的bsp目录新建一个板子。
.
├── bsp
│   ├── Inc
│   │   └── rtconfig.h
│   └── Src
│       └── board.c
├── Core
│   ├── Inc
│   │   ├── gpio.h
│   │   ├── main.h
│   │   ├── stm32f1xx_hal_conf.h
│   │   ├── stm32f1xx_it.h
│   │   └── usart.h
│   └── Src
│       ├── gpio.c
│       ├── main.c
│       ├── stm32f1xx_hal_msp.c
│       ├── stm32f1xx_it.c
│       ├── system_stm32f1xx.c
│       └── usart.c
├── Drivers
│   ├── CMSIS
│   │   ├── 省略
│   └── STM32F1xx_HAL_Driver
│       ├── Inc
│       ├── License.md
│       └── Src
├── Makefile
├── rt-thread
│   ├── components
│   │   ├── device
│   │   └── finsh
│   ├── include
│   │   ├── libc
│   │   ├── rtdbg.h
│   │   ├── rtdebug.h
│   │   ├── rtdef.h
│   │   ├── rthw.h
│   │   ├── rtlibc.h
│   │   ├── rtm.h
│   │   ├── rtservice.h
│   │   └── rtthread.h
│   ├── libcpu
│   │   ├── arm
│   │   └── risc-v
│   └── src
│       ├── clock.c
│       ├── components.c
│       ├── cpu.c
│       ├── idle.c
│       ├── ipc.c
│       ├── irq.c
│       ├── kservice.c
│       ├── mem.c
│       ├── memheap.c
│       ├── mempool.c
│       ├── object.c
│       ├── scheduler.c
│       ├── slab.c
│       ├── thread.c
│       └── timer.c
├── rt_thread.ioc
├── startup_stm32f103xb.s
└── STM32F103C8Tx_FLASH.ld
3.修改main.c文件内容
1.修改前在main.c中添加LED闪烁测试,此时并未移植RTOS
修改makefile中的交叉编译工具环境
GCC_PATH=/usr/local/gcc-arm-none-eabi-10.3-2021.10/bin
PREFIX = arm-none-eabi-
2.makefile中添加ASMsrc Csrc INC
C_SOURCES =  \
...省略原有的
rt-thread/src/clock.c	\
rt-thread/src/components.c	\
rt-thread/src/cpu.c	\
rt-thread/src/idle.c	\
rt-thread/src/ipc.c	\
rt-thread/src/irq.c	\
rt-thread/src/kservice.c	\
rt-thread/src/mem.c	\
rt-thread/src/memheap.c	\
rt-thread/src/mempool.c	\
rt-thread/src/object.c	\
rt-thread/src/scheduler.c	\
rt-thread/src/slab.c	\
rt-thread/src/thread.c	\
rt-thread/src/timer.c	\
rt-thread/libcpu/arm/cortex-m3/cpuport.c	\
rt-thread/components/device/device.c	\
bsp/Src/board.c

# ASM sources
ASM_SOURCES =  \
startup_stm32f103xb.s	\
rt-thread/libcpu/arm/cortex-m3/context_gcc.s

# C includes
C_INCLUDES =  \
-ICore/Inc \
-IDrivers/STM32F1xx_HAL_Driver/Inc \
-IDrivers/STM32F1xx_HAL_Driver/Inc/Legacy \
-IDrivers/CMSIS/Device/ST/STM32F1xx/Include \
-IDrivers/CMSIS/Include	\
-Irt-thread/components/finsh	\
-Irt-thread/include	\
-Ibsp/Inc
4.RT-Thread 操作系统重定义 HardFault_Handler、PendSV_Handler、SysTick_Handler 中断函数
为了避免重复定义的问题,在cubemx中,需要在中断配置中,代码生成的选项中,取消选择三个中断函数(对应注释选项是 Hard fault interrupt, Pendable request, Time base :System tick timer)重新生成并编译测试。
5.在main中调用entry
调整rt_config.h中的#define RT_THREAD_PRIORITY_MAX 32 否则可能会导致出错
entry();
由于entry会启动rtthread,启动过程中会绑定main函数作为main线程。这里需修改绑定的main函数为usr_main,新建bsp/Src/usr_main.c并添加到makefile编写usr_main函数
main_thread_entry中main修改为usr_main,将main.c中的main作为了一个启动函数,但可以避免重新编译时移动board.c,因此main中取消while循环
在我们新建的usr_main函数中添加led测试代码,注意rtthead正常情况下已被启动,故此时调用的函数不是HAL_Delay()而是rt_thread_mdelay
在main.h中包含#include <rtthread.h>
6.在 RT-Thread Nano 上添加控制台与 FinSH
添加 UART 控制台(实现打印)
串口初始化和系统输出函数,即可完成 UART 控制台打印功能。
串口初始化工作我们已使用cubemx完成,rtconfig.h 中使能 RT_USING_CONSOLE,在此前我们可以在usr_main中使用HAL_UART_Transmit();测试串口输出
Core/Src/usart.c中添加对接函数rt_hw_console_output,打印出了启动信息
void rt_hw_console_output(const char *str)
{
rt_size_t i = 0, size = 0;
char a = '\r';
__HAL_UNLOCK(&huart1);
size = rt_strlen(str);
for (i = 0; i < size; i++)
{
if (*(str + i) == '\n')
{
HAL_UART_Transmit(&huart1, (uint8_t *)&a, 1, 1);
}
HAL_UART_Transmit(&huart1, (uint8_t *)(str + i), 1, 1);
}
}
\ | /
- RT -     Thread Operating System
 / | \     3.1.5 build Dec 22 2021
 2006 - 2020 Copyright by rt-thread team
添加 FinSH 组件(实现命令输入)
在 rtconfig.h 中使能 #define RT_USING_FINSH 宏定义
makefile src中添加bsp/Src/ringbuffer.c
rt-thread/components/finsh/cmd.c \
rt-thread/components/finsh/finsh_port.c \
rt-thread/components/finsh/msh.c \
rt-thread/components/finsh/shell.c
此时编译会出现
24 |
对接控制台输入函数,实现字符输入:实现 rt_hw_console_getchar Core/Src/usart.c
具体修改见代码
bsp/Src/ringbuffer.c
Core/Src/usart.c
由于对接完成后完成后依旧报错"TODO 4:",在makefile SRC中去掉了rt-thread/components/finsh/finsh_port.c
链接脚本
在lds中的text段添加以下内容,否则系统无法进行自动初始化函数,导致finsh线程不会被开启
/***************RTOS add**********************/
	/* section information for finsh shell */
	. = ALIGN(4);
	__fsymtab_start = .;
	KEEP(*(FSymTab))
	__fsymtab_end = .;

	. = ALIGN(4);
	__vsymtab_start = .;
	KEEP(*(VSymTab))
	__vsymtab_end = .;

	/* section information for utest */
	. = ALIGN(4);
	__rt_utest_tc_tab_start = .;
	KEEP(*(UtestTcTab))
	__rt_utest_tc_tab_end = .;

	/* section information for at server */
	. = ALIGN(4);
	__rtatcmdtab_start = .;
	KEEP(*(RtAtCmdTab))
	__rtatcmdtab_end = .;
	. = ALIGN(4);

	/* section information for initial. */
	. = ALIGN(4);
	__rt_init_start = .;
	KEEP(*(SORT(.rti_fn*)))
	__rt_init_end = .;

	. = ALIGN(4);

	PROVIDE(__ctors_start__ = .);
	KEEP (*(SORT(.init_array.*)))
	KEEP (*(.init_array))
	PROVIDE(__ctors_end__ = .);

	. = ALIGN(4);
/********************************************/
7.完成
编译后FINSH组建已经可用,并且修改cubemx后无需再移动main中的文件 目录与修改的文件如下所示
.
├── bsp								-我们自己的代码使用的文件夹
│   ├── Inc
│   │   ├── ringbuffer.h			-对接Finsh的缓冲头文件
│   │   └── rtconfig.h				-由Rtthread复制出来做rtos功能配置
│   └── Src
│       ├── board.c					-与官方移植不同的是我们没有动这个文件
│       ├── ringbuffer.c			-对接Finsh的缓冲实现
│       └── usr_main.c				-usr_main函数,也是main线程调用的函数
├── Core							-使用cubemx生成的代码
│   ├── Inc
│   │   └── ...
│   └── Src							-只修改了main.c和usart.c,且写在合适位置处,cubemx重新生成代码时不会被冲掉
│       └── ...
├── Drivers							-cubemx生成的驱动文件和HAL库
│   ├── CMSIS
│   │   └── ...
│   └── STM32F1xx_HAL_Driver
│       └── ...
├── Makefile						-makefile文件,用来指导编译,最初由cubemx生成,修改了编译环境,添加了一些源码结构
├── README.md						-说明,即本文
├── rt-thread
│   ├── components					-组件,用到了其中的finsh组建,没有修改源码
│   │   ├── device
│   │   └── finsh
│   ├── include						-rtthread使用的头文件,未修改
│   │   └── ...
│   ├── libcpu						-rtthread对于不同cpu支持的汇编代码,这里我们选用了arm/m3下的gcc.s
│   │   ├── arm
│   │   └── risc-v
│   └── src							-rtthread相关的源码,未作修改
│       └── ...
├── rt_thread.ioc					-cubemx项目文件
├── startup_stm32f103xb.s			-启动汇编代码cubemx生成,与官方不同的是,未做修改
└── STM32F103C8Tx_FLASH.ld			-链接脚本,cubemx生成,添加了rtthread所需的代码段
可以看到,我们并未修改rt-thread下的文件,因此无需关心这些源码的修改 完成后三层目录结构如下
rt-thread-nano$ tree -L 3
.
├── bsp
│   ├── Inc
│   │   ├── ringbuffer.h
│   │   └── rtconfig.h
│   └── Src
│       ├── board.c
│       ├── ringbuffer.c
│       └── usr_main.c
├── Core
│   ├── Inc
│   │   ├── gpio.h
│   │   ├── main.h
│   │   ├── stm32f1xx_hal_conf.h
│   │   ├── stm32f1xx_it.h
│   │   └── usart.h
│   └── Src
│       ├── gpio.c
│       ├── main.c
│       ├── stm32f1xx_hal_msp.c
│       ├── stm32f1xx_it.c
│       ├── system_stm32f1xx.c
│       └── usart.c
├── Drivers
│   ├── CMSIS
│   │   ├── Core
│   │   ├── Core_A
│   │   ├── Device
│   │   ├── docs
│   │   ├── DSP
│   │   ├── Include
│   │   ├── Lib
│   │   ├── LICENSE.txt
│   │   ├── NN
│   │   ├── RTOS
│   │   └── RTOS2
│   └── STM32F1xx_HAL_Driver
│       ├── Inc
│       ├── License.md
│       └── Src
├── Makefile
├── README.md
├── rt-thread
│   ├── components
│   │   ├── device
│   │   └── finsh
│   ├── include
│   │   ├── libc
│   │   ├── rtdbg.h
│   │   ├── rtdebug.h
│   │   ├── rtdef.h
│   │   ├── rthw.h
│   │   ├── rtlibc.h
│   │   ├── rtm.h
│   │   ├── rtservice.h
│   │   └── rtthread.h
│   ├── libcpu
│   │   ├── arm
│   │   └── risc-v
│   └── src
│       ├── clock.c
│       ├── components.c
│       ├── cpu.c
│       ├── idle.c
│       ├── ipc.c
│       ├── irq.c
│       ├── kservice.c
│       ├── mem.c
│       ├── memheap.c
│       ├── mempool.c
│       ├── object.c
│       ├── scheduler.c
│       ├── slab.c
│       ├── thread.c
│       └── timer.c
├── rt_thread.ioc
├── startup_stm32f103xb.s
└── STM32F103C8Tx_FLASH.ld
附录:思路
rt-thread的执行过程
本部分分析文件启动过程
startup_stm32f103xb.s:
Reset_Handler
64:将数据段初始化器从闪存复制到SRAM
81:清BSS
96:系统时钟初始化 ->Core/Src/system_stm32f1xx.c-SystemInit()空的
98:静态构造函数 ->__libc_init_array c 库的初始化
101:跳转到入口函数(原来是main) -> RTOS/src/components.c-entry(void) -> rtthread_startup();
中断异常向量表:
中断入口函数定义:
RTOS/src/components.c
rtthread_startup()
关中断
板初始化
打印RTOS版本信息
初始化系统系统定时器
调度器初始化
初始化应用程序
初始化main线程并启动绑定main_thread_entry函数
main_thread_entry:rt线程组件初始化
函数指针遍历执行了许多函数...
执行了main();
定时器线程初始化
此线程未开启需开启RT_USING_TIMER_SOFT宏
空闲线程初始化
绑定rt_thread_idle_entry函数
while(1){
未开启RT_USING_IDLE_HOOK,若开启会执行idle钩子函数
rt_thread_idle_excute该功能将在系统空闲时执行系统后台任务。内部未开启RT_USING_HEAP
未开启RT_USING_PM,否则会进入电源管理器rt_system_power_manager
}
开启调度器
进行调度执行RTOS/libcpu/context_gcc.s-rt_hw_context_switch_to
cubemx生成的默认执行过程
startup_stm32f103xb.s 之前同上,101:跳转到入口函数main中直接执行。
原作者:姬绪孔
 /7
/7 