使用指南
ali-iotkit 软件包封装了 HTTP、MQTT、CoAP 和 OTA 等应用层协议,方便了用户设备接入云平台,这里摘取部分做简要介绍。
MQTT 连接
目前阿里云支持 MQTT 标准协议接入,兼容 3.1.1 和 3.1 版本协议,具体的协议请参考 MQTT 3.1.1 和 MQTT 3.1 协议文档。
特征
支持 MQTT 的 PUB、SUB、PING、PONG、CONNECT、DISCONNECT 和 UNSUB 等报文
支持 cleanSession
不支持 will、retain msg
不支持 QOS2
基于原生的 MQTT topic 上支持 RRPC 同步模式,服务器可以同步调用设备并获取设备回执结果
安全等级
支持 TLSV1、 TLSV1.1 和 TLSV1.2 版本的协议建立安全连接。
TCP 通道基础+芯片级加密(ID2硬件集成): 安全级别高
TCP 通道基础+对称加密(使用设备私钥做对称加密):安全级别中
TCP 方式(数据不加密): 安全级别低
连接域名
华东2节点: productKey .iot-as-mqtt.cn-shanghai.aliyuncs.com:1883
美西节点: productKey .iot-as-mqtt.us-west-1.aliyuncs.com:1883
新加坡节点: productKey .iot-as-mqtt.ap-southeast-1.aliyuncs.com:1883
Topic 规范
默认情况下创建一个产品后,产品下的所有设备都拥有以下 Topic 类的权限:
/ productKey / deviceName /update pub
/ productKey / deviceName /update/error pub
/ productKey / deviceName /get sub
/sys/ productKey / deviceName /thing/# pub&sub
/sys/ productKey / deviceName /rrpc/# pub&sub
/broadcast/ productKey /# pub&sub
每个 Topic 规则称为 topic 类,topic 类实行设备维度隔离。每个设备发送消息时,将 deviceName 替换为自己设备的 deviceName ,防止 topic 被跨设备越权,topic 说明如下:
pub:表示数据上报到 topic 的权限
sub:表示订阅 topic 的权限
/ productKey / deviceName /xxx 类型的 topic 类:可以在物联网平台的控制台扩展和自定义
/sys 开头的 topic 类:属于系统约定的应用协议通信标准,不允许用户自定义的,约定的 topic 需要符合阿里云 ALink 数据标准
/sys/ productKey / deviceName /thing/xxx 类型的 topic 类:网关主子设备使用的 topic 类,用于网关场景
/broadcast 开头的 topic 类:广播类特定 topic
/sys/ productKey / deviceName /rrpc/request/${messageId}:用于同步请求,服务器会对消息 Id 动态生成 topic, 设备端可以订阅通配符
/sys/ productKey / deviceName /rrpc/request/+:收到消息后,发送 pub 消息到 /sys/ productKey / deviceName /rrpc/response/${messageId},服务器可以在发送请求时,同步收到结果
建立 MQTT 连接
使用 IOT_MQTT_Construct 接口与云端建立 MQTT 连接。
如果要实现设备长期在线,需要程序代码中去掉 IOT_MQTT_Unregister 和 IOT_MQTT_Destroy 部分,使用 while 保持长连接状态。
示例代码如下:
while(1)
{
IOT_MQTT_Yield(pclient, 200);
HAL_SleepMs(100);
}
订阅 Topic 主题
使用 IOT_MQTT_Subscribe 接口订阅某个 Topic。
代码如下:
/* Subscribe the specific topic */
rc = IOT_MQTT_Subscribe(pclient, TOPIC_DATA, IOTX_MQTT_QOS1,
_demo_message_arrive, NULL);
if (rc < 0) {
IOT_MQTT_Destroy(&pclient);
EXAMPLE_TRACE("IOT_MQTT_Subscribe() failed, rc = %d", rc);
rc = -1;
goto do_exit;
}
发布消息
使用 IOT_MQTT_Publish 接口发布信息到云端。
代码如下:
/* Initialize topic information */
memset(&topic_msg, 0x0, sizeof(iotx_mqtt_topic_info_t));
strcpy(msg_pub, "message: hello! start!");
topic_msg.qos = IOTX_MQTT_QOS1;
topic_msg.retain = 0;
topic_msg.dup = 0;
topic_msg.payload = (void *)msg_pub;
topic_msg.payload_len = strlen(msg_pub);
rc = IOT_MQTT_Publish(pclient, TOPIC_DATA, &topic_msg);
EXAMPLE_TRACE("rc = IOT_MQTT_Publish() = %d", rc);
取消订阅
使用 IOT_MQTT_Unsubscribe 接口取消订阅云端消息
下行数据接收
使用 IOT_MQTT_Yield 数据接收函数接收来自云端的消息。
请在任何需要接收数据的地方调用这个 API。如果系统允许,请起一个单独的线程,执行该接口。
代码如下:
/* handle the MQTT packet received from TCP or SSL connection */
IOT_MQTT_Yield(pclient, 200);
销毁 MQTT 连接
使用 IOT_MQTT_Destroy 接口销毁 MQTT 连接,释放内存。
代码如下:
IOT_MQTT_Destroy(&pclient);
检查连接状态
使用 IOT_MQTT_CheckStateNormal 接口查看当前的连接状态。
该接口用于查询MQTT的连接状态。但是,该接口并不能立刻检测到设备断网,只会在有数据发送或是 keepalive 时才能侦测到 disconnect。
MQTT 保持连接
设备端在 keepalive_interval_ms 时间间隔内,至少需要发送一次报文,包括 ping 请求。
如果服务端在 keepalive_interval_ms 时间内无法收到任何报文,物联网平台会断开连接,设备端需要进行重连。
在 IOT_MQTT_Construct 函数可以设置 keepalive_interval_ms 的取值,物联网平台通过该取值作为心跳间隔时间。keepalive_interval_ms 的取值范围是60000~300000。
示例代码:
iotx_mqtt_param_t mqtt_params;
memset(&mqtt_params, 0x0, sizeof(mqtt_params));
mqtt_params.keepalive_interval_ms = 60000;
mqtt_params.request_timeout_ms = 2000;
/* Construct a MQTT client with specify parameter */
pclient = IOT_MQTT_Construct(&mqtt_params);
CoAP 连接
支持 RFC 7252 Constrained Application Protocol协议,具体请参考:RFC 7252
使用 DTLS v1.2 保证通道安全,具体请参考:DTLS v1.2
服务器地址 endpoint = productKey .iot-as-coap.cn-shanghai.aliyuncs.com:5684 其中 productKey 请替换为您申请的产品 Key
CoAP 约定
不支持?号形式传参数
暂时不支持资源发现
仅支持 UDP 协议,并且目前必须通过 DTLS
URI 规范,CoAP 的 URI 资源和 MQTT TOPIC 保持一致,参考 MQTT规范
应用场景
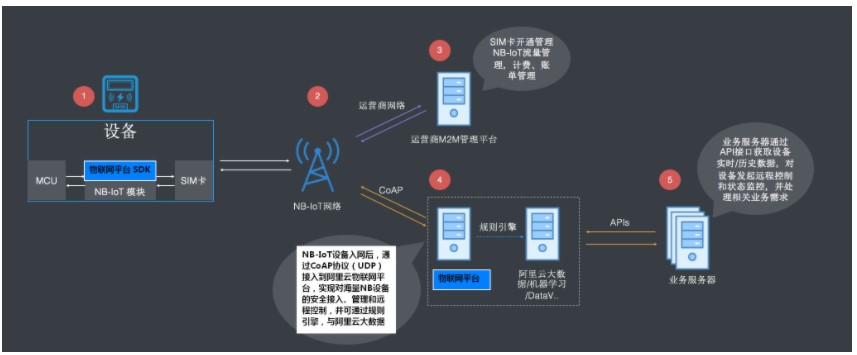
CoAP 协议适用在资源受限的低功耗设备上,尤其是 NB-IoT 的设备使用,基于 CoAP 协议将 NB-IoT 设备接入物联网平台的流程如下图所示:

建立连接
使用 IOT_CoAP_Init 和 IOT_CoAP_DeviceNameAuth 接口与云端建立 CoAP 认证连接。
示例代码:
iotx_coap_context_t *p_ctx = NULL;
p_ctx = IOT_CoAP_Init(&config);
if (NULL != p_ctx) {
IOT_CoAP_DeviceNameAuth(p_ctx);
do {
count ++;
if (count == 11) {
count = 1;
}
IOT_CoAP_Yield(p_ctx);
} while (m_coap_client_running);
IOT_CoAP_Deinit(&p_ctx);
} else {
HAL_Printf("IoTx CoAP init failed\r\n");
}
收发数据
SDK 使用接口 IOT_CoAP_SendMessage 发送数据,使用 IOT_CoAP_GetMessagePayload 和IOT_CoAP_GetMessageCode 接收数据。
示例代码:
/* send data */
static void iotx_post_data_to_server(void *param)
{
char path[IOTX_URI_MAX_LEN + 1] = {0};
iotx_message_t message;
iotx_deviceinfo_t devinfo;
message.p_payload = (unsigned char *)"{"name":"hello world"}";
message.payload_len = strlen("{"name":"hello world"}");
message.resp_callback = iotx_response_handler;
message.msg_type = IOTX_MESSAGE_CON;
message.content_type = IOTX_CONTENT_TYPE_JSON;
iotx_coap_context_t *p_ctx = (iotx_coap_context_t *)param;
iotx_set_devinfo(&devinfo);
snprintf(path, IOTX_URI_MAX_LEN, "/topic/%s/%s/update/",
(char *)devinfo.product_key,
(char *)devinfo.device_name);
IOT_CoAP_SendMessage(p_ctx, path, &message);
}
/* receive data */
static void iotx_response_handler(void *arg, void *p_response)
{
int len = 0;
unsigned char *p_payload = NULL;
iotx_coap_resp_code_t resp_code;
IOT_CoAP_GetMessageCode(p_response, &resp_code);
IOT_CoAP_GetMessagePayload(p_response, &p_payload, &len);
HAL_Printf("[APPL]: Message response code: 0x%x\r\n", resp_code);
HAL_Printf("[APPL]: Len: %d, Payload: %s, \r\n", len, p_payload);
}
下行数据接收
使用 IOT_CoAP_Yield 接口接收来自云端的下行数据。
请在任何需要接收数据的地方调用这个API,如果系统允许,请起一个单独的线程,执行该接口。
销毁 CoAP 连接
使用 IOT_CoAP_Deinit 接口销毁 CoAP 连接并释放内存。
OTA 升级
固件升级 Topic
设备端上报固件版本给云端
/ota/device/inform/ productKey /deviceName
设备端订阅该topic接收云端固件升级通知
/ota/device/upgrade/ productKey /deviceName
设备端上报固件升级进度
/ota/device/progress/ productKey /deviceName
设备端请求是否固件升级
/ota/device/request/ productKey /deviceName
固件升级说明
设备固件版本号只需要在系统启动过程中上报一次即可,不需要周期循环上报
根据版本号来判断设备端OTA是否升级成功
从OTA服务端控制台发起批量升级,设备升级操作记录状态是待升级
实际升级以OTA系统接收到设备上报的升级进度开始,设备升级操作记录状态是升级中。
设备离线时,接收不到服务端推送的升级消息
当设备上线后,主动通知服务端上线消息,OTA 服务端收到设备上线消息,验证该设备是否需要升级,如果需要,再次推送升级消息给设备, 否则,不推送消息。
OTA 代码说明
初始化
OTA 模块的初始化依赖于 MQTT 连接,即先获得的 MQTT 客户端句柄 pclient。
h_ota = IOT_OTA_Init(PRODUCT_KEY, DEVICE_NAME, pclient);
if (NULL == h_ota) {
rc = -1;
printf("initialize OTA failed\n");
}
上报版本号
在 OTA 模块初始化之后,调用 IOT_OTA_ReportVersion 接口上报当前固件的版本号,升级成功后重启运行新固件,并使用该接口上报新固件版本号,云端与 OTA 升级任务的版本号对比成功后,提示 OTA 升级成功。
示例代码如下:
if (0 != IOT_OTA_ReportVersion(h_ota, "version2.0")) {
rc = -1;
printf("report OTA version failed\n");
}
下载固件
MQTT 通道获取到 OTA 固件下载的 URL 后,使用 HTTPS 下载固件,边下载边存储到 Flash OTA 分区。
IOT_OTA_IsFetching() 接口:用于判断是否有固件可下载
IOT_OTA_FetchYield() 接口:用于下载一个固件块
IOT_OTA_IsFetchFinish() 接口:用于判断是否已下载完成 示例代码:
// 判断是否有固件可下载
if (IOT_OTA_IsFetching(h_ota)) {
unsigned char buf_ota[OTA_BUF_LEN];
uint32_t len, size_downloaded, size_file;
do {
// 循环下载固件
len = IOT_OTA_FetchYield(h_ota, buf_ota, OTA_BUF_LEN, 1);
if (len > 0) {
// 写入到Flash等存储器中(边下载边存储)
}
} while (!IOT_OTA_IsFetchFinish(h_ota)); // 判断固件是否下载完毕
}
上报下载状态
使用 IOT_OTA_ReportProgress 接口上报固件下载进度。
if (percent - last_percent > 0) {
IOT_OTA_ReportProgress(h_ota, percent, NULL);
}
IOT_MQTT_Yield(pclient, 100);
判断下载固件是否完整
固件下载完成后,使用 IOT_OTA_Ioctl 接口校验固件的完整性。
int32_t firmware_valid;
IOT_OTA_Ioctl(h_ota, IOT_OTAG_CHECK_FIRMWARE, &firmware_valid, 4);
if (0 == firmware_valid) {
printf("The firmware is invalid\n");
} else {
printf("The firmware is valid\n");
}
销毁 OTA 连接
使用 IOT_OTA_Deinit 销毁 OTA 连接并释放内存。
原作者:RT-Thread软件包手册
 /9
/9 