文章目录
前言
一、参考资料
二、电路图
三、驱动
四、makefile——添加驱动
五、dts——使能gpio
5.1 参考
5.2 改动1—— hx117节点
5.3 改动2——引脚节点
5.4 已经被定义的引脚
5.5 gpio源码
六、改动总结——使能hx711
七、验证驱动添加
八、编写测试文件
8.1 测试代码
8.2 配置编译环境变量
九、验证
十、其他——添加文件路径
小结
前言
本章介绍基于luckfox开发板添加压力传感器hx711,并编写测试
一、参考资料
Rockchip_RV1103_Datasheet_V1.1-20220427.pdf

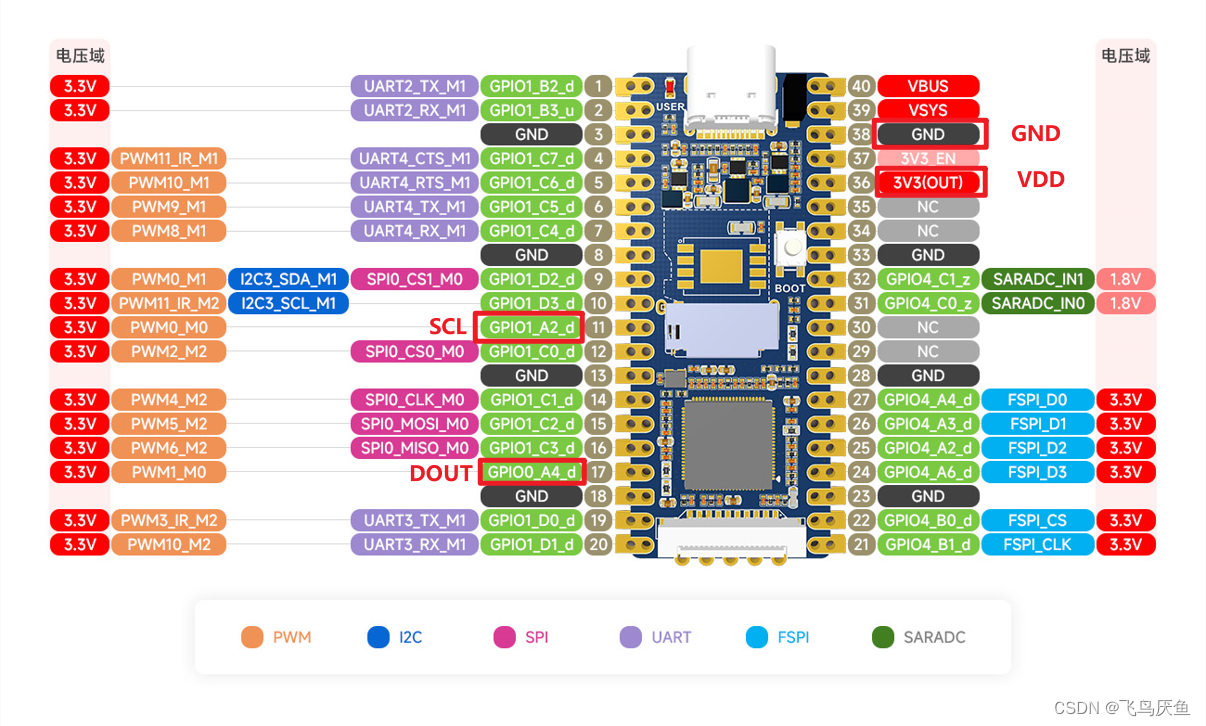
二、电路图

只有这两个io口没有复用其他功能,需要关掉PWM0_0/1_0。
三、驱动
luckfox-pico-main\sysdrv\source\kernel\drivers\iio\adc\hx711.c
这里匹配gpio
static int hx711_probe(struct platform_device *pdev)
{
hx711_data->gpiod_pd_sck = devm_gpiod_get(dev, "sck", GPIOD_OUT_LOW);
if (IS_ERR(hx711_data->gpiod_pd_sck)) {
dev_err(dev, "failed to get sck-gpiod: err=%ld\\\\n",
PTR_ERR(hx711_data->gpiod_pd_sck));
return PTR_ERR(hx711_data->gpiod_pd_sck);
}
hx711_data->gpiod_dout = devm_gpiod_get(dev, "dout", GPIOD_IN);
if (IS_ERR(hx711_data->gpiod_dout)) {
dev_err(dev, "failed to get dout-gpiod: err=%ld\\\\n",
PTR_ERR(hx711_data->gpiod_dout));
return PTR_ERR(hx711_data->gpiod_dout);
}
hx711_data->reg_avdd = devm_regulator_get(dev, "avdd");
if (IS_ERR(hx711_data->reg_avdd))
return PTR_ERR(hx711_data->reg_avdd);
}
static struct platform_driver hx711_driver = {
.probe = hx711_probe,
.remove = hx711_remove,
.driver = {
.name = "hx711-gpio",
.of_match_table = of_hx711_match,
},
};
四、makefile——添加驱动
# luckfox-pico-main\\\\sysdrv\\\\source\\\\kernel\\\\drivers\\\\Makefile
obj-$(CONFIG_IIO)		+= iio/

# luckfox-pico-main\\\\sysdrv\\\\source\\\\kernel\\\\drivers\\\\iio\\\\Makefile
obj-y += adc/

# luckfox-pico-main\\\\sysdrv\\\\source\\\\kernel\\\\drivers\\\\iio\\\\adc\\\\Makefile
obj-$(CONFIG_HX711) += hx711.o
配置
luckfox-pico\sysdrv\source\kernel\arch\arm\configs\luckfox_rv1106_linux_defconfig
CONFIG_HX711=y
CONFIG_IIO=y
五、dts——使能gpio
5.1 参考
luckfox-pico\sysdrv\source\kernel\Documentation\devicetree\bindings\iio\adc\avia-hx711.yaml
examples:
  - |
    #include <dt-bindings/gpio/gpio.h>
    weight {
        compatible = "avia,hx711";
        sck-gpios = <&gpio3 10 GPIO_ACTIVE_HIGH>;
        dout-gpios = <&gpio0 7 GPIO_ACTIVE_HIGH>;
        avdd-supply = <&avdd>;
        clock-frequency = <100000>;
    };
注意,这里要改动下,需要匹配驱动中的of获取,移除gpios和supply。
static const struct of_device_id of_hx711_match[] = {
{ .compatible = "avia,hx711", },
{},
};
5.2 改动1—— hx117节点
rv1103-luckfox-pico-ipc.dtsi
rv1103g-luckfox-pico.dts
rv1106-evb.dtsi
rv1106.dtsi
rv1103.dtsi
luckfox-pico-main\sysdrv\source\kernel\arch\arm\boot\dts\rv1103g-luckfox-pico.dts
hx711:hx711 {
status = "okay";
compatible = "avia,hx711";
sck-gpios = <&gpio1 RK_PA2 GPIO_ACTIVE_HIGH>;
dout-gpios = <&gpio1 RK_PA4 GPIO_ACTIVE_HIGH>;
avdd-supply = <&vcc_3v3>;//vcc3v3_sys
clock-frequency = <400000>;
};
dtsi中sck-gpios是全的,但是在代码中只有sck,这个是在代码中省去了,注意区分。
这里只是给hx117增加了设备节点,但是rv1103和其他平台不太一样,还需要自己在dts中定义pin的节点
5.3 改动2——引脚节点
这点真就没注意到,导致我纠结了好久,还是没有获取到hx117的数据。
参考:https://wiki.luckfox.com/zh/Luckfox-Pico/Luckfox-Pico-GPIO/
gpio1pa2:gpio1pa2 {
		compatible = "regulator-fixed";
		pinctrl-names = "default";
		pinctrl-0 = <&gpio1_pa2>;
		regulator-name = "gpio1_pa2";
		regulator-always-on;
	};

	gpio0pa4:gpio0pa4 {
		compatible = "regulator-fixed";
		pinctrl-names = "default";
		pinctrl-0 = <&gpio0_pa4>;
		regulator-name = "gpio0_pa4";
		regulator-always-on;
	};

&pinctrl {
	gpio1-pa2 {
		gpio1_pa2:gpio1-pa2 {
			rockchip,pins =	<1 RK_PA2 RK_FUNC_GPIO &pcfg_pull_none>;
		};
	};

	gpio0-pa4 {
		gpio0_pa4:gpio0-pa4 {
			rockchip,pins =	<0 RK_PA4 RK_FUNC_GPIO &pcfg_pull_none>;
		};
	};
};
5.4 已经被定义的引脚
板子的21-27都被定义了,这是用于fspi
i2c3和spi0被enable了,需要disable后测试hx117
其中spi的cs选的是c0(28+0=16),不是d2(38+2=26),所以只需要关掉i2s3即可。
或者改用gpio1_A2和gpio_A4,这样不会有引脚复用,可以同时支持i2c、spi、adc。
5.5 gpio源码


都设为高电平有效GPIO_ACTIVE_HIGH
引脚作为输入还是输出由驱动中devm_gpiod_get定义
/sys/bus/iio/devices/iio:device0/
六、改动总结——使能hx711
[url=home.php?mod=space&uid=1999721]@@[/url] -63,6 +63,23 @@ gpio4pb1:gpio4pb1 {
regulator-name = "gpio4_pb1";
regulator-always-on;
};
+
+ /* add hx711 */
+ gpio1pa2:gpio1pa2 {
+ compatible = "regulator-fixed";
+ pinctrl-names = "default";
+ pinctrl-0 = <&gpio1_pa2>;
+ regulator-name = "gpio1_pa2";
+ regulator-always-on;
+ };
+
+ gpio0pa4:gpio0pa4 {
+ compatible = "regulator-fixed";
+ pinctrl-names = "default";
+ pinctrl-0 = <&gpio0_pa4>;
+ regulator-name = "gpio0_pa4";
+ regulator-always-on;
+ };
};
/**********GPIO**********/
&pinctrl {
@@ -102,6 +119,19 @@ gpio4_pb1:gpio4-pb1 {
};
};
+ /* add hx711*/
+ gpio1-pa2 {
+ gpio1_pa2:gpio1-pa2 {
+ rockchip,pins = <1 RK_PA2 RK_FUNC_GPIO &pcfg_pull_none>;
+ };
+ };
+
+ gpio0-pa4 {
+ gpio0_pa4:gpio0-pa4 {
+ rockchip,pins = <0 RK_PA4 RK_FUNC_GPIO &pcfg_pull_none>;
+ };
+ };
+
};
@@ -178,19 +208,21 @@ &uart4 {
/**********PWM**********/
+
&pwm0 {
- status = "okay";
+ status = "disabled";
pinctrl-names = "active";
pinctrl-0 = <&pwm0m0_pins>;
// pinctrl-0 = <&pwm0m1_pins>;
};
&pwm1 {
- status = "okay";
+ status = "disabled";
pinctrl-names = "active";
pinctrl-0 = <&pwm1m0_pins>;
// pinctrl-0 = <&pwm1m1_pins>;
};
// &pwm2 {
// status = "okay";
// pinctrl-names = "active";
@@ -251,4 +283,15 @@ &pwm11 {
+/**********iio**********/
+/ {
+ hx711:hx711 {
+ status = "okay";
+ compatible = "avia,hx711";
+ sck-gpios = <&gpio1 RK_PA2 GPIO_ACTIVE_HIGH>;
+ dout-gpios = <&gpio0 RK_PA4 GPIO_ACTIVE_HIGH>;
+ avdd-supply = <&vcc_3v3>;//vcc3v3_sys
+ clock-frequency = <400000>;
+ };
+};
@@ -320,3 +320,7 @@ CONFIG_DEBUG_FS=y
# CONFIG_SCHED_DEBUG is not set
# CONFIG_FTRACE is not set
# CONFIG_RUNTIME_TESTING_MENU is not set
+
+# sensor -- hx711
+CONFIG_HX711=y
+CONFIG_IIO=y
七、验证驱动添加
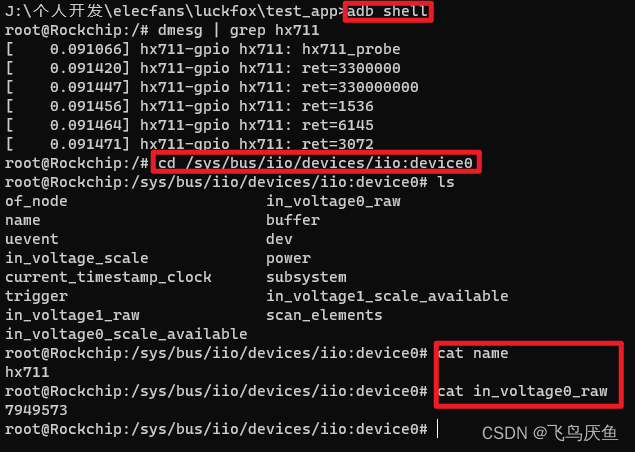
可以看到驱动正常加载了,注意dmesg中的hx711相关log是我自己在驱动中添加的,默认是没有的,可以直接获取iio属性判断驱动有没有添加成功。
root@Rockchip:/
[ 0.091066] hx711-gpio hx711: hx711_probe
[ 0.091420] hx711-gpio hx711: ret=3300000
[ 0.091447] hx711-gpio hx711: ret=330000000
[ 0.091456] hx711-gpio hx711: ret=1536
[ 0.091464] hx711-gpio hx711: ret=6145
[ 0.091471] hx711-gpio hx711: ret=3072
root@Rockchip:/
root@Rockchip:/sys/bus/iio/devices/iio:device0
of_node in_voltage0_raw
name buffer
uevent dev
in_voltage_scale power
current_timestamp_clock subsystem
trigger in_voltage1_scale_available
in_voltage1_raw scan_elements
in_voltage0_scale_available
root@Rockchip:/sys/bus/iio/devices/iio:device0
hx711
root@Rockchip:/sys/bus/iio/devices/iio:device0
7949573
root@Rockchip:/sys/bus/iio/devices/iio:device0

八、编写测试文件
应用实例ko
https://wiki.luckfox.com/zh/Luckfox-Pico/Core3566-SDK
执行文件bin
https://wiki.luckfox.com/zh/Luckfox-Pico/Luckfox-Pico-GPIO
8.1 测试代码
hx711_app.c
//
static int cal_offset = 8500000; // save raw value without test items
static int cal_scale = 475; // when set phone, 1g is 475
static int cal_weight = 187; // the weight of phone
// static float weight = 0;
static int weight = 0;
// float convert_to_weight(int sensor_data) {
int convert_to_weight(int sensor_data) {
int weight;
// weight = (float)(sensor_data - cal_offset) / cal_scale;
// printf("\\\\nsensor_raw=%d,cal_offset=%d,cal_scale=%d\\\\n",sensor_data,cal_offset,cal_scale);
if(cal_scale != 0)
weight = (sensor_data - cal_offset) / cal_scale;
else
weight = 0;
// printf("Sensor data: %.1f\\\\n", weight);
// printf("Sensor data: %d\\\\n", weight);
return weight;
}
int get_hx711_raw(){
int fd;
char buf[64];
ssize_t num_read;
fd = open(IIO_DEVICE "/in_voltage0_raw", O_RDONLY);
if (fd < 0) {
perror("Failed to open iio device");
return 1;
}
num_read = read(fd, buf, sizeof(buf) - 1);
if (num_read < 0) {
perror("Failed to read sensor data");
close(fd);
return 1;
}
close(fd);
buf[num_read] = '\\\\0';
int sensor_data = atoi(buf);
// printf(" raw sensor_data=%d\\\\n",sensor_data);
return sensor_data;
}
// float get_hx711_value(){
int get_hx711_value(){
int sensor_data = get_hx711_raw();
weight = convert_to_weight(sensor_data);
return weight;
}
// save scale&offset to file
void set_cal_value(){
int fd;
char tmp_char[64];
fd = open(SENSOR_CALI_PATH_OFFSET, O_CREAT|O_RDWR ,0777);
if (fd < 0) {
perror("Failed to open cal offset.");
return;
}
// printf("-------\\\\ncal_offset=%d\\\\n",cal_offset);
memset(tmp_char,0,sizeof(tmp_char));
sprintf(tmp_char,"%d\\\\0",cal_offset);
// printf("xxx tmp_char=[%s]\\\\n",tmp_char);
write(fd, tmp_char, sizeof(tmp_char));
close(fd);
fd = open(SENSOR_CALI_PATH_SCALE, O_CREAT|O_RDWR ,0777);
if (fd < 0) {
perror("Failed to open cal offset.");
return;
}
// printf("cal_scale=%d\\\\n",cal_scale);
memset(tmp_char,0,sizeof(tmp_char));
sprintf(tmp_char,"%d\\\\0",cal_scale) ;
// printf("xxx tmp_char=[%s]\\\\n-------\\\\n",tmp_char);
write(fd, tmp_char, sizeof(tmp_char)-1);
close(fd);
}
void print_cal_value_and_raw(int sensor_raw_tmp){
printf("cal&raw:\\\\n");
printf(" cal_offset=%d sensor_raw=%d\\\\n", cal_offset, sensor_raw_tmp);
printf(" test_offset\\\\t%d\\\\n cal_weight\\\\t%d\\\\n cal_scale\\\\t%d\\\\n",
sensor_raw_tmp - cal_offset, cal_weight, cal_scale);
printf("\\\\n");
}
void print_cal_value(){
printf("hx711 calibration value\\\\n");
printf(" cal_offset\\\\t%d\\\\n cal_weight\\\\t%d\\\\n cal_scale\\\\t%d\\\\n",
cal_offset, cal_weight, cal_scale);
printf("\\\\n");
}
void sns_calibration(){
int cal_test_num = 10;
int cal_average = 0;
int cal_test_tmp = 0;
int cal_scale_raw = 0;
// test 10 times to get offset average
for(int i=0; i<cal_test_num; i++){
cal_test_tmp = get_hx711_raw();
usleep(10);
cal_average = (cal_average * i + cal_test_tmp)/(i+1);
}
cal_offset=cal_average;
usleep(20);
printf("!!! Please put test items on the board whose weight same with cmd3\\\\nWaiting input char to continue ...\\\\n");
getchar();
cal_test_tmp = get_hx711_raw();
cal_scale_raw = cal_test_tmp - cal_offset;
cal_scale = (cal_scale_raw)/cal_weight;
print_cal_value_and_raw(cal_test_tmp);
set_cal_value();
}
void get_cal_value(){
int tmp_offset;
int tmp_scale;
char tmp_file_value[64];
int fd;
// printf("get_cal_value\\\\n");
fd = open(SENSOR_CALI_PATH_OFFSET, O_RDWR,0777);
if (fd < 0) {
perror("Failed to open cal offset.");
return;
}
read(fd, tmp_file_value, sizeof(tmp_file_value) - 1);
// printf("tmp_file_value=%s\\\\n",tmp_file_value);
tmp_offset = atoi(tmp_file_value);
// printf("tmp_offset=%d\\\\n",tmp_offset);
close(fd);
fd = open(SENSOR_CALI_PATH_SCALE, O_RDWR,0777);
if (fd < 0) {
perror("Failed to open cal offset.");
return;
}
memset(tmp_file_value,0,sizeof(tmp_file_value));
read(fd, tmp_file_value, sizeof(tmp_file_value) - 1);
tmp_scale = atoi(tmp_file_value);
// printf("tmp_offset=%d\\\\n",tmp_scale);
close(fd);
cal_offset = tmp_offset;
cal_scale = tmp_scale;
}
int main(int argc, char *argv[]) {
char cmd1[16];
char cmd2[16];
char cmd3[16];
int ret;
int val_tmp=0;
// calibration: put the items whose weight is known. weight sends to cmd3
// ./hx771_app -c 187
if(argc == 3){
strcpy(cmd2,argv[1]);
strcpy(cmd3,argv[2]);
printf("cmd2=%s cmd3=%s\\\\n",cmd2,cmd3);
if(strcmp(cmd2, "-c") == 0){
printf("get cal cal_weight %s\\\\n",cmd3);
cal_weight=atoi(cmd3); // save the weight of cal items
} else {
printf("hx711 no cal_weight\\\\n");
return 0;
}
sns_calibration();
sleep(1);
// test the calibration result
val_tmp = get_hx711_value();
printf("sensor value: %d\\\\n", val_tmp);
return 0;
}
printf("-------------test-------------\\\\n");
get_cal_value();
print_cal_value();
int sensor_data;
int test_num=5;
while(test_num--){
val_tmp = get_hx711_value();
printf("%02d: %d\\\\n",5 - test_num,val_tmp);
sleep(1);
}
printf("--------------------------\\\\n");
return 0;
}
8.2 配置编译环境变量
需要在ubuntu环境下运行。
export PATH=/home/luckfox/Luckfox-Pico/luckfox-pico/tools/linux/toolchain/arm-rockchip830-linux-uclibcgnueabihf/bin:$PATH
source ~/.bashrc
cd ~/luckfox/luckfox-pico/project/app/test_app/hx711
arm-rockchip830-linux-uclibcgnueabihf-gcc hx711_app.c -o hx711_app

九、验证
由于将虚拟机中生成的可执行文件复制到windows本地,再通过adb传入设备中,这部分流程比较重复,所以编写了一个简单的bat脚本进行刷入,需要输入虚拟机的登录密钥就可以执行了。
scp youkai@192.168.206.130:/home/youkai/luckfox/luckfox-pico/project/app/test_app/hx711/hx711_app .

adb push hx711_app /root/

adb shell "chmod 777 /root/hx711_app"
adb shell "./root/hx711_app -c 187"
直接运行这个bat脚本,然后输入密码就可以实现自动刷执行文件并校准。
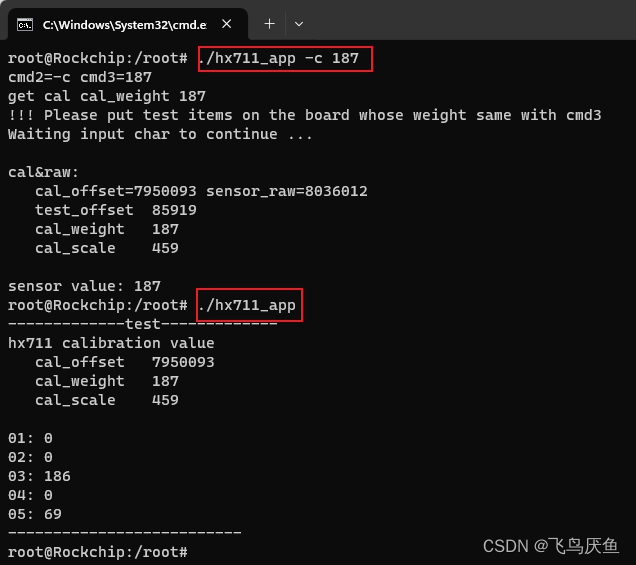
刷完执行文件后也可以手动下命令进行测试。
root@Rockchip:/root
root@Rockchip:/root

小结
本章实现了hx711的数据读取,以及计算出称量物品的重量,后续可以结合算法实现相关功能。

