0.概述
本文主要介绍以I2C 接口的光照传感器BH1750为例子,介绍硬件编程、运行、C代码编译和运行。
1.光照传感器概述
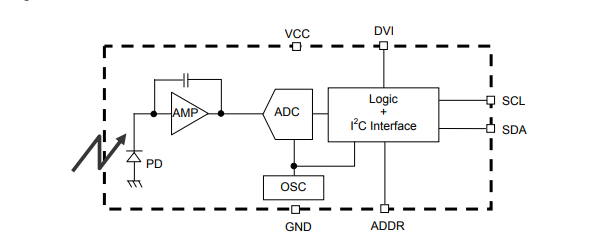
BH1750 是一款数字化的光强度传感器芯片,主要用于测量环境光照强度。它采用了专门的光敏元件和 ADC(模数转换器),能够将光照强度转换为数字输出。BH1750 芯片具有高分辨率和广泛的动态范围,适用于各种光照测量应用。

2.I2C接口连接传感器
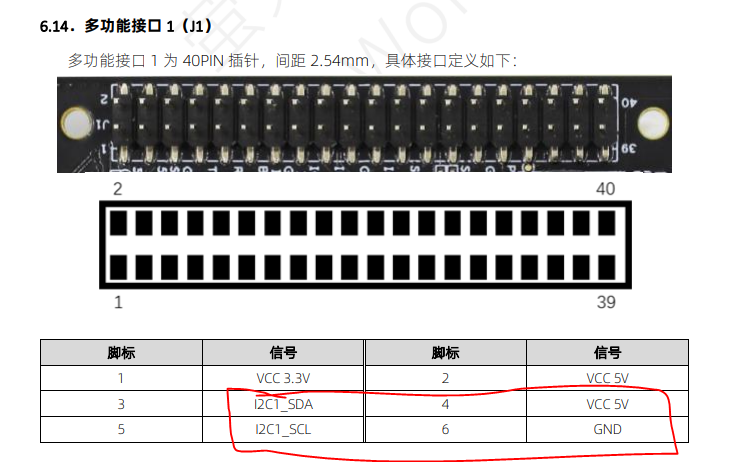
根据飞腾到硬件规格书找到板子背面的多功能接口1(JI),信号标注I2C接口

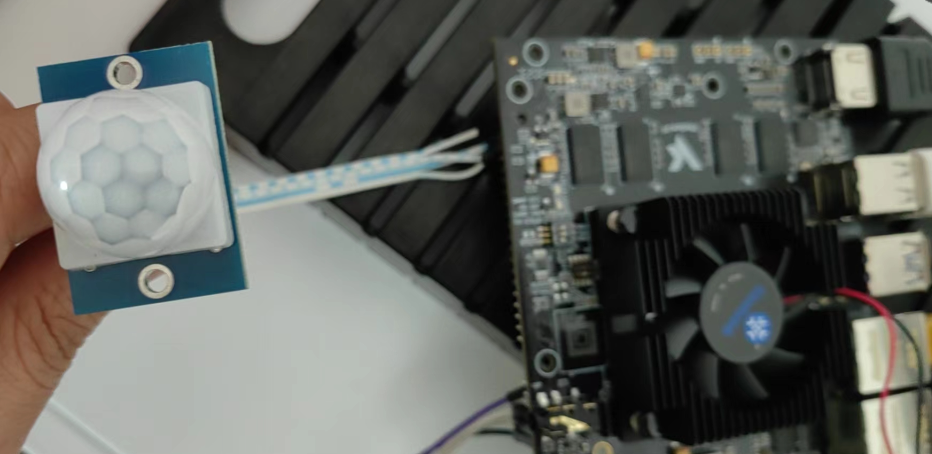
按照规格书,把传感器接上,如图:

3.I2C 测试命令
使用linux通用I2C工具测试一下,先安装测试工具:
sudo apt-get install i2c-tools
SSH到开发板使用sudo 命令进行简单的I2C 读写,可以发现接上I2C 传感器之后I2C-2总线多了一个地址为0x23的器件,简单介绍如下:
查看有哪几个总线
user@Phytium-Pi:~$ i2cdetect -l
i2c-3   unknown         Phytium I2C adapter                     N/A
i2c-1   unknown         Phytium I2C adapter                     N/A
i2c-2   unknown         Phytium I2C adapter                     N/A
i2c-0   unknown         Phytium I2C adapter                     N/A
查看总线为2的设备
user@Phytium-Pi:~$ sudo i2cdetect -y -r 2
     0  1  2  3  4  5  6  7  8  9  a  b  c  d  e  f
00:          -- -- -- -- -- -- -- -- -- -- -- -- --
10: -- -- -- -- -- -- -- -- -- -- -- -- -- -- -- --
20: -- -- -- 23 -- -- -- -- -- -- -- -- -- -- -- --
30: -- -- -- -- -- -- -- -- -- -- -- -- -- -- -- --
读取总线2下面0x23设备的所有值
user@Phytium-Pi:~$ sudo i2cdump -f 2 0x23
No size specified (using byte-data access)
WARNING! This program can confuse your I2C bus, cause data loss and worse!
I will probe file /dev/i2c-2, address 0x23, mode byte
Continue? [Y/n] y
     0  1  2  3  4  5  6  7  8  9  a  b  c  d  e  f    0123456789abcdef
00: 00 00 00 00 00 00 00 00 00 00 00 00 00 00 00 00    ................
10: 00 00 00 00 00 00 00 00 00 00 00 00 00 00 00 00    ................
20: 00 00 00 00 00 00 00 00 00 00 00 00 00 00 00 00    ................
30: 00 00 00 00 00 00 00 00 00 00 00 00 00 00 00 00    ................
40: 00 00 00 00 00 00 00 00 00 00 00 00 00 00 00 00    ................
50: 00 00 00 00 00 00 00 00 00 00 00 00 00 00 00 00    ................
60: 00 00 00 00 00 00 00 00 00 00 00 00 00 00 00 00    ................
70: 00 00 00 00 00 00 00 00 00 00 00 00 00 00 00 00    ................
80: 00 00 00 00 00 00 00 00 00 00 00 00 00 00 00 00    ................
90: 00 00 00 00 00 00 00 00 00 00 00 00 00 00 00 00    ................
a0: 00 00 00 00 00 00 00 00 00 00 00 00 00 00 00 00    ................
b0: 00 00 00 00 00 00 00 00 00 00 00 00 00 00 00 00    ................
c0: 00 00 00 00 00 00 00 00 00 00 00 00 00 00 00 00    ................
d0: 00 00 00 00 00 00 00 00 00 00 00 00 00 00 00 00    ................
e0: 00 00 00 00 00 00 00 00 00 00 00 00 00 00 00 00    ................
f0: 00 00 00 00 00 00 00 00 00 00 00 00 00 00 00 00    ................
4.光照传感器C源码及注释
#include <stdio.h>
#include <sys/ioctl.h>
#include <unistd.h>
#include <fcntl.h>
#include <linux/i2c-dev.h>
#include <linux/i2c.h>
#define DEVICE_NAME "/dev/i2c-2"
#define DEVICE_ADDR 0x23
float convertToNumber(unsigned char *data) {
float result = (data[1] + (256 * data[0])) / 1.2;
return result;
}
float readLight(int devAddr) {
unsigned char buf[2];
int fd;
unsigned char wr_buf[13] = {0};
wr_buf[0] = 0x20;
wr_buf[1] = 0x00;
wr_buf[2] = 0x00;
fd =open(DEVICE_NAME, O_RDWR);
if (fd< 0)
{
printf("open i2c failed \n");
}
if (ioctl(fd,I2C_SLAVE_FORCE, DEVICE_ADDR) < 0)
{
printf("set slave address failed \n");
}
write(fd, wr_buf, 1);
sleep(10);
int bytesRead = read(fd, buf, 2);
if (bytesRead == -1) {
printf("Error reading data from I2C\n");
return -1;
}
float lightLevel = convertToNumber(buf);
close(fd);
return lightLevel;
}
int main() {
printf("hello,this is read_write i2c test \n");
while (1) {
float lightLevel = readLight(DEVICE_ADDR);
printf("BH1750 Light Level: %.2flx\n", lightLevel);
usleep(500000);
}
return 0;
}
5.代码编译
1、gcc简介: Ubuntu 下的 C 语言编译器是 GCC,我们 安装Ubuntu 的时候会默认安装,通过 gcc -v 可查看版本号。也可以看到该编译器可编译的目标对象:x86_64-linux-gnu,表示Ubuntu自带的编译器是针对X86架构的,编译的可执行文件只能运行于X86架构的CPU,如果想要编译在ARM架构上运行的程序就需要安装针对ARM架构的GCC编译器,俗称交叉编译器。
user@Phytium-Pi:~/BH1750$ gcc -v
Using built-in specs.
COLLECT_GCC=gcc
COLLECT_LTO_WRAPPER=/usr/lib/gcc/aarch64-linux-gnu/9/lto-wrapper
Target: aarch64-linux-gnu
Configured with: ../src/configure -v --with-pkgversion='Ubuntu 9.4.0-1ubuntu1~20.04.2' --with-bugurl=file:///usr/share/doc/gcc-9/README.Bugs --enable-languages=c,ada,c++,go,d,fortran,objc,obj-c++,gm2 --prefix=/usr --with-gcc-major-version-only --program-suffix=-9 --program-prefix=aarch64-linux-gnu- --enable-shared --enable-linker-build-id --libexecdir=/usr/lib --without-included-gettext --enable-threads=posix --libdir=/usr/lib --enable-nls --enable-clocale=gnu --enable-libstdcxx-debug --enable-libstdcxx-time=yes --with-default-libstdcxx-abi=new --enable-gnu-unique-object --disable-libquadmath --disable-libquadmath-support --enable-plugin --enable-default-pie --with-system-zlib --with-target-system-zlib=auto --enable-objc-gc=auto --enable-multiarch --enable-fix-cortex-a53-843419 --disable-werror --enable-checking=release --build=aarch64-linux-gnu --host=aarch64-linux-gnu --target=aarch64-linux-gnu
Thread model: posix
gcc version 9.4.0 (Ubuntu 9.4.0-1ubuntu1~20.04.2)
2、gcc编译代码: gcc main.c 编译完成后默认生成a.out 的可执行文件,执行方法:“./+可执行文件”。使用-o 可指定生成的可执行文件名字:gcc BH1750.c -o main

6.代码运行结果
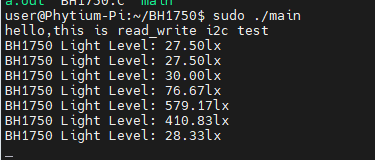
调整光照,查看运行结果,可以看到数值变化

 /6
/6 