EASY EAI api将DRM的使用方法简化封装起来,使用户简单快速的使用显示屏。一共只有三个API函数,使用起来非常简单,分别用于:初始化显示屏函数、释放显示屏函数、内容提交函数。
API函数:
需要注意的是:Display简易API只支持输入RGB888格式。
官方提供了简易API示例程序,代码如下所示:
#include <stdio.h>
#include <unistd.h>
#include <signal.h>
#include <stdlib.h>
#include <disp.h>

#define	DISP_WIDTH		720
#define	DISP_HEIGHT		1280
#define	IMAGE_PATH		"720X1280.rgb"
#define	IMGRATIO		3
#define	IMAGE_SIZE		(DISP_WIDTH*DISP_HEIGHT*IMGRATIO)

static int g_run = 0;
static void sigterm_handler(int sig) {
	fprintf(stderr, "signal %d\n", sig);
	g_run = 0;
}

int main()
{
	char *pbuf = NULL;
	int ret = 0;
	FILE *fp = NULL;

	signal(SIGINT, sigterm_handler);

	/* 1、准备图像数据 */
	pbuf = (char *)malloc(IMAGE_SIZE);
	if (!pbuf) {
		printf("malloc error: %s, %d\n", __func__, __LINE__);
		return -1;
	}
	fp = fopen(IMAGE_PATH, "r");
	if (!fp) {
		printf("fopen error: %s, %d\n", __func__, __LINE__);
		free(pbuf);
		return -1;
	}
	ret = fread(pbuf, 1, IMAGE_SIZE, fp);
	fclose(fp);
	if (ret != IMAGE_SIZE) {
		printf("fread error: %s, %d\n", __func__, __LINE__);
		free(pbuf);
		return -1;
	}

	/* 2、初始化显示 */
	ret = disp_init(DISP_WIDTH, DISP_HEIGHT); //RGB888 default
	if (ret) {
		printf("disp_init() error func:%s, line:%d\n", __func__, __LINE__);
		goto exit1;
	}

	/* 3、提交显示 */
	disp_commit(pbuf, IMAGE_SIZE);

	g_run++;
	while(g_run) {
		sleep(1);
	}

	disp_exit();
exit1:
	free(pbuf);
	pbuf = NULL;

    return 0;
}
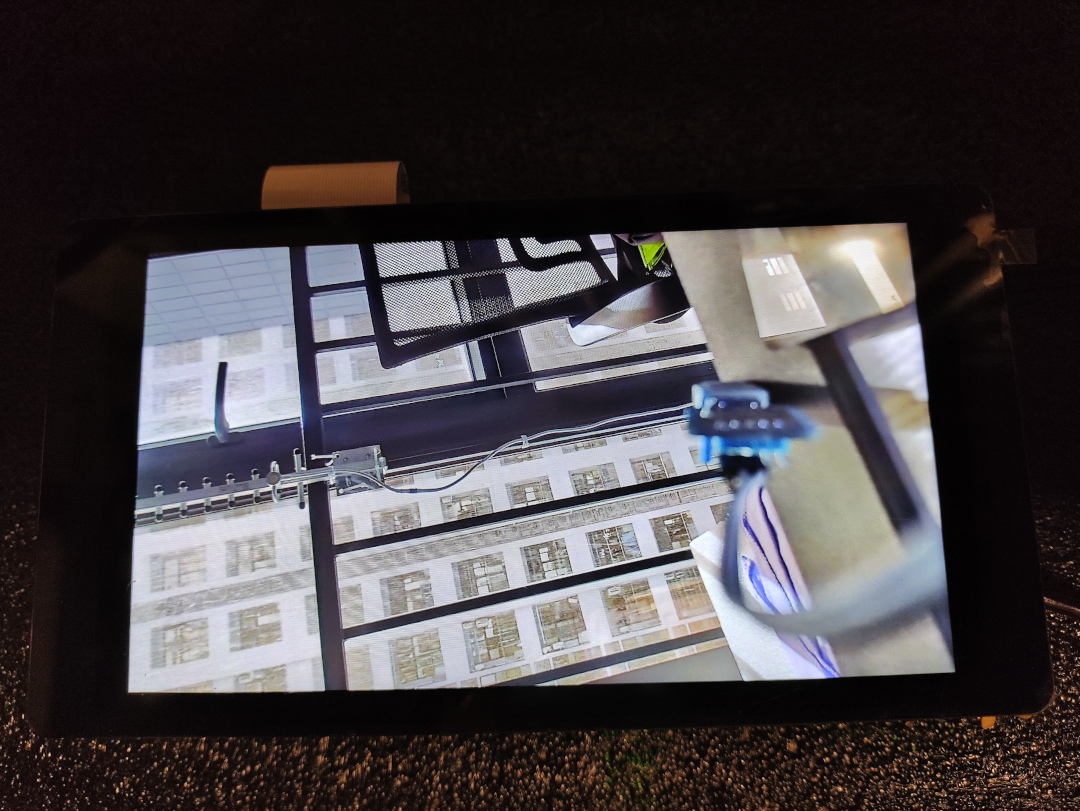
该程序用于将一个RGB原始图像文件显示到屏幕上。
运行效果如下:
接下来,新增代码文件test-fill.c:
#include <stdio.h>
#include <unistd.h>
#include <signal.h>
#include <stdlib.h>
#include <string.h>
#include <time.h>
#include <disp.h>

#define DISP_WIDTH 720
#define DISP_HEIGHT 1280
#define IMGRATIO 3

#define IMAGE_SIZE (DISP_WIDTH * DISP_HEIGHT * IMGRATIO)

static volatile int g_run = 0;
static void sigterm_handler(int sig)
{
    fprintf(stderr, "signal %d\n", sig);
    g_run = 0;
}

int main(int argc, char *argv[])
{
    char *pbuf = NULL;
    int ret = 0;
    char ch0, ch1, ch2;

    ch0 = argc > 1 ? atoi(argv[1]) : 255;
    ch1 = argc > 2 ? atoi(argv[2]) : 0;
    ch2 = argc > 3 ? atoi(argv[3]) : 0;

    signal(SIGINT, sigterm_handler);

    /* 1、准备图像数据 */
    pbuf = (char *)malloc(IMAGE_SIZE);
    if (!pbuf)
    {
        printf("malloc error: %s, %d\n", __func__, __LINE__);
        return -1;
    }

    memset(pbuf, 0, IMAGE_SIZE);

    /* 2、初始化显示 */
    ret = disp_init(DISP_WIDTH, DISP_HEIGHT); // RGB888 default
    if (ret)
    {
        printf("disp_init() error func:%s, line:%d\n", __func__, __LINE__);
        goto exit1;
    }

    // 整个屏幕 填充一种颜色
    int x, y;
    for (x = 0; x < DISP_WIDTH; x++)
    {
        for (y = 0; y < DISP_HEIGHT; y++)
        {
            char *pix = &pbuf[(y * DISP_WIDTH + x) * IMGRATIO];
            pix[0] = ch0;
            pix[1] = ch1;
            pix[2] = ch2;
        }
    }

    /* 3、提交显示 */
    disp_commit(pbuf, IMAGE_SIZE);

    g_run = 1;
    while (g_run)
    {
    }

    disp_exit();
exit1:
    free(pbuf);
    pbuf = NULL;
    printf("exit %s...\n", __func__);

    return 0;
}
CMakeLists.txt中添加代码段:
#--------------------------
# test-fill
#--------------------------
link_directories(${toolkit_root}/peripheral_api/display)	#-L
add_executable(test-fill test-fill.c)			#-o
target_link_libraries(test-fill display easymedia pthread)	#-l
target_include_directories(test-fill PRIVATE ${api_inc})	#-I
通过测试发现:
接下来,就可以绘制图形了,我们分别尝试绘制:
绘制实心矩形比较简单,直接判断点是否在范围内即可,核心代码:
for (x = 0; x < WIDTH; x++)
	for (y = 0; y < HEIGHT; y++)
		if ((x0 <= x && x <= x1) && (y0 <= y && y <= y1)) {
       drawPixel(x, y);
    }
完整代码如下:
#include <stdio.h>
#include <unistd.h>
#include <signal.h>
#include <stdlib.h>
#include <string.h>
#include <time.h>
#include <disp.h>

#define DISP_WIDTH 720
#define DISP_HEIGHT 1280
#define IMGRATIO 3

#define IMAGE_SIZE (DISP_WIDTH * DISP_HEIGHT * IMGRATIO)

static volatile int g_run = 0;
static void sigterm_handler(int sig)
{
    fprintf(stderr, "signal %d\n", sig);
    g_run = 0;
    printf("exit %s...\n", __func__);
}

int main()
{
    char *pbuf = NULL;
    int ret = 0;

    signal(SIGINT, sigterm_handler);

    /* 1、准备图像数据 */
    pbuf = (char *)malloc(IMAGE_SIZE);
    if (!pbuf)
    {
        printf("malloc error: %s, %d\n", __func__, __LINE__);
        return -1;
    }

    memset(pbuf, 0, IMAGE_SIZE);

    /* 2、初始化显示 */
    ret = disp_init(DISP_WIDTH, DISP_HEIGHT); // RGB888 default
    if (ret)
    {
        printf("disp_init() error func:%s, line:%d\n", __func__, __LINE__);
        goto exit1;
    }

    // 绘制矩形
    int x0 = DISP_WIDTH / 2;
    int y0 = DISP_HEIGHT / 2;
    int x1 = x0 + DISP_WIDTH / 4;
    int y1 = y0 + DISP_HEIGHT / 4;
    int x, y;
    for (x = 0; x < DISP_WIDTH; x++)
    {
        for (y = 0; y < DISP_HEIGHT; y++)
        {
            int *pix = (int *)&pbuf[(y * DISP_WIDTH + x) * IMGRATIO];
            if ((x0 <= x && x <= x1) && (y0 <= y && y <= y1))
            {
                *pix = 0xFF0000;
            }
        }
    }

    /* 3、提交显示 */
    disp_commit(pbuf, IMAGE_SIZE);

    g_run = 1;
    while (g_run)
    {
    }

    disp_exit();
exit1:
    free(pbuf);
    pbuf = NULL;

    return 0;
}
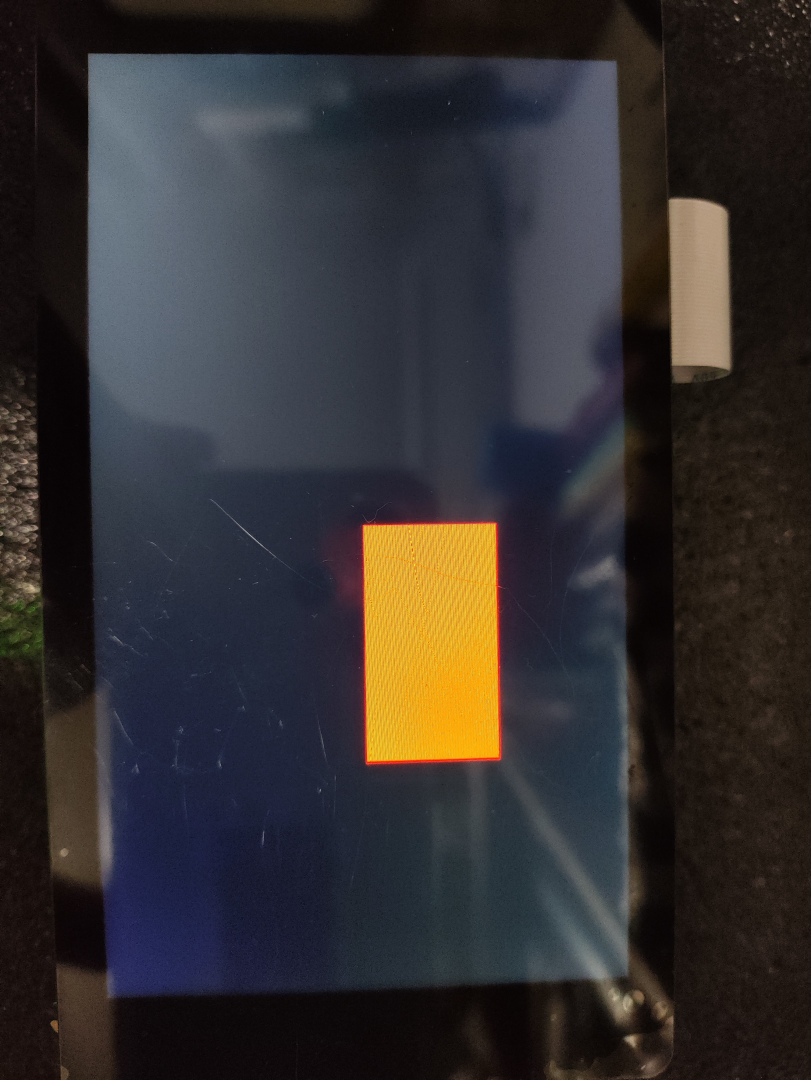
保存文件名为test-rect.c
CMakeLists.txt添加:
#--------------------------
# test-rect
#--------------------------
link_directories(${toolkit_root}/peripheral_api/display)	#-L
add_executable(test-rect test-rect.c)			#-o
target_link_libraries(test-rect display easymedia pthread)	#-l
target_include_directories(test-rect PRIVATE ${api_inc})	#-I
运行效果如下:
绘制实心圆,可以通过公式判断点是否在圆形内实现,核心代码为:
for (x = 0; x < WIDTH; x++)
	for (y = 0; y < HEIGHT; y++)
		if ((x - x0)*(x - x0) + (y - y0)*(y - y0) <= R*R) {
       drawPixel(x, y);
    }
完整代码如下:
#include <stdio.h>
#include <unistd.h>
#include <signal.h>
#include <stdlib.h>
#include <string.h>
#include <time.h>
#include <disp.h>

#define DISP_WIDTH 720
#define DISP_HEIGHT 1280
#define IMGRATIO 3

#define IMAGE_SIZE (DISP_WIDTH * DISP_HEIGHT * IMGRATIO)

static volatile int g_run = 0;
static void sigterm_handler(int sig)
{
    fprintf(stderr, "signal %d\n", sig);
    g_run = 0;
    printf("exit %s...\n", __func__);
}

int main()
{
    char *pbuf = NULL;
    int ret = 0;

    signal(SIGINT, sigterm_handler);

    /* 1、准备图像数据 */
    pbuf = (char *)malloc(IMAGE_SIZE);
    if (!pbuf)
    {
        printf("malloc error: %s, %d\n", __func__, __LINE__);
        return -1;
    }

    memset(pbuf, 0, IMAGE_SIZE);

    /* 2、初始化显示 */
    ret = disp_init(DISP_WIDTH, DISP_HEIGHT); // RGB888 default
    if (ret)
    {
        printf("disp_init() error func:%s, line:%d\n", __func__, __LINE__);
        goto exit1;
    }

    // 绘制圆形
    int x0 = DISP_WIDTH / 2;
    int y0 = DISP_HEIGHT / 2;
    int r2 = 160 * 160;
    int x, y;
    for (x = 0; x < DISP_WIDTH; x++)
    {
        for (y = 0; y < DISP_HEIGHT; y++)
        {
            char *pix = &pbuf[(y * DISP_WIDTH + x) * IMGRATIO];
            if ((x - x0) * (x - x0) + (y - y0) * (y - y0) <= r2)
            {
                pix[0] = 255;
                pix[1] = 0;
                pix[2] = 0;
            }
        }
    }

    /* 3、提交显示 */
    disp_commit(pbuf, IMAGE_SIZE);

    g_run = 1;
    while (g_run)
    {
    }

    disp_exit();
exit1:
    free(pbuf);
    pbuf = NULL;

    return 0;
}
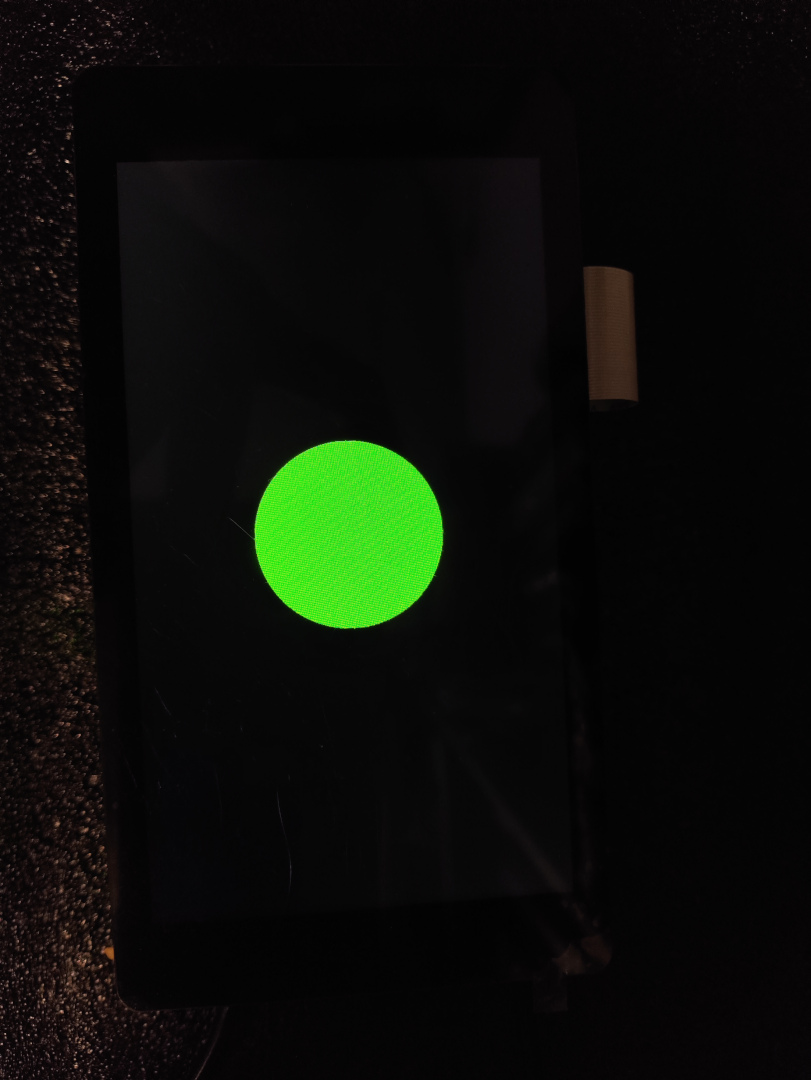
保存文件为test-draw.c
CMakeLists.txt添加:
#--------------------------
# test-draw
#--------------------------
link_directories(${toolkit_root}/peripheral_api/display)	#-L
add_executable(test-draw test-draw.c)			#-o
target_link_libraries(test-draw display easymedia pthread)	#-l
target_include_directories(test-draw PRIVATE ${api_inc})	#-I
运行效果如下:
类似的,在循环中不断提交不同的画面,就可以绘制动画了。
接下来绘制一个移动的方块:
#include <stdio.h>
#include <unistd.h>
#include <signal.h>
#include <stdlib.h>
#include <string.h>
#include <time.h>
#include <disp.h>

#define DISP_WIDTH 720
#define DISP_HEIGHT 1280
#define IMGRATIO 3

#define IMAGE_SIZE (DISP_WIDTH * DISP_HEIGHT * IMGRATIO)

static volatile int g_run = 0;
static void sigterm_handler(int sig)
{
    fprintf(stderr, "signal %d\n", sig);
    g_run = 0;
    printf("exit %s...\n", __func__);
}

void draw_box(char* disp_buffer, int x0, int y0, int size, int color)
{
    int x, y;
    for (x = 0; x < DISP_WIDTH; x++) {
        for (y = 0; y < DISP_HEIGHT; y++) {
            int* pix = (int*)&disp_buffer[(y * DISP_WIDTH + x) * IMGRATIO];
            if ((x0 <= x && x < x0 + size) && (y0 < y && y < y0 + size)) {
                *pix = color;
            }
        }
    }
}

int main()
{
    char* pbuf = NULL;
    int ret = 0;

    signal(SIGINT, sigterm_handler);

    /* 1、准备图像数据 */
    pbuf = (char*)malloc(IMAGE_SIZE);
    if (!pbuf) {
        printf("malloc error: %s, %d\n", __func__, __LINE__);
        return -1;
    }

    memset(pbuf, 0, IMAGE_SIZE);

    /* 2、初始化显示 */
    ret = disp_init(DISP_WIDTH, DISP_HEIGHT); // RGB888 default
    if (ret) {
        printf("disp_init() error func:%s, line:%d\n", __func__, __LINE__);
        goto exit1;
    }

    g_run = 1;
    int x = 0, y = 0;     // 方块位置
    int dx = 5, dy = 5;   // 方块移动步长
    int size = 80;        // 方块大小
    int color = 0xFFFFFF; // 方块颜色: 白色
    while (g_run) {
        // 清空画面
        memset(pbuf, 0, IMAGE_SIZE);

        // 绘制方块
        draw_box(pbuf, x, y, size, color);

        // 提交显示
        disp_commit(pbuf, IMAGE_SIZE);

        // 绘制位置
        x += dx;
        y += dy;

        // 横向到边了
        if (x + size >= DISP_WIDTH || x == 0) {
            dx = -dx;
        }

        // 纵向到边了
        if (y + size >= DISP_HEIGHT || y == 0) {
            dy = -dy;
        }
    }

    disp_exit();
exit1:
    free(pbuf);
    pbuf = NULL;

    return 0;
}
这段代码的运行效果如下视频。
更多回帖
 长按上方图片保存到相册
 复制链接
复制链接