
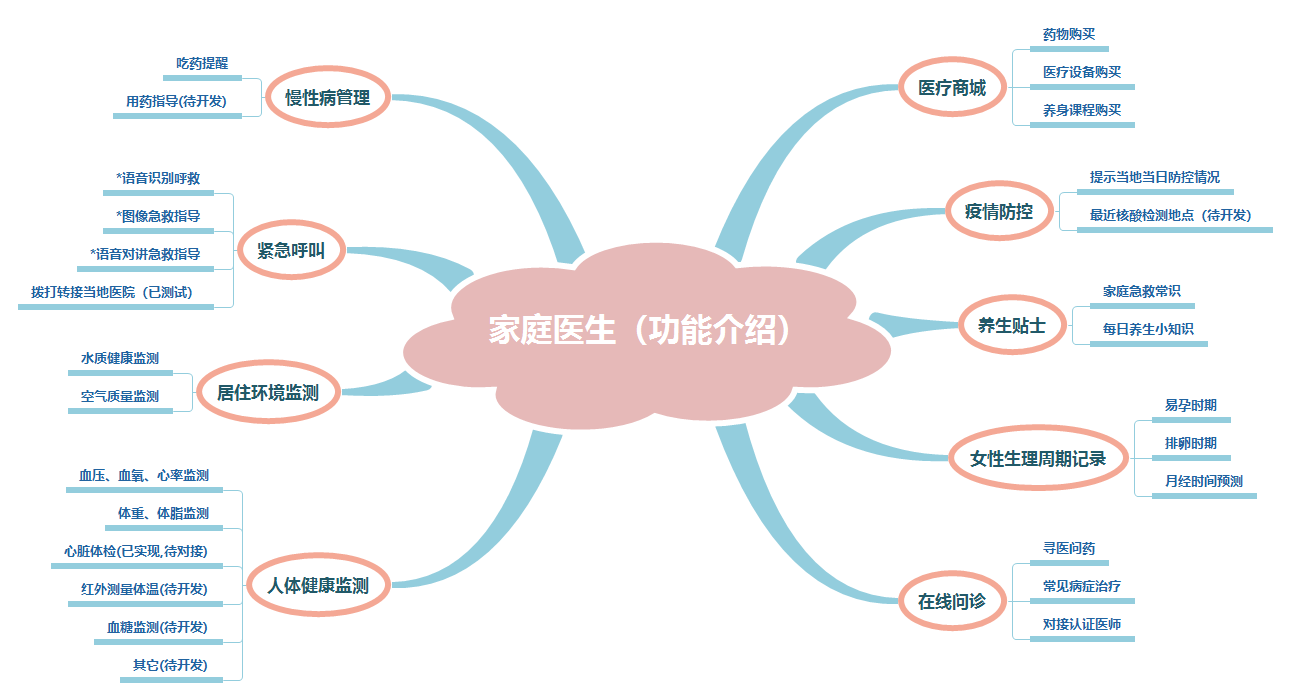
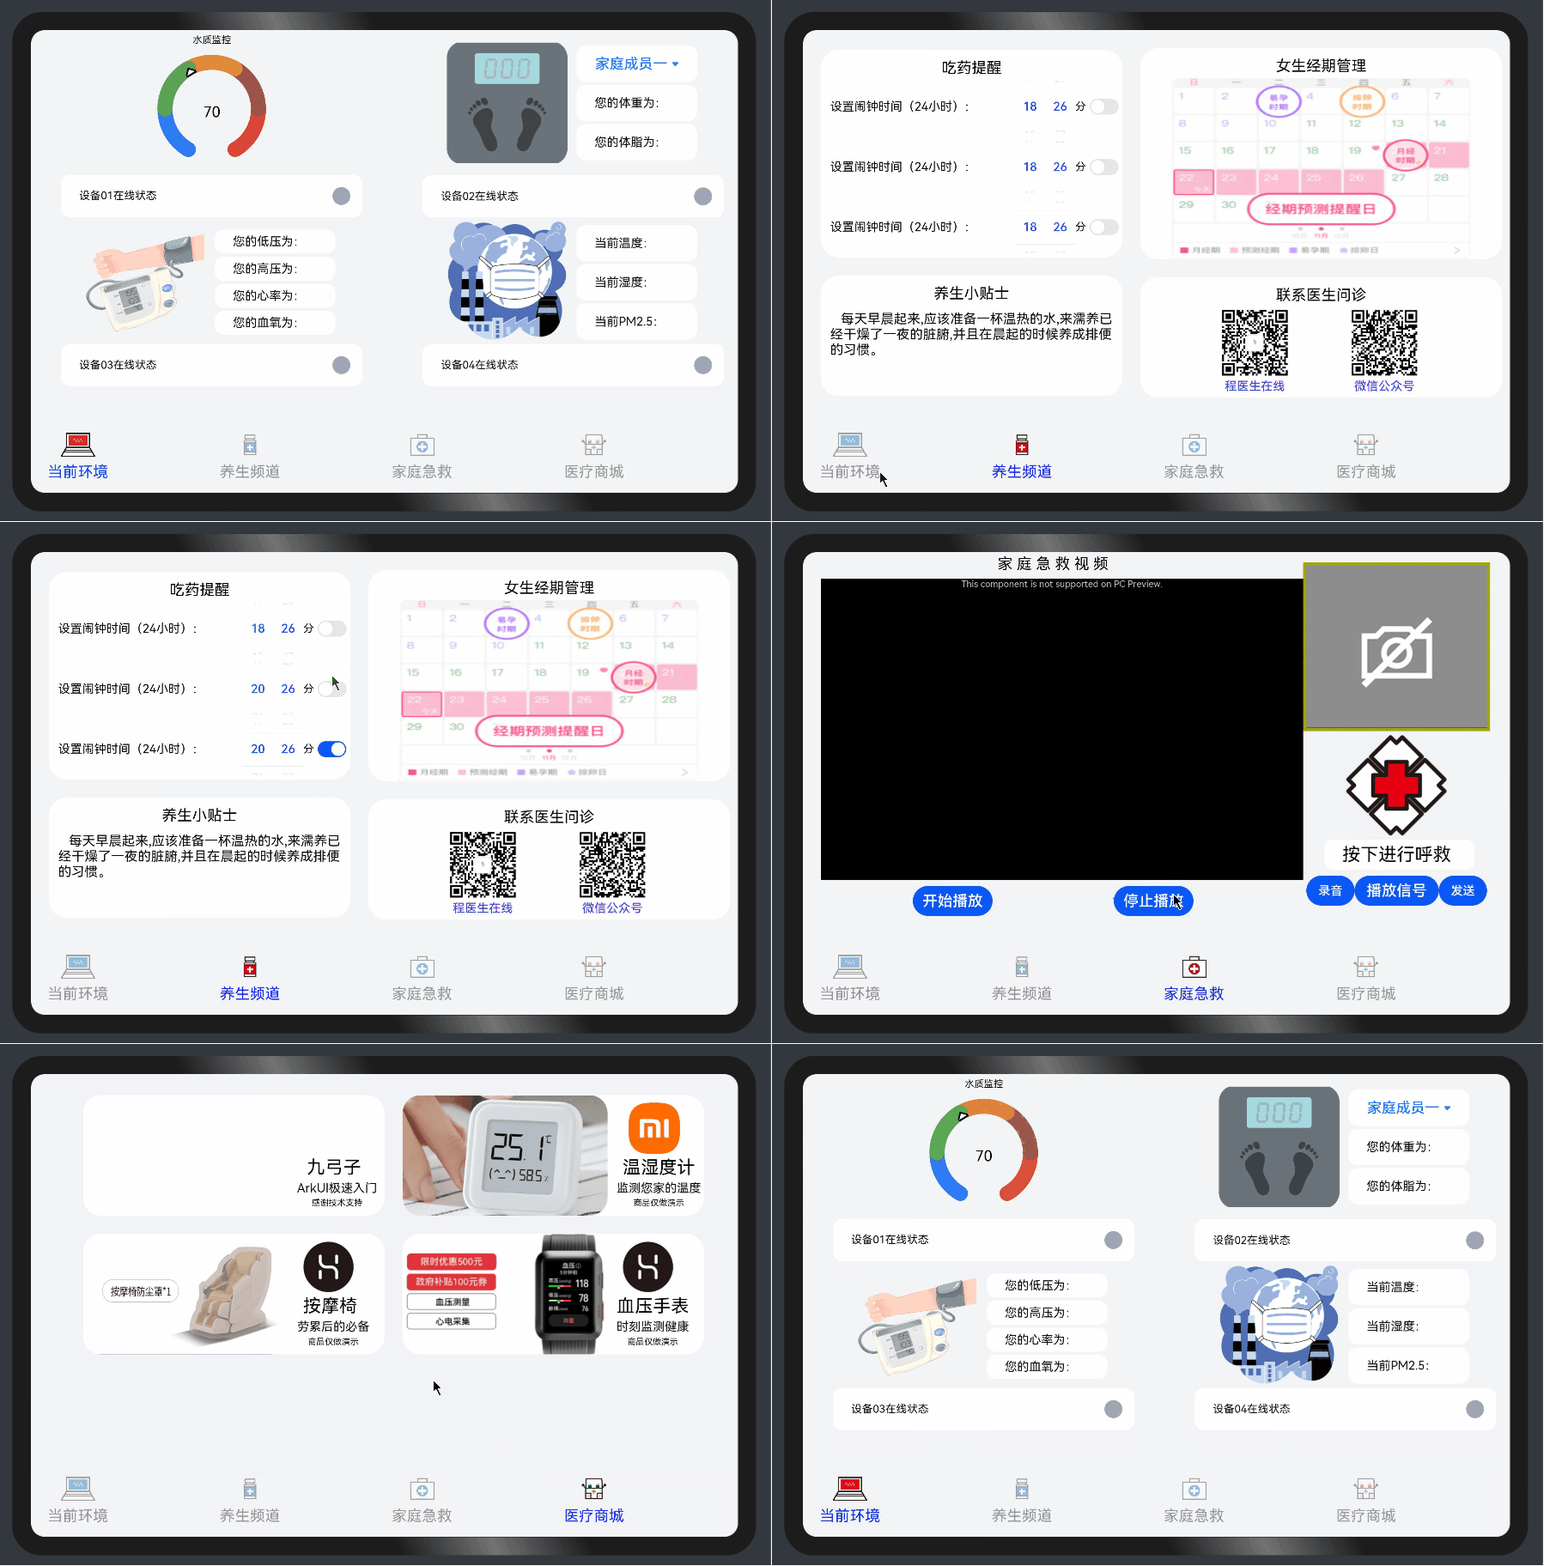
该组件可将界面分为多个页面(如上图所示),每个角标可设置对应的图标和文字。
// xxx.ets
@Entry
@Component
struct TabContentExample {
@State fontColor: string = 'rgba(0, 0, 0, 0.4)'
@State selectedFontColor: string = 'rgba(10, 30, 255, 1)'
@State currentIndex: number = 0
private controller: TabsController = new TabsController()
@Builder TabBuilder(index: number) {
Column() {
Image(this.currentIndex === index ? '点击前图片' : '点击后图片')
.width(10)
.height(10)
.opacity(this.currentIndex === index ? 1 : 0.4)
.objectFit(ImageFit.Contain)
Text(`Tab${(index > 2 ? (index - 1) : index) + 1}`)
.fontColor(this.currentIndex === index ? this.selectedFontColor : this.fontColor)
.fontSize(10)
.margin({top: 2})
}
}
build() {
Column() {
Tabs({ barPosition: BarPosition.End, controller: this.controller }) {
TabContent() {
Flex({justifyContent: FlexAlign.Center}) {
Text('Tab1').fontSize(32)
}
}.tabBar(this.TabBuilder(0))
TabContent() {
Flex({justifyContent: FlexAlign.Center}) {
Text('Tab2').fontSize(32)
}
}.tabBar(this.TabBuilder(1))
}
.vertical(false)
.barWidth(300).barHeight(56)
.onChange((index: number) => {
this.currentIndex = index
})
.width('90%').backgroundColor('rgba(241, 243, 245, 0.95)')
}.width('100%').height(200).margin({ top: 5 })
}
}
如上方,可实现同页面下两个选项显示。
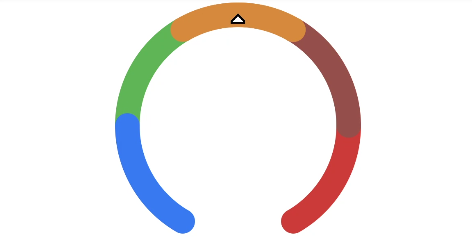
该组件可实现将数据图形化,把number类型数据转化为多段图形,更能直观的表现当前数值的大小和数值大小对应的程度。
Gauge({ value: 50, min: 0, max: 100 })
        .startAngle(210).endAngle(150)
        .colors([[0x317AF7, 1], [0x5BA854, 1], [0xE08C3A, 1], [0x9C554B, 1], [0xD94838, 1]])
        .strokeWidth(20)
        .width(200).height(200)
其中Toggle是勾选框样式、状态按钮样式及开关样式。TimePicker可以对时间进行滚动。
官方文档链接:
通过提供视频URL以及窗体大小,可以实现本地视频/网络视频的播放、暂停、停止等。
如果要使用网络视频,需要ohos.permission.INTERNET权限(详细可见三.(1))
说明:
- 该组件从API Version 8开始支持。后续版本如有新增内容,则采用上角标单独标记该内容的起始版本。
- 示例效果请以真机运行为准,当前IDE预览器不支持。
提供具有网页显示能力的Web组件,通过该组件可以实现页面内网页的展示。
@Entry
@Component
struct WebComponent {
  controller:WebController = new WebController();
  build() {
    Column() {
      Web({ src:'www.baidu.com', controller:this.controller })
        .width('100%')
        .height('100%')
    }
  }
}
说明: 从API Version 7开始支持。后续版本如有新增内容,则采用上角标单独标记该内容的起始版本。通过CustomDialogController类显示自定义弹窗。
@CustomDialog
struct CustomDialogExample {
controller: CustomDialogController
web_controller:WebController = new WebController();
cancel: () => void
confirm: () => void
build() {
Column() {
Web({ src:'http://www.baidu.com', controller:this.web_controller })
.width('100%')
.height('100%')
}.width('290vp')
.height('300vp')
}
}
@Entry
@Component
struct Index {
dialogController: CustomDialogController = new CustomDialogController({
builder: CustomDialogExample({ cancel: this.onCancel, confirm: this.onAccept }),
cancel: this.existApp,
autoCancel: true
})
onPageShow(){
this.dialogController.open()
}
build()
{
}
}
如上方程序,实现了开机时弹出一个载入网页的弹窗。
竖向排列(Column):
@State srtText: string = "测试变量";
 Text(this.srtText) //动态
        .fontSize(60)
        .fontWeight(FontWeight.Bold)
        .fontColor("#e94674")
      Button() {    //按钮控件
        Text('点击')
          .fontSize(50)
          .fontWeight(FontWeight.Bold)
      }.type(ButtonType.Capsule)
      .margin({
        top: 200
      })
      .width('50%')
      .height('10%')
      .backgroundColor('#0D9FFB')
      .onClick(() => {    //点击事件
          this.srtText = "更改内容"//更改数据
      })
在使用 @State变量对组件进行刷新时,发现只能在build中实现动态刷新,在外部创建全局变量或者外部函数的方式都不能实现,查阅资料后得到如下部分:
官方文档: https://docs.openharmony.cn/pages/v3.1/zh-cn/application-dev/ui/ts-application-states-appstorage.md/
在管理组件拥有的状态中,已经定义了如何将组件的状态变量与父组件或祖先组件中的@State装饰的状态变量同步,主要包括@Prop、@Link、@Consume。
本章节定义如何将组件变量与AppStorage同步,主要提供@StorageLink和@StorageProp装饰器。
组件通过使用@StorageLink(key)装饰的状态变量,与AppStorage建立双向数据绑定,key为AppStorage中的属性键值。当创建包含@StorageLink的状态变量的组件时,该状态变量的值将使用AppStorage中的值进行初始化。在UI组件中对@StorageLink的状态变量所做的更改将同步到AppStorage,并从AppStorage同步到任何其他绑定实例中,如PersistentStorage或其他绑定的UI组件。
组件通过使用@StorageProp(key)装饰的状态变量,将与AppStorage建立单向数据绑定,key标识AppStorage中的属性键值。当创建包含@StoageProp的状态变量的组件时,该状态变量的值将使用AppStorage中的值进行初始化。AppStorage中的属性值的更改会导致绑定的UI组件进行状态更新。
let varA = AppStorage.Link('varA')
let envLang = AppStorage.Prop('languageCode')
@Entry
@Component
struct ComponentA {
@StorageLink('varA') varA: number = 2
@StorageProp('languageCode') lang: string = 'en'
private label: string = 'count'
private aboutToAppear() {
this.label = (this.lang === 'zh') ? '数' : 'Count'
}
build() {
Row({ space: 20 }) {
Button(`${this.label}: ${this.varA}`)
.onClick(() => {
AppStorage.Set<number>('varA', AppStorage.Get<number>('varA') + 1)
})
Button(`lang: ${this.lang}`)
.onClick(() => {
if (this.lang === 'zh') {
AppStorage.Set<string>('languageCode', 'en')
} else {
AppStorage.Set<string>('languageCode', 'zh')
}
this.label = (this.lang === 'zh') ? '数' : 'Count'
})
}
}
}
即通过AppStorage.Link和 @StorageLink的方式,可实现外部动态刷新Text组件和image组件(等等之类都可以),方便我们在全局调用时更新数据。
在基础UI和TCP上无需调用权限,单当使用复杂功能(文件读写、摄像头、地理位置、录音等)需要在系统中声明权限,而官方的权限说明没有很细致(造成程序没问题但无法实现功能),新人容易在此卡坑
先看下官方的权限定义: https://docs.openharmony.cn/pages/v3.2Beta/zh-cn/application-dev/security/permission-list.md/
如果需要修改,请在Config.json中修改,其位置是"module"下新建"reqPermissions",如下:
"reqPermissions": [
      {
        "name": "ohos.permission.MICROPHONE"
      },
      {
        "name": "ohos.permission.CAMERA"
      },
      {
        "name": "ohos.permission.MEDIA_LOCATION"
      },
      {
        "name": "ohos.permission.WRITE_MEDIA"
      },
      {
        "name": "ohos.permission.READ_MEDIA"
      },
      {
        "name": "ohos.permission.INTERNET"
      }
    ]
以上是申请了麦克风、摄像头、本地图库、媒体读写和网络访问(个别访问API使用)的权限。
对于Harmony和其它设备来说,应用横屏是系统内置的功能,检测到重力或者手动调整即可实现,但是在OpenHarmony 3.2Beta的DAYU200上并不支持,而中控端常见是横屏使用,所以这里是踩的第一个坑。
先看官方定义:在Config.json中修改,其位置是"module"下"orientation"的属性,设置为“landscape”即可实现横屏,在Harmony中有效,而DAYU200暂时不支持横屏。
此时出现了矛盾,最后选择另一种方法来解决这个难题。
组件的通用属性中包括图行变换环节:
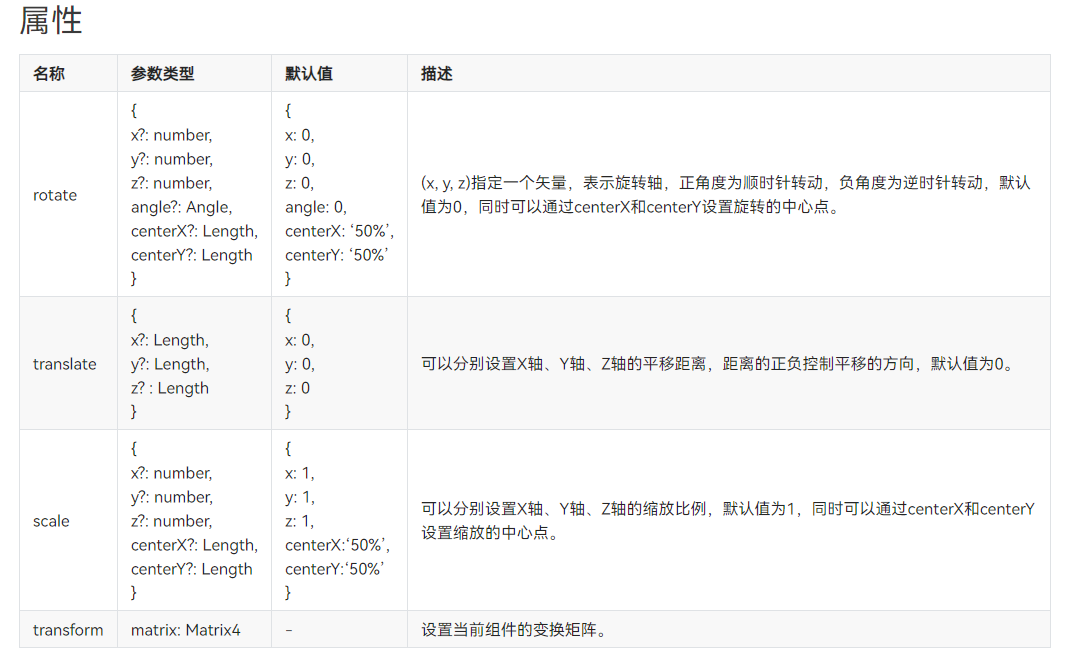
在二.(5)中提到了transform,而横屏使用到了rotate特性,针对整个build实现90度旋转即可达到横屏的效果,经实测以下代码刚好满足DAYU200,有同样问题的可以试着这样解决。
.width(1200).height(720)
    .rotate({
      x:0,
      y:0,
      z: 1,
      centerX: 0,
      centerY: 0,
      angle: 90
    })
    .translate({ x: 0, y: -720 })
该部分参考官方手册: https://docs.openharmony.cn/pages/v3.2Beta/zh-cn/application-dev/reference/apis/js-apis-socket.md/
import socket from '@ohos.net.socket';
let tcp = socket.constructTCPSocketInstance();
tcp.bind({address: '0.0.0.0', port: 12121, family: 1}, err => {
if (err) {
console.log('bind fail');
return;
}
console.log('bind success');
})
tcp.on('message', value => {
console.log("on message, message:" + value.message + ", remoteInfo:" + value.remoteInfo)
let da = resolveArrayBuffer(value.message);
let dat_buff = String(da);
//此处对接受到的数据进行处理
});
//将接受到的数据转化为文本型
function resolveArrayBuffer(message){
if (message instanceof ArrayBuffer) {
let dataView = new DataView(message)
let str = ""
for (let i = 0;i < dataView.byteLength; ++i) {
let c = String.fromCharCode(dataView.getUint8(i))
if (c !== "\n") {
str += c
}
}
return str;
}
}
//数据的发送函数
function send_once(Con_buff) {
if (flag == false) {
let promise = tcp.connect({ address: { address: 'xxx.xxx.xxx.xxx', port: xxxx, family: 1 }, timeout: 2000 });
promise.then(() => {
console.log('connect success');
flag = true;
tcp.send({
data: Con_buff
}, err => {
if (err) {
console.log('send fail');
return;
}
console.log('send success');
})
}).catch(err => {
console.log('connect fail');
});
} else if (flag == true) {
tcp.send({
data: Con_buff
}, err => {
if (err) {
console.log('send fail');
return;
}
console.log('send success');
})
}
}
针对IMAGE控件,其支持三种类型的图片显示,包括图像数据、本地路径/网络路径、Base64编码的图片显示
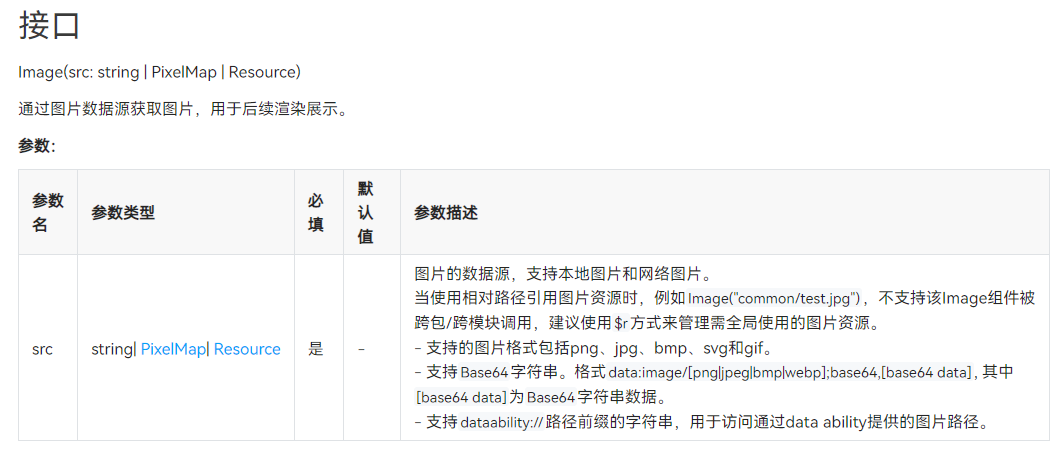
本应用为了支持后续的软总线和多屏互联以及应用流转的长期发展来看,使用dataaility地址来完成资源调度,其中dataaility:///代表本机,dataaility://后接设备ID,在给予权限后和实现跨设备交互。
因DAYU200的相机控制需要API9,且API9和API8对应的HTD软件不同,且API9仍在测试阶段,本应用是基于API8进行开发
其中主要使用到的是mediaLibrary.getMediaLibrary.startMediaSelect()函数
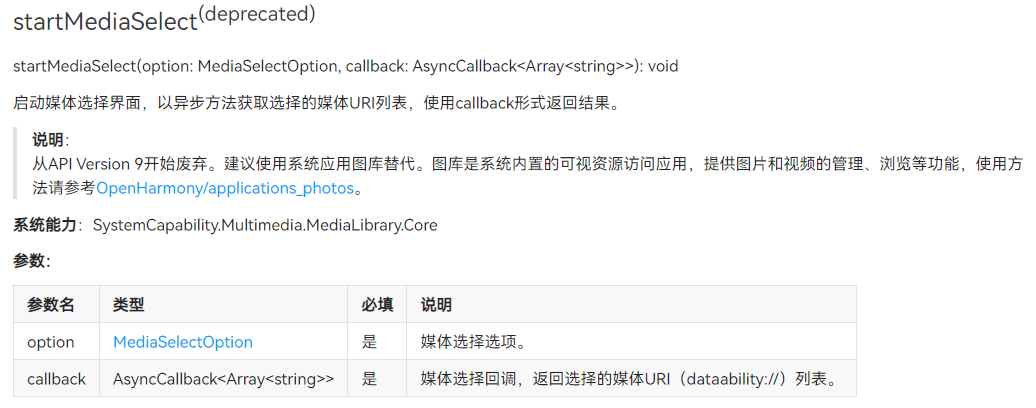
图片数据(一键求救后需要发送本地图片)的上传选择HTTP来实现,因为使用DAYU200相机拍摄的文件大小为4M左右,需使用传输协议来实现,这边选择使用HTTP文件协议
官网文档: https://docs.openharmony.cn/pages/v3.2Beta/zh-cn/application-dev/reference/apis/js-apis-request.md/
此处因我使用的是HTTP而非HTTPS,则需要在Config.json中修改cleartextTraffic属性:
"deviceConfig": {
"default": {
"network": {
"cleartextTraffic": true
}
}
}
此处图片路径选择图库返回的路径,进行提交,选择并上传:
function Choose_image()
{
let option = {
type : "image",
count : 1
};
ge_media.startMediaSelect(option, (err, value) => {
if (err) {
return;
}
AppStorage.Set<String>('var_IMG',value);
IMG_URL = value.toString();
let file1 = { filename: "test", name: "test", uri: IMG_URL, type: "jpg" };
let data = { };
let header = { };
let uploadTask;
request.upload({ url: 'HTTP服务器地址', header: header, method: "POST", files: [file1], data: [data] }).then((data) => {
uploadTask = data;
send_once("a6/"+IMG_URL);
}).catch((err) => {
console.error('Failed to request the upload. Cause: ' + JSON.stringify(err));
})
});
}
音频录制管理类,用于录制音频媒体。在调用AudioRecorder的方法前,需要先通过createAudioRecorder() 构建一个AudioRecorder实例。
音频录制demo可参考: 音频录制开发指导
录音数据这里是现在本地生成一个m4a文件,之后通过数据http上传的形式实现服务器发送,这里我参考了官方例程中的录音机示例:

经过处理后,从中提取出录音相关的三个ts文件(即使用我提取的三个文件就可以实现录音):MediaManger.ts/Record.ts/RecordModel.ts
MediaManger:
// @ts-nocheck
/*
* Copyright (c) 2022 Huawei Device Co., Ltd.
* Licensed under the Apache License, Version 2.0 (the "License");
* you may not use this file except in compliance with the License.
* You may obtain a copy of the License at
*
* http://www.apache.org/licenses/LICENSE-2.0
*
* Unless required by applicable law or agreed to in writing, software
* distributed under the License is distributed on an "AS IS" BASIS,
* WITHOUT WARRANTIES OR CONDITIONS OF ANY KIND, either express or implied.
* See the License for the specific language governing permissions and
* limitations under the License.
*/
import mediaLibrary from '@ohos.multimedia.mediaLibrary'
import dataStorage from '@ohos.data.storage'
import featureAbility from '@ohos.ability.featureAbility'
import { Record } from './Record'
const TAG = '[Recorder.MediaManager]'
let PATH: string = ''
class MediaManager {
private mediaTest: mediaLibrary.MediaLibrary = mediaLibrary.getMediaLibrary()
private storage: any = undefined
constructor() {
this.initStorage()
}
initStorage() {
let context = featureAbility.getContext()
context.getFilesDir().then(path => {
PATH = path + '/'
console.info(`${TAG}create store PATH=${PATH}`)
this.storage = dataStorage.getStorageSync(path + '/myStore')
console.info(`${TAG}create store success`)
})
}
async createAudioFile() {
this.mediaTest = mediaLibrary.getMediaLibrary()
let info = {
suffix: '.m4a', directory: mediaLibrary.DirectoryType.DIR_AUDIO
}
//let dateTimeUtil = new DateTimeUtil()
//let name = `${dateTimeUtil.getDate()}_${dateTimeUtil.getTime()}`
let name = '1234'
let displayName = `${name}${info.suffix}`
//Logger.info(TAG, `createAudioFile displayName=${displayName}`)
let publicPath = await this.mediaTest.getPublicDirectory(info.directory)
//Logger.info(TAG, `createAudioFile publicPath=${publicPath}`)
return await this.mediaTest.createAsset(mediaLibrary.MediaType.AUDIO, displayName, publicPath)
}
async queryAllAudios() {
let fileKeyObj = mediaLibrary.FileKey
let fetchOp = {
selections: `${fileKeyObj.MEDIA_TYPE}=?`,
selectionArgs: [`${mediaLibrary.MediaType.AUDIO}`],
}
const fetchFileResult = await this.mediaTest.getFileAssets(fetchOp)
let result: Array<Record> = []
//Logger.info(TAG, `queryAllAudios fetchFileResult=${fetchFileResult.getCount()}`)
if (fetchFileResult.getCount() > 0) {
let fileAssets = await fetchFileResult.getAllObject()
for (let i = 0; i < fileAssets.length; i++) {
let record = new Record(fileAssets[i], false)
result.push(record)
}
}
return result
}
async queryFile(id: number) {
let fileKeyObj = mediaLibrary.FileKey
if (id !== undefined) {
let args = id.toString()
let fetchOp = {
selections: `${fileKeyObj.ID}=?`,
selectionArgs: [args],
}
const fetchFileResult = await this.mediaTest.getFileAssets(fetchOp)
//Logger.info(TAG, `fetchFileResult.getCount() = ${fetchFileResult.getCount()}`)
const fileAsset = await fetchFileResult.getAllObject()
return new Record(fileAsset[0], false)
} else {
return undefined
}
}
deleteFile(uri) {
//Logger.info(TAG, `deleteFile,uri = ${uri}`)
return this.mediaTest.deleteAsset(uri)
}
onAudioChange(callback: () => void) {
this.mediaTest.on('audioChange', () => {
callback()
})
}
saveFileDuration(name: string, value) {
this.storage.putSync(name, value)
this.storage.flush()
}
getFileDuration(name: string) {
return this.storage.getSync(name, '00:00')
}
}
export default new MediaManager()
Record:
/*
* Copyright (c) 2022 Huawei Device Co., Ltd.
* Licensed under the Apache License, Version 2.0 (the "License");
* you may not use this file except in compliance with the License.
* You may obtain a copy of the License at
*
* http://www.apache.org/licenses/LICENSE-2.0
*
* Unless required by applicable law or agreed to in writing, software
* distributed under the License is distributed on an "AS IS" BASIS,
* WITHOUT WARRANTIES OR CONDITIONS OF ANY KIND, either express or implied.
* See the License for the specific language governing permissions and
* limitations under the License.
*/
import mediaLibrary from '@ohos.multimedia.mediaLibrary'
import MediaManager from './MediaManager'
export class Record {
fileAsset: mediaLibrary.FileAsset
title: string
duration: string
isCheck: boolean
constructor(fileAsset: mediaLibrary.FileAsset, isCheck: boolean) {
this.fileAsset = fileAsset
if (fileAsset) {
if (fileAsset.duration > 0) {
//this.duration = dateTimeUtil.getDurationString(fileAsset.duration)
this.duration = '124'
} else {
this.duration = MediaManager.getFileDuration(fileAsset.title)
}
this.title = fileAsset.title
} else {
this.duration = '00:00'
this.title = ''
}
this.isCheck = isCheck
}
}
RecordModel:
/*
* Copyright (c) 2022 Huawei Device Co., Ltd.
* Licensed under the Apache License, Version 2.0 (the "License");
* you may not use this file except in compliance with the License.
* You may obtain a copy of the License at
*
* http://www.apache.org/licenses/LICENSE-2.0
*
* Unless required by applicable law or agreed to in writing, software
* distributed under the License is distributed on an "AS IS" BASIS,
* WITHOUT WARRANTIES OR CONDITIONS OF ANY KIND, either express or implied.
* See the License for the specific language governing permissions and
* limitations under the License.
*/
import media from '@ohos.multimedia.media'
const TAG: string = '[Recorder.RecordModel]'
let audioConfig = {
audioSourceType: 1,
audioEncoder: 3,
audioEncodeBitRate: 22050,
audioSampleRate: 22050,
numberOfChannels: 2,
format: 6,
uri: ''
}
export class RecordModel {
private audioRecorder = undefined
initAudioRecorder() {
this.release();
this.audioRecorder = media.createAudioRecorder()
//Logger.info(TAG, 'create audioRecorder success')
}
release() {
if (typeof (this.audioRecorder) != `undefined`) {
//Logger.info(TAG, 'case audioRecorder release')
this.audioRecorder.release()
this.audioRecorder = undefined
}
}
startRecorder(pathName, callback) {
//Logger.info(TAG, `enter the startRecorder,pathName=${pathName}, audioRecorder=${JSON.stringify(this.audioRecorder)}`)
if (typeof (this.audioRecorder) != 'undefined') {
//Logger.info(TAG, 'enter the if')
this.audioRecorder.on('prepare', () => {
//Logger.info(TAG, 'setCallback prepare case callback is called')
this.audioRecorder.start()
})
this.audioRecorder.on('start', () => {
//Logger.info(TAG, 'setCallback start case callback is called')
callback()
})
//Logger.info(TAG, 'start prepare')
audioConfig.uri = pathName
this.audioRecorder.prepare(audioConfig)
} else {
//Logger.info(TAG, 'case failed, audioRecorder is null')
}
}
pause(callback) {
// Logger.info(TAG, 'audioRecorder pause called')
if (typeof (this.audioRecorder) != `undefined`) {
this.audioRecorder.on('pause', () => {
// Logger.info(TAG, 'audioRecorder pause finish')
callback()
})
this.audioRecorder.pause()
}
}
resume(callback) {
//Logger.info(TAG, 'audioRecorder resume called')
if (typeof (this.audioRecorder) != `undefined`) {
this.audioRecorder.on('resume', () => {
// Logger.info(TAG, 'audioRecorder resume finish')
callback()
})
this.audioRecorder.resume()
}
}
finish(callback) {
if (typeof (this.audioRecorder) != `undefined`) {
this.audioRecorder.on('stop', () => {
//Logger.info(TAG, 'audioRecorder stop called')
this.audioRecorder.release()
callback()
})
this.audioRecorder.stop()
}
}
}
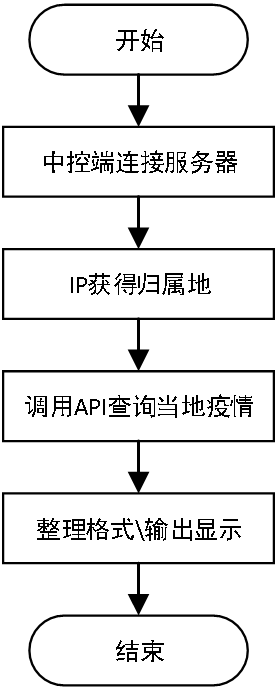
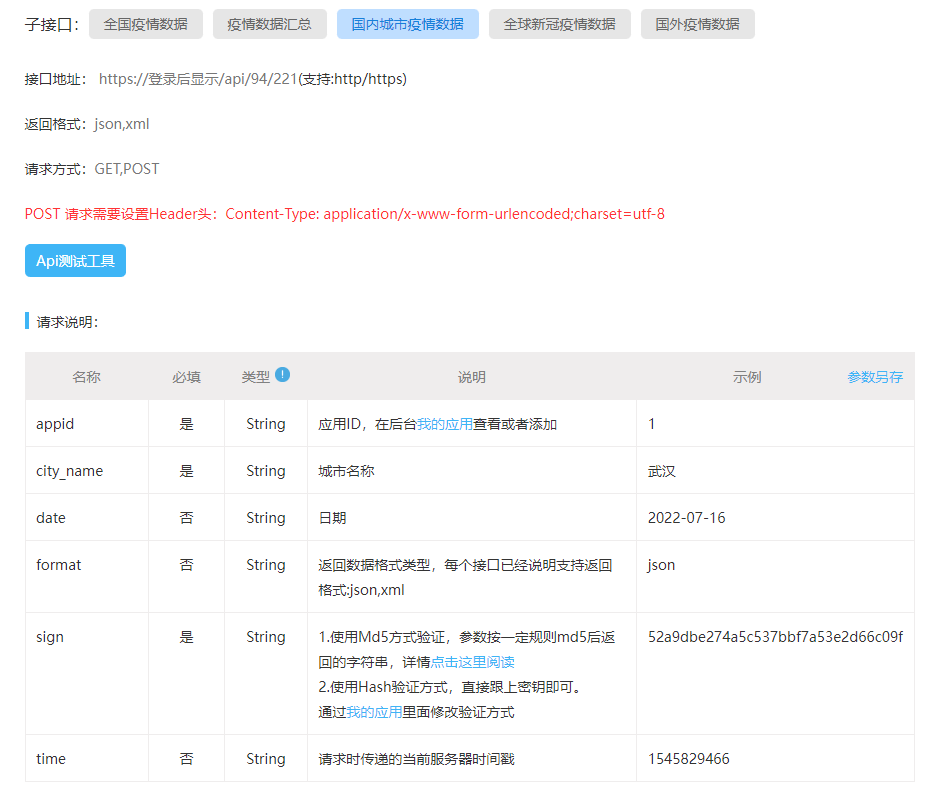
疫情的信息是动态实现的,首先当中控端连接服务器时会提供IP,服务器根据IP的归属地获得当前城市名称,由城市名称使用API获得当地当日疫情信息。

 举报
举报


 举报
举报


 举报
举报
更多回帖
