当在串口终端输入各种命令的时候,RT-Thread 系统是怎么实现的
在我们使用终端的时候,输入tab键就会补全命令,输入回车就会执行命令,下面我们来一起分析一下RT-Thread的这部分源码吧
但是在这之前我们需要看的是,这些命令是如何导出供我们去运行的,导出命令的方式有很多
MSH_CMD_EXPORT(name, desc); //自定义 msh 命令
MSH_CMD_EXPORT_ALIAS(command, alias, desc) //自定义 msh 命令重命名
FINSH_FUNCtiON_EXPORT(name, desc); //自定义 C-Style 命令 FINSH_VAR_EXPORT(name, type, desc); //自定义 C-Style 变量
FINSH_FUNCTION_EXPORT_ALIAS(name, alias, desc); //自定义 C-Style 命令重命名
下面我们就从最常用的一个MSH_CMD_EXPORT来去分析,其他的类似
MSH_CMD_EXPORT命令的原理
long version(void)
{
rt_show_version();
return 0;
}
MSH_CMD_EXPORT(version, show RT-Thread version information);
第一层封装
#define MSH_CMD_EXPORT(command, desc)
FINSH_FUNCTION_EXPORT_CMD(command, __cmd_##command, desc)
上述的##是用于连接
例如:
MSH_CMD_EXPORT(version, show RT-Thread version information);
调用之后会变成
FINSH_FUNCTION_EXPORT_CMD(version, __cmd_version, show RT-Thread version information)
第二层封装
#define FINSH_FUNCTION_EXPORT_CMD(name, cmd, desc)
const char __fsym_##cmd##_name[] SECTION(".rodata.name") = #cmd;
const char __fsym_##cmd##_desc[] SECTION(".rodata.name") = #desc;
RT_USED const struct finsh_syscall __fsym_##cmd SECTION("FSymTab")=
{
__fsym_##cmd##_name,
__fsym_##cmd##_desc,
(syscall_func)&name
};
上述的#将值转化为字符串
例如:
FINSH_FUNCTION_EXPORT_CMD(version, __cmd_version, show RT-Thread version information)
封装中的cmd表示__cmd_version,而#cmd表示"__cmd_version"
SECTION(".rodata.name")将变量放入.rodata.name段中
(syscall_func)&name将值带入也就是(syscall_func)&version它指向version函数的指针
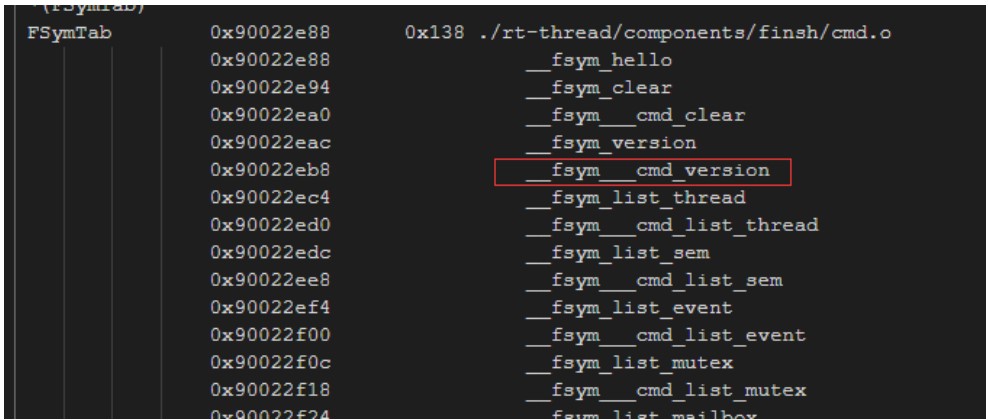
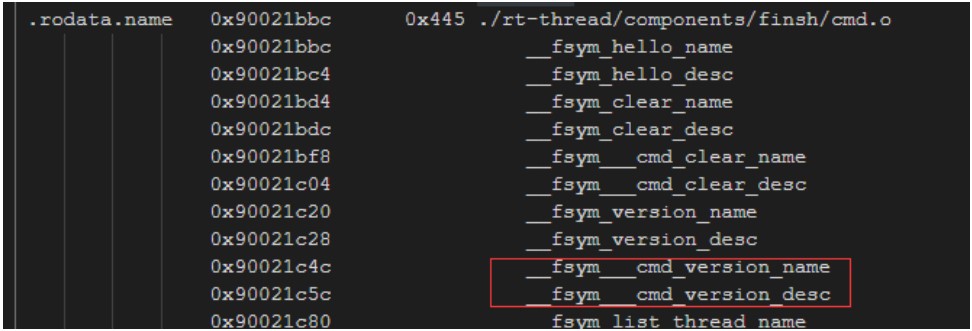
注,下图是rtthread.map文件中的一些段信息,这里不是对应的值,而是宏定义导出的名称


总结一下:这里是将命令的名字和描述的值放在了.rodata.name段,将它们的地址和函数的地址一起组成结构体(也就是一段连续的地址)放在了FSymTab段,最后供其他程序从段中寻找地址去调用对应的函数,这就是MSH_CMD_EXPORT宏定义要做的事命令存放的起始地址
上边提到了FSymTab段,说把终端命令的信息放在了这里,那么我们该怎么获得这个地址呢
首先设置FSymTab段,FSymTab$a表示start,FSymTab$z表示end,
#pragma section("FSymTab$a", read)
const char __fsym_begin_name[] = "__start";
const char __fsym_begin_desc[] = "begin of finsh";
__declspec(allocate("FSymTab$a")) const struct finsh_syscall __fsym_begin =
{
__fsym_begin_name,
__fsym_begin_desc,
NULL
};
#pragma section("FSymTab$z", read)
const char __fsym_end_name[] = "__end";
const char __fsym_end_desc[] = "end of finsh";
__declspec(allocate("FSymTab$z")) const struct finsh_syscall __fsym_end =
{
__fsym_end_name,
__fsym_end_desc,
NULL
};
但你要说这个段的开始地址和结束地址的具体值到底怎么来的,我感觉是link.lds文件中这段代码在最后链接的时候堆积出来的,这些就不深究了
. = ALIGN(4);
__fsymtab_start = .;
KEEP(*(FSymTab))
__fsymtab_end = .;
在finsh_system_init函数中有一下的代码
unsigned int *ptr_begin, *ptr_end;
ptr_begin = (unsigned int *)&__fsym_begin;
ptr_begin += (sizeof(struct finsh_syscall) / sizeof(unsigned int));
while (*ptr_begin == 0) ptr_begin ++;
ptr_end = (unsigned int *) &__fsym_end;
ptr_end --;
while (*ptr_end == 0) ptr_end --;
finsh_system_function_init(ptr_begin, ptr_end);
void finsh_system_function_init(const void *begin, const void *end)
{
_syscall_table_begin = (struct finsh_syscall *) begin;
_syscall_table_end = (struct finsh_syscall *) end;
}
通过这两段代码来把FSymTab段的起始地址和结束地址分别保存在_syscall_table_begin和_syscall_table_end变量中以供下边查找使用
下面来看一下finsh_thread_entry函数
还以version这个命令为例
当我们在终端按下键盘按键的时候,都会通过void finsh_thread_entry(void *parameter)函数中的ch = finsh_getchar();去获取字符,然后去判断该字符是一些输入值(字母类的),还是一些属性值(回车、tab、上下左右键等)(这是我自己的分类,RT-Thread内部实现没有区分)
当我们输入version会发生什么呢,RT-Thread内部是单个字母进行操作的,当我们每输入一个字符都会存在shell->line数组中
由于键盘左右键可以控制添加你漏输的字符,所以在字符输入分为两种情况,(字符删除是类似的,这里就不在说明)
//shell->echo_mode 这个变量是控制命令是否回显的
/* normal character */
if (shell->line_curpos < shell->line_position)
{
int i;
/* 将光标后面的字符整体后移一位,将新获取的字符插入,并在回显状态下输出 */
rt_memmove(&shell->line[shell->line_curpos + 1],
&shell->line[shell->line_curpos],
shell->line_position - shell->line_curpos);
shell->line[shell->line_curpos] = ch;
if (shell->echo_mode)
rt_kprintf("%s", &shell->line[shell->line_curpos]);
/* move the cursor to new position */
/* 退格到原来的光标 */
for (i = shell->line_curpos; i < shell->line_position; i++)
rt_kprintf("�");
}
else
{
/* 当光标在最后时,直接在shell->line数组最后增加就行 */
shell->line[shell->line_position] = ch;
if (shell->echo_mode)
rt_kprintf("%c", ch);
}
因为RT-Thread是支持tab键补全的,所以我们只需要输入v就可以使用tab键去补全,可以有效的防止输错的情况
tab键操作
finsh_thread_entry函数
这是判断tab键的部分,其中line_curpos表示当前已输入命令的光标位置 。line_position表示当前已输入命令的总长度 ,下面就是通过shell_auto_complete(&shell->line[0]);来把终端的命令补全,并将补全的命令长度更新到光标位置shell->line_curpos和命令总长度shell->line_position
/* handle tab key */
else if (ch == ' ')
{
int i;
/* move the cursor to the beginning of line */
for (i = 0; i < shell->line_curpos; i++)
rt_kprintf("�");
/* auto complete */
shell_auto_complete(&shell->line[0]);
/* re-calculate position */
shell->line_curpos = shell->line_position = strlen(shell->line);
continue;
}
shell_auto_complete函数
下面就来看一下shell_auto_complete函数的具体功能,首先通过msh_is_used()来判断当前的命令行终端模式,这里使用的就是msh模式,执行完msh_auto_complete函数后就输出msh />标志还有对应的补全命令(FINSH_PROMPT的内部实现就不解释了,在没有进入文件系统目录输出的就是msh />,如果进入了文件系统的路径,还会将对应的路径输出)
static void shell_auto_complete(char *prefix)
{
rt_kprintf("
");
if (msh_is_used() == RT_TRUE)
{
msh_auto_complete(prefix);
}
else
{
extern void list_prefix(char * prefix);
list_prefix(prefix);
}
rt_kprintf("%s%s", FINSH_PROMPT, prefix);
}
msh_auto_complete函数
下面看一下msh_auto_complete函数的实现
这段代码定义了一个 index 结构体指针,当指针的范围在 _syscall_table_begin 和 _syscall_table_end 范围之内时就对该指针进行解引用,这里的指针就是命令导出时放的结构体指针,所以这里就是把对应的结构体中的命令名字取出来与已经输入的命令做对比,并把全部匹配的输出,而且还在这些匹配的命令中找到最大的公共部分,作为已补全的命令,更新到shell->line数组中
struct finsh_syscall *index;
/* checks in internal command */
{
/* 从_syscall_table_begin到_syscall_table_end地址中依次把cmd名称取出来比较
* 也就是上述宏定义封装中放在FSymTab段和.rodata.name段的数据
*/
for (index = _syscall_table_begin; index < _syscall_table_end; FINSH_NEXT_SYSCALL(index))
{
/* skip finsh shell function */
if (strncmp(index->name, "__cmd_", 6) != 0) continue;
cmd_name = (const char *) &index->name[6];
if (strncmp(prefix, cmd_name, strlen(prefix)) == 0)
{
if (min_length == 0)
{
/* set name_ptr */
name_ptr = cmd_name;
/* set initial length */
min_length = strlen(name_ptr);
}
/* 比较两次段中的名字的最大相同长度 */
length = str_common(name_ptr, cmd_name);
/* 将最短的相同长度记录到min_length */
if (length < min_length)
min_length = length;
rt_kprintf("%s
", cmd_name);
}
}
}
/* auto complete string */
if (name_ptr != NULL)
{
/* 将min_length长度所对应的字符赋给prefix */
rt_strncpy(prefix, name_ptr, min_length);
}
回车键
这个键的实现是最复杂了,也是整个终端命令的精髓所在,键盘上下键的储存命令也是在这里实现的
储存命令
这段代码首先判断了当前已存指令数量shell->history_count和预设的最大储存数量FINSH_HISTORY_LINES,如果已经满了的话,则需要抛弃最早储存的指令,使储存数组向前覆盖,以储存最新的指令,如果没满的话直接将指令放在指令数量的数组shell->cmd_history[shell->history_count]里即可
当然两者都判断这次输入的指令和最近一次保存的指令是否一致, 防止出现同一个指令的连续存储(第九行和第二十八行)
static void shell_push_history(struct finsh_shell *shell)
{
if (shell->line_position != 0)
{
/* push history */
if (shell->history_count >= FINSH_HISTORY_LINES)
{
/* if current cmd is same as last cmd, don't push */
if (memcmp(&shell->cmd_history[FINSH_HISTORY_LINES - 1], shell->line, FINSH_CMD_SIZE))
{
/* move history */
int index;
for (index = 0; index < FINSH_HISTORY_LINES - 1; index ++)
{
memcpy(&shell->cmd_history[index][0],
&shell->cmd_history[index + 1][0], FINSH_CMD_SIZE);
}
memset(&shell->cmd_history[index][0], 0, FINSH_CMD_SIZE);
memcpy(&shell->cmd_history[index][0], shell->line, shell->line_position);
/* it's the maximum history */
shell->history_count = FINSH_HISTORY_LINES;
}
}
else
{
/* if current cmd is same as last cmd, don't push */
if (shell->history_count == 0 || memcmp(&shell->cmd_history[shell->history_count - 1], shell->line, FINSH_CMD_SIZE))
{
shell->current_history = shell->history_count;
memset(&shell->cmd_history[shell->history_count][0], 0, FINSH_CMD_SIZE);
memcpy(&shell->cmd_history[shell->history_count][0], shell->line, shell->line_position);
/* increase count and set current history position */
shell->history_count ++;
}
}
}
shell->current_history = shell->history_count;
}
运行导出的命令
那么在我们得到shell->line数组之后是怎么运行我们的程序的呢
#ifdef FINSH_USING_MSH
if (msh_is_used() == RT_TRUE)
{
if (shell->echo_mode)
rt_kprintf("
");
msh_exec(shell->line, shell->line_position);
}
else
#endif
{
#ifndef FINSH_USING_MSH_ONLY
/* add ';' and run the command line */
shell->line[shell->line_position] = ';';
rt_kprintf("FINSH_USING_MSH_ONLY
");
if (shell->line_position != 0) finsh_run_line(&shell->parser, shell->line);
else
if (shell->echo_mode) rt_kprintf("
");
#endif
}
rt_kprintf(FINSH_PROMPT);
memset(shell->line, 0, sizeof(shell->line));
shell->line_curpos = shell->line_position = 0;
上述代码除去一些msh之外的,可以简化成下面的形式,也就是msh_exec,加上终端提示符的输出,以及对shell结构体的清空
msh_exec(shell->line, shell->line_position);
rt_kprintf(FINSH_PROMPT);
memset(shell->line, 0, sizeof(shell->line));
shell->line_curpos = shell->line_position = 0;
msh_exec函数理解
重点还是要看msh_exec函数的实现
int msh_exec(char *cmd, rt_size_t length)
{
int cmd_ret;
/* strim the beginning of command */
while (*cmd == ' ' || *cmd == ' ')
{
cmd++;
length--;
}
if (length == 0)
return 0;
/* Exec sequence:
* 1. built-in command
* 2. module(if enabled)
*/
if (_msh_exec_cmd(cmd, length, &cmd_ret) == 0)
{
return cmd_ret;
}
#ifdef RT_USING_DFS
#ifdef DFS_USING_WORKDIR
if (msh_exec_script(cmd, length) == 0)
{
return 0;
}
#endif
#ifdef RT_USING_MODULE
if (msh_exec_module(cmd, length) == 0)
{
return 0;
}
#endif
#ifdef RT_USING_LWP
if (_msh_exec_lwp(cmd, length) == 0)
{
return 0;
}
#endif
#endif
/* truncate the cmd at the first space. */
{
char *tcmd;
tcmd = cmd;
while (*tcmd != ' ' && *tcmd != '�')
{
tcmd++;
}
*tcmd = '�';
}
rt_kprintf("%s: command not found.
", cmd);
return -1;
}
同样的除去一些msh之外的,可以简化为如下代码(一些简单的逻辑已经去除,只说一些关键的东西)
下面的代码通过while,把命令前面空格和” ”去掉,然后去执行_msh_exec_cmd函数,如果没有找到这个命令的话将会执行下面的代码,去截取第一个空格前的指令,并输出具体信息,%s: command not found.
int msh_exec(char *cmd, rt_size_t length)
{
int cmd_ret;
/* strim the beginning of command */
while (*cmd == ' ' || *cmd == ' ')
{
cmd++;
length--;
}
if (_msh_exec_cmd(cmd, length, &cmd_ret) == 0)
{
return cmd_ret;
}
/* truncate the cmd at the first space. */
{
char *tcmd;
tcmd = cmd;
while (*tcmd != ' ' && *tcmd != '�')
{
tcmd++;
}
*tcmd = '�';
}
rt_kprintf("%s: command not found.
", cmd);
return -1;
}
那么下面就看一下_msh_exec_cmd函数的具体实现
_msh_exec_cmd函数理解
RT_ASSERT(cmd);判断指针cmd是否为空,当为空指针时进入断言
然后通过while循环得到指令名字的长度,再使用msh_get_cmd获取其对应的函数指针,使用msh_split将命令连带的参数信息放在argc指针数组中,使用cmd_func(argc, argv);调用运行,就相当于运行了MSH_CMD_EXPORT导出的函数
static int _msh_exec_cmd(char *cmd, rt_size_t length, int *retp)
{
int argc;
rt_size_t cmd0_size = 0;
cmd_function_t cmd_func;
char *argv[FINSH_ARG_MAX];
RT_ASSERT(cmd);
RT_ASSERT(retp);
/* find the size of first command */
while ((cmd[cmd0_size] != ' ' && cmd[cmd0_size] != ' ') && cmd0_size < length)
cmd0_size ++;
if (cmd0_size == 0)
return -RT_ERROR;
cmd_func = msh_get_cmd(cmd, cmd0_size);
if (cmd_func == RT_NULL)
return -RT_ERROR;
/* split arguments */
memset(argv, 0x00, sizeof(argv));
argc = msh_split(cmd, length, argv);
if (argc == 0)
return -RT_ERROR;
/* exec this command */
*retp = cmd_func(argc, argv);
return 0;
}
分析到这里终于运行起来了MSH_CMD_EXPORT导出的函数,但是还不知道msh_get_cmd是怎么获取到对应函数的指针的
msh_get_cmd函数理解
在找到段的首地址之后,通过对比终端输入的值cmd和 FSymTab段中以结构体访问的命令的名字地址去访问.rodata.name段的名字值去做对比,找到命令后返回对应结构体中函数的指针
static cmd_function_t msh_get_cmd(char *cmd, int size)
{
struct finsh_syscall *index;
cmd_function_t cmd_func = RT_NULL;
for (index = _syscall_table_begin;
index < _syscall_table_end;
FINSH_NEXT_SYSCALL(index))
{
/*判断是否有__cmd_前缀,在MSH_CMD_EXPORT的第一层封装中加入了这个前缀*/
if (strncmp(index->name, "__cmd_", 6) != 0) continue;
if (strncmp(&index->name[6], cmd, size) == 0 &&
index->name[6 + size] == '�')
{
/*将cmd对应的命令的函数地址赋给函数指针cmd_func*/
cmd_func = (cmd_function_t)index->func;
break;
}
}
return cmd_func;
}
FINSH_NEXT_SYSCALL(index)宏定义理解
#define FINSH_NEXT_SYSCALL(index) index=finsh_syscall_next(index)
struct finsh_syscall* finsh_syscall_next(struct finsh_syscall* call)
{
unsigned int *ptr;
ptr = (unsigned int*) (call + 1);
while ((*ptr == 0) && ((unsigned int*)ptr < (unsigned int*) _syscall_table_end))
ptr ++;
return (struct finsh_syscall*)ptr;
}
这里四字节四字节去查找是非为空的原因是:
当关闭FINSH_USING_DESCRIPTION或FINSH_USING_SYMTAB时,字节数会由12字节减少为8字节
struct finsh_syscall
{
const char* name; /* the name of system call */
#if defined(FINSH_USING_DESCRIPTION) && defined(FINSH_USING_SYMTAB)
const char* desc; /* description of system call */
#endif
syscall_func func; /* the function address of system call */
};
方向键
这部分的代码也是在void finsh_thread_entry(void *parameter)函数中去实现的,同样是使用ch = finsh_getchar();去获取,但是不同的是方向键是由三位组成的,所以要连续的去判断对应的值
/*
* handle control key
* up key : 0x1b 0x5b 0x41
* down key: 0x1b 0x5b 0x42
* right key:0x1b 0x5b 0x43
* left key: 0x1b 0x5b 0x44
*/
if (ch == 0x1b)
{
shell->stat = WAIT_SPEC_KEY;
continue;
}
else if (shell->stat == WAIT_SPEC_KEY)
{
if (ch == 0x5b)
{
shell->stat = WAIT_FUNC_KEY;
continue;
}
shell->stat = WAIT_NORMAL;
}
else if (shell->stat == WAIT_FUNC_KEY)
{
shell->stat = WAIT_NORMAL;
上下键是类似的,都是通过读取回车储存在shell->cmd_history数组中的值去写入到当前的命令行数组shell->line中,通过shell_handle_history(shell);输出去覆盖当前终端上的值
if (ch == 0x41) /* up key */
{
#ifdef FINSH_USING_HISTORY
/* prev history */
if (shell->current_history > 0)
shell->current_history --;
else
{
shell->current_history = 0;
continue;
}
/* copy the history command */
memcpy(shell->line, &shell->cmd_history[shell->current_history][0],
FINSH_CMD_SIZE);
shell->line_curpos = shell->line_position = strlen(shell->line);
shell_handle_history(shell);
#endif
continue;
}
左右键的话,就更简单了,没什么好说的
else if (ch == 0x44) /* left key */
{
if (shell->line_curpos)
{
rt_kprintf("�");
shell->line_curpos --;
}
continue;
}
else if (ch == 0x43) /* right key */
{
if (shell->line_curpos < shell->line_position)
{
rt_kprintf("%c", shell->line[shell->line_curpos]);
shell->line_curpos ++;
}
continue;
}
原作者:Aurora_zk


