概述
做电子产品,如果不支持固件升级,后期可能带来维护成本非常巨大,为了降低后期维护成本,引入固件升级功能是基本条件。网上这些资料一抓一大把,我这里直接说怎么使用,具体原理,大家伙自行网上查找资料科普,本篇文章基本都是基于这位大佬的无私分享,链接,在此本人分享一种,将APP的bin文件复制到U盘里,进行固件升级方式。比起ST官网介绍的DFU模式还要便捷,无需第三方上位机,无需安装任何驱动,方可对产品固件升级。
ST官网例程(AN4657-STM32Cube_IAP_using_UART)链接
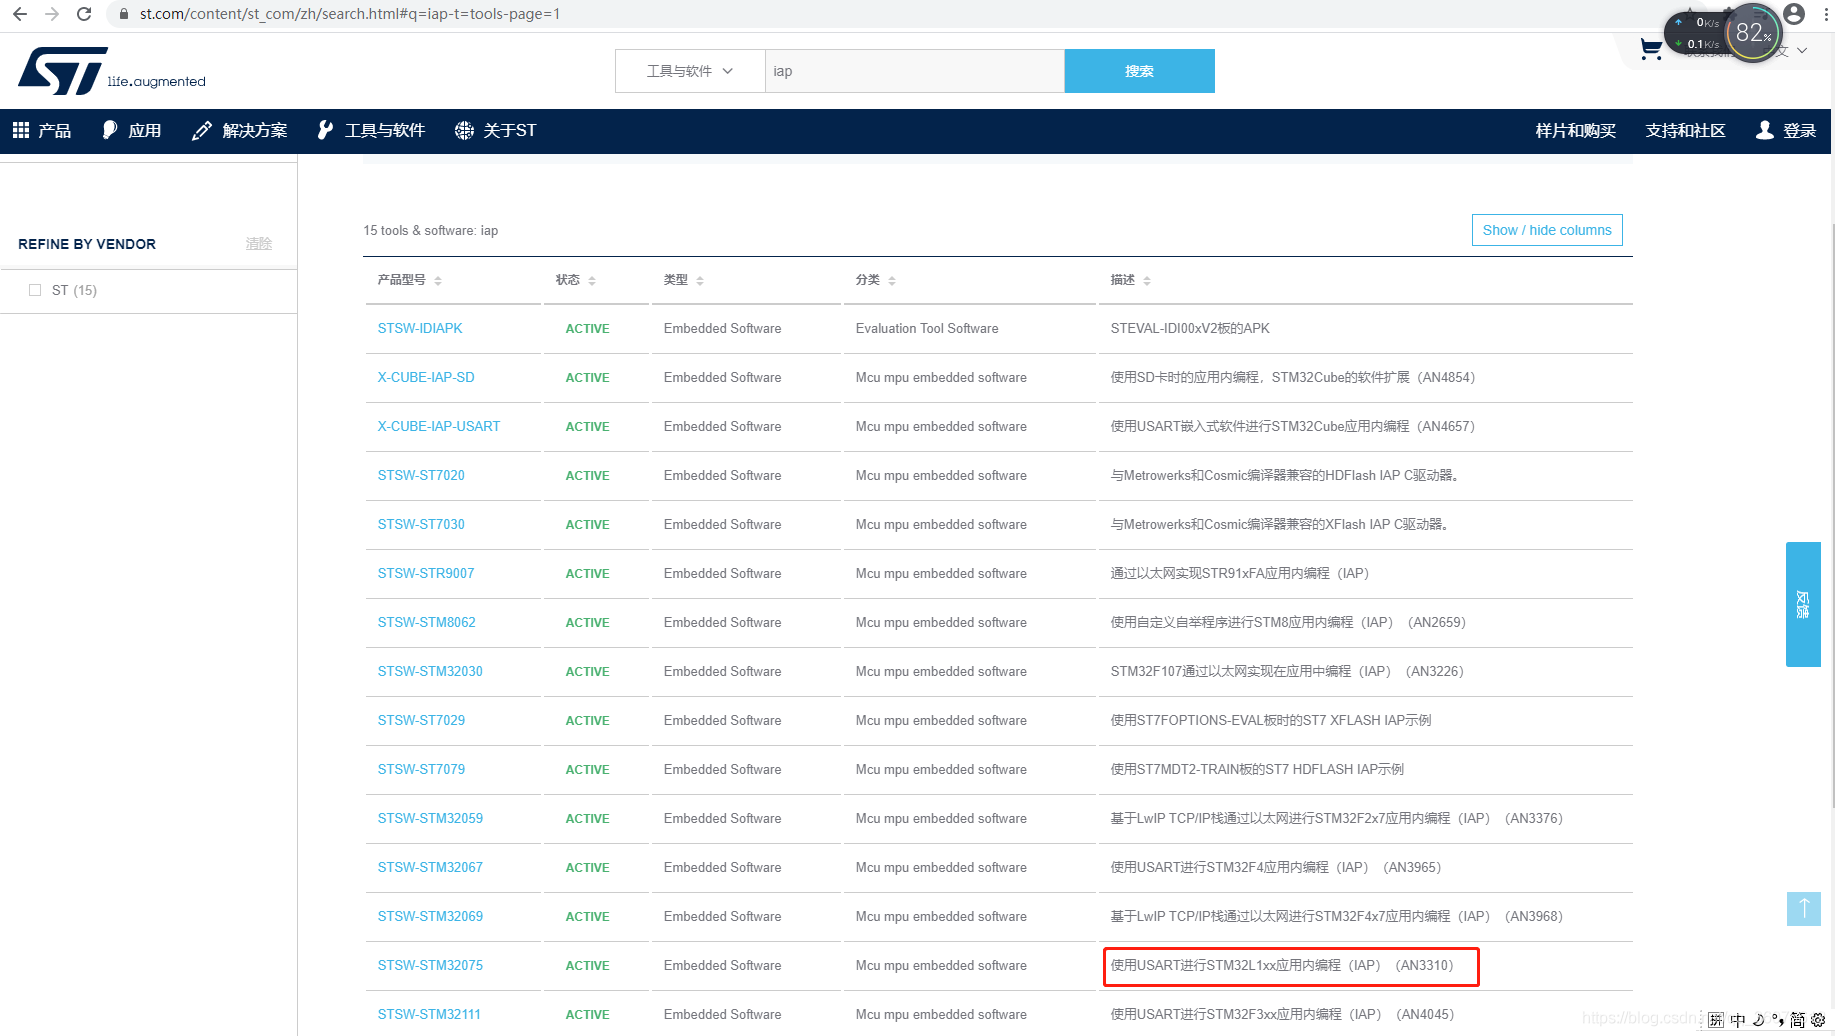
 同时,也可以在ST官网搜索栏中输入:“IAP”关键字搜索即可,如下所示。
 有两种方法:
1)通过一个KEY触发是否跳转;
2)通过检测USB拔插状态,来识别,跳转app或者是bootloader模式,当USB拔出时,重新上电,检测到3s时,会出现跳转到app
固件升级需要分两部分:bootloader + app
 由上图可知,STM32 内置的 Flash 被分成了两个部分,分别用来保存 Bootloader 和 Application 程序,这里有两个有两个 FLASH 起始地址 0x8000000 和 0x8008000:
为什么是 0x8000000 这个地址呢?而不是其他地址呢?这是由 M3 内核硬件上的设计就已经这么做了,人为设计好了,可以参考 M3 内核权威指南;
0x8008000 这个地址则是由我们自己来设置,这个地址的范围必须在 0x8000000 和 0x8020000 之间,所以一般根据 Bootloader 程序的最终大小,在这范围之间取一个比较合理的值即可。如下图所示;
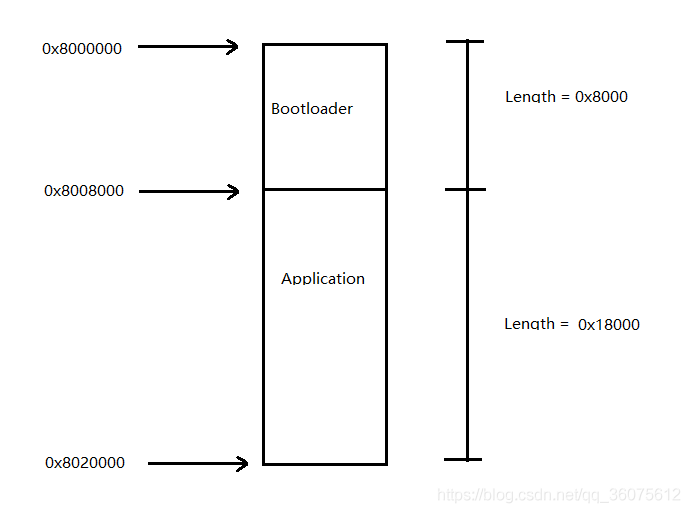 注:本文使用的STM32F103CBT6,属于中等大小 Flash,128K = 0x20000,所以地址范围是 0x8000000~0x8020000;
bootloader启动流程,查阅STM32官网资料得知,如下
 由上图可知:
 在bootloader工程中的main.c文件做了跳转地址校验:
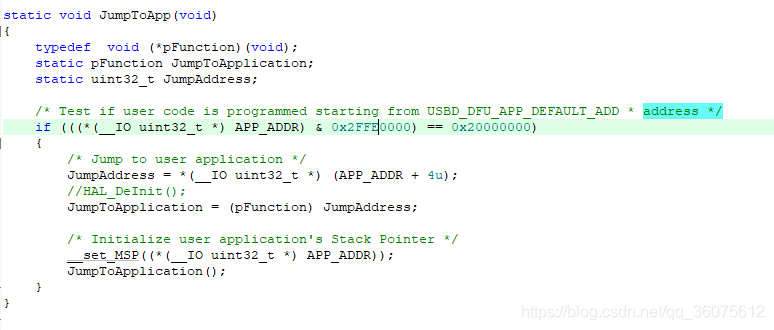 本文中 ApplicationAddress = 0x8000000;那么*(__IO uint32_t*)APP_ADDR)则是这个地址中所保存的值,由表格一可以知道,程序起始地址的第一个向量地址保存的栈顶的,因此,地址 0x800_0000 和 0x800_8000 中保存的值都是指向栈顶,如下图所示;
 栈是在 RAM 上分配,因此 RAM 的有效范围要做一个检测,栈顶地址和 0x2FFE0000 做与运算可以推算出,要校验的 RAM 范围是 0x2000_0000—0x2001_FFFF,所以 RAM 大小是 128K,官方 DEMO 默认使用 HD 高密度系列,所以是 128K,本文是 CBT6,20K 的 RAM,则需要改成 0x2FFFB000:
 计算方式:20K = 20*1024= 0x5000,0x2FFF_FFFF - (0x5000 - 1) = 0x2FFF_B000
硬件平台:STM32F103CBT6
 编码平台IDE:keil V5.29
一、STM32CUBEMX配置
(注:只要看USB功能配置即可,LED只是方便观察,KEY是用于区分升级与不升级切换作用。)

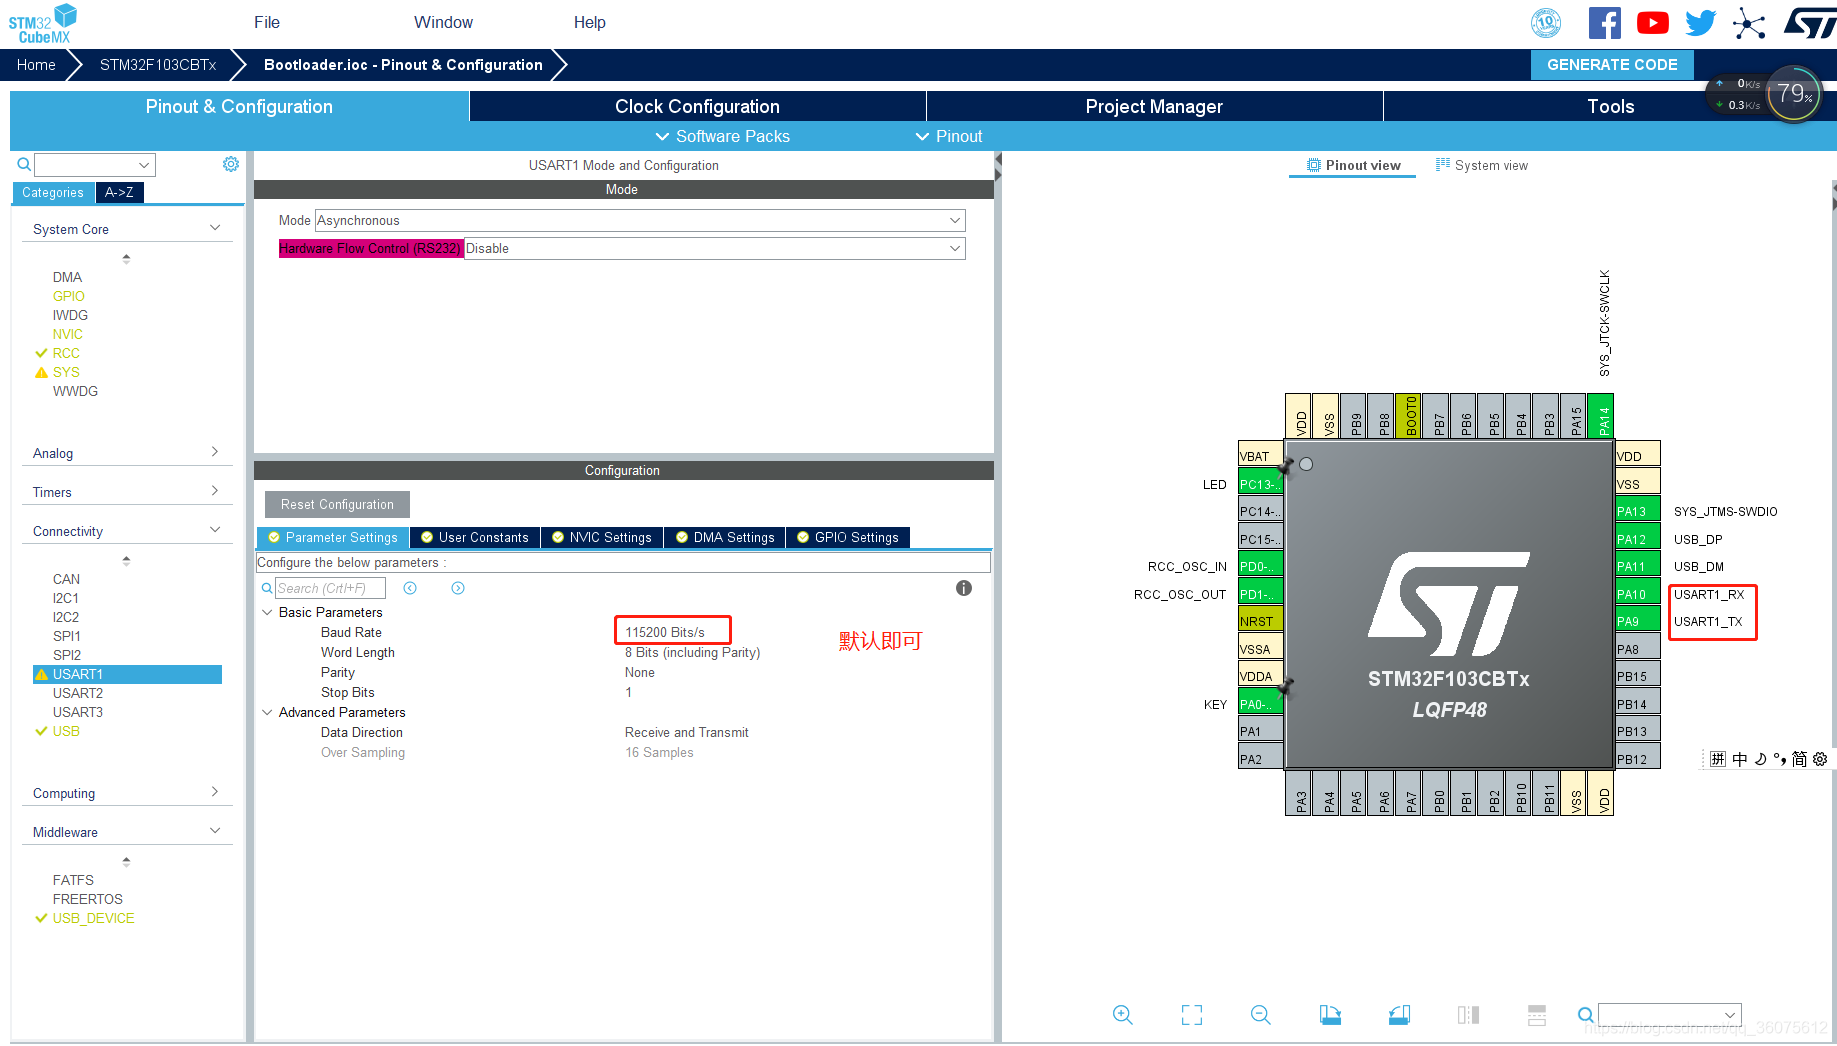
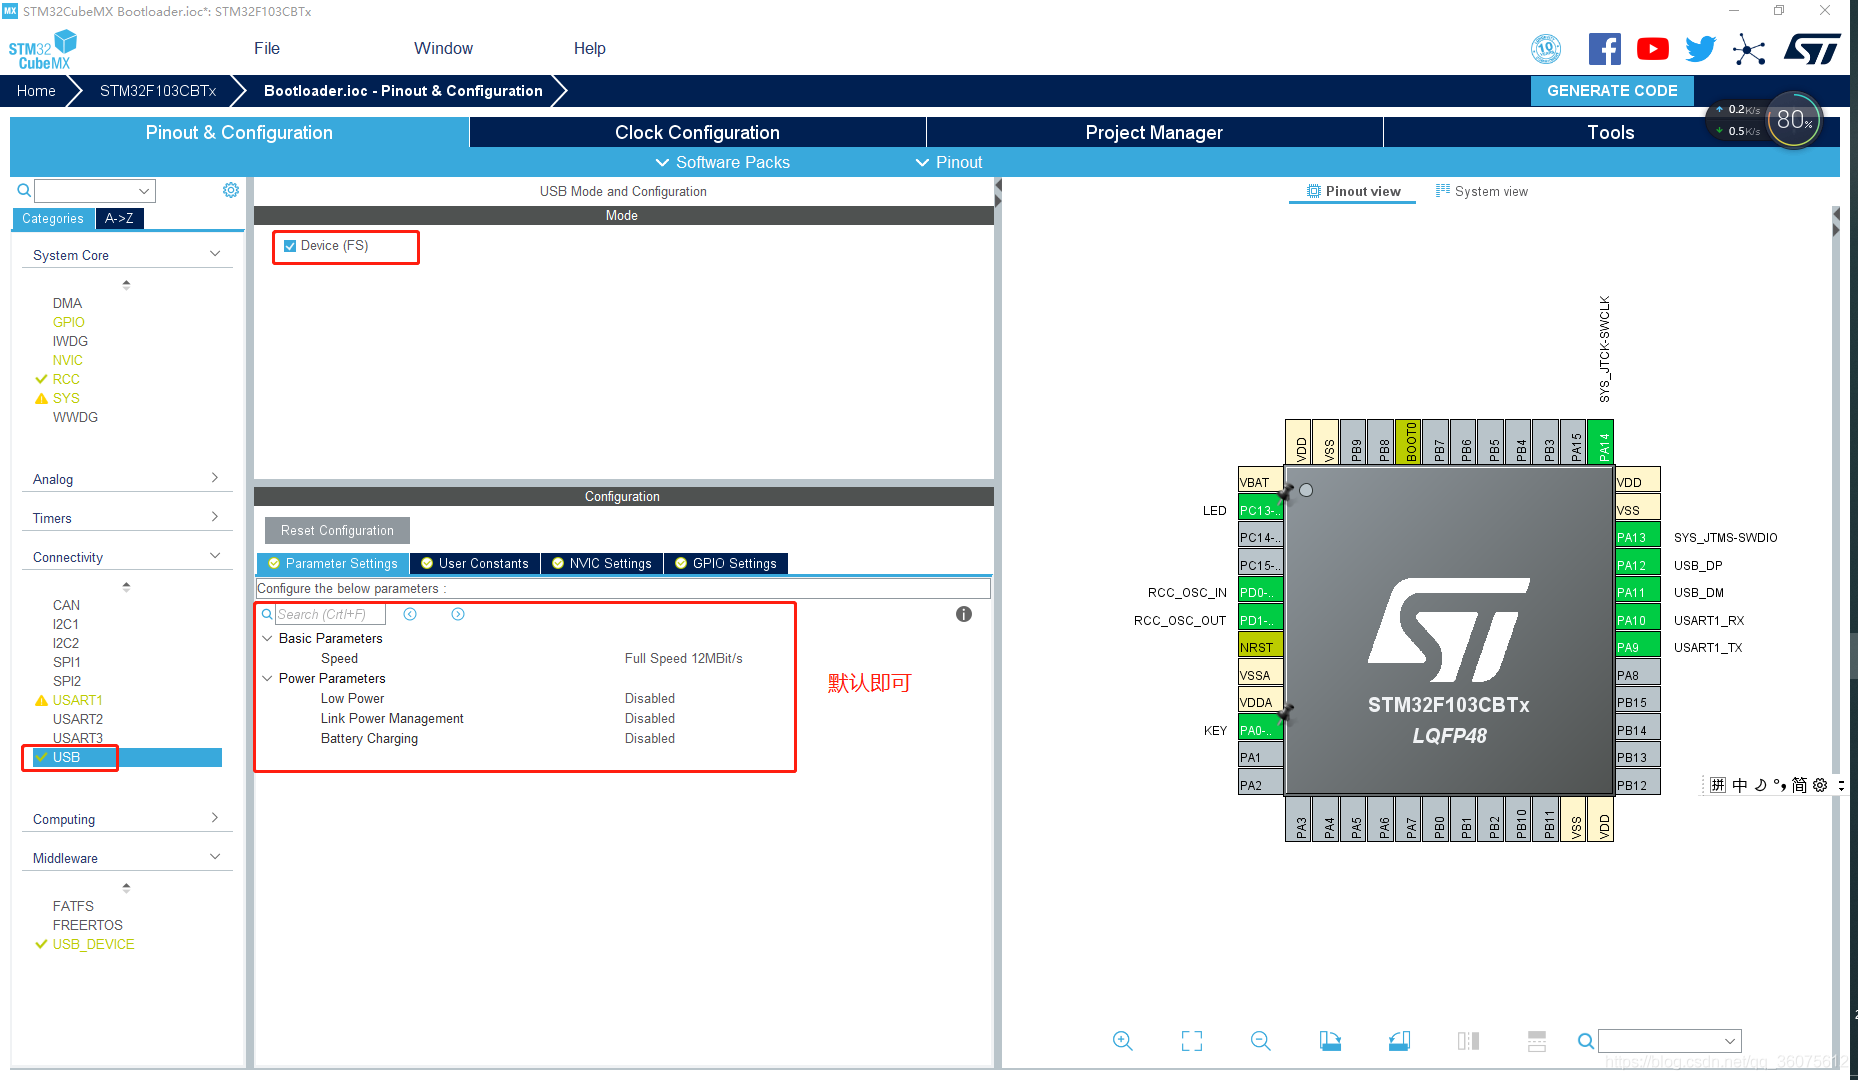
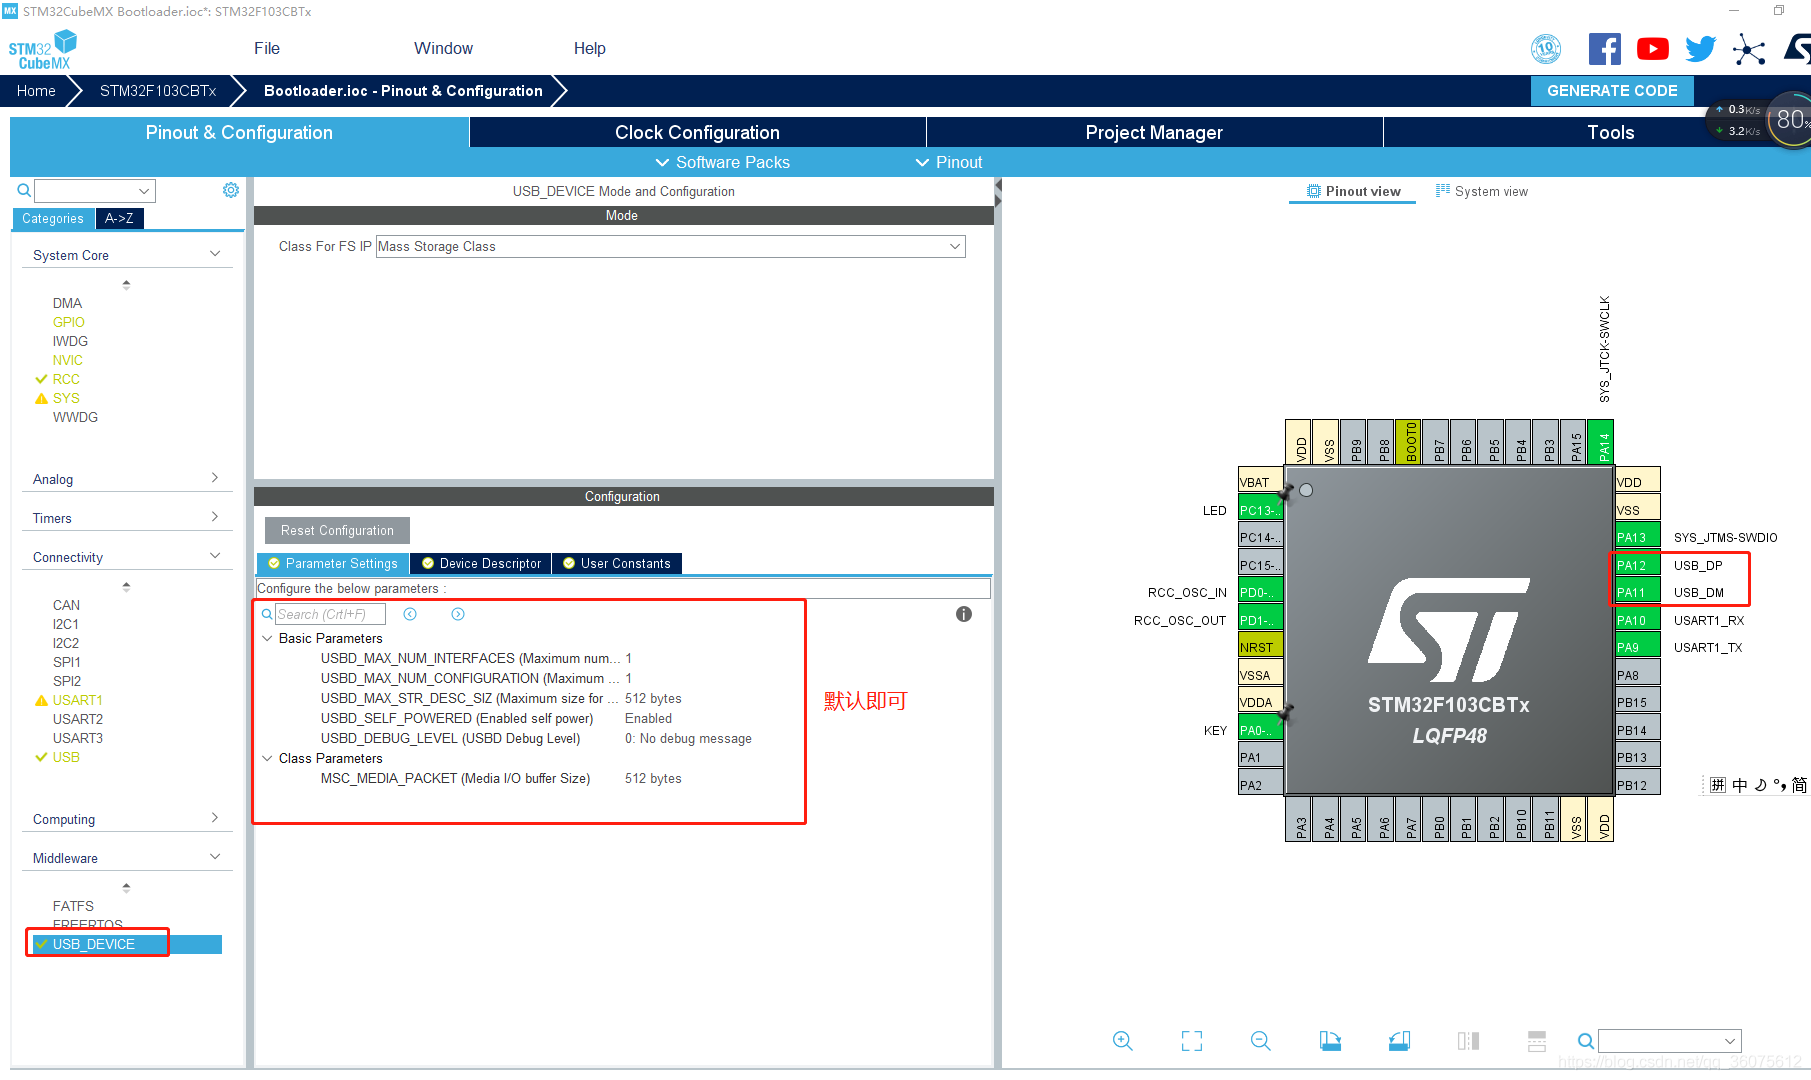 以上关于STM32CubeMX配置介绍完毕,接下来介绍编码步骤。
二、编码
1)bootloader工程
把开源源码下载来,分别把fat32.c、fat32.h、btldr_config.h 文件添加到本工程即可。
在此,只需要关注:main.c、u***d_storage_if.c文件
/* USER CODE BEGIN INCLUDE */
#include "fat32.h"
/* USER CODE END INCLUDE */
.
.
.
.
/* USER CODE BEGIN PRIVATE_FUNCTIONS_DECLARATION */
static void _STORAGE_ReadBlocks(uint32_t *buf, uint64_t readAddr, uint32_t blockSize, uint32_t numOfBlocks)
{
uint32_t iBlock;
uint8_t* buf8 = (uint8_t*)buf;
for(iBlock=0; iBlock
{
fat32_read(buf8, (uint32_t)readAddr);
readAddr += blockSize;
buf8 += blockSize;
}
}
static void _STORAGE_WriteBlocks(uint32_t *buf, uint64_t writeAddr, uint32_t blockSize, uint32_t numOfBlocks)
{
uint32_t iBlock;
uint8_t* buf8 = (uint8_t*)buf;
for(iBlock=0; iBlock
{
fat32_write(buf8, (uint32_t)writeAddr);
writeAddr += blockSize;
buf8 += blockSize;
}
}
/* USER CODE END PRIVATE_FUNCTIONS_DECLARATION */
.
.
.
/**
* @brief .
* @param lun: .
* @retval USBD_OK if all operations are OK else USBD_FAIL
*/
int8_t STORAGE_Read_FS(uint8_t lun, uint8_t *buf, uint32_t blk_addr, uint16_t blk_len)
{
/* USER CODE BEGIN 6 */
_STORAGE_ReadBlocks((uint32_t *)buf, (uint64_t)(blk_addr * STORAGE_BLK_SIZ), STORAGE_BLK_SIZ, blk_len);
return (USBD_OK);
/* USER CODE END 6 */
}
/**
* @brief .
* @param lun: .
* @retval USBD_OK if all operations are OK else USBD_FAIL
*/
int8_t STORAGE_Write_FS(uint8_t lun, uint8_t *buf, uint32_t blk_addr, uint16_t blk_len)
{
/* USER CODE BEGIN 7 */
_STORAGE_WriteBlocks((uint32_t *)buf, (uint64_t)(blk_addr * STORAGE_BLK_SIZ), STORAGE_BLK_SIZ, blk_len);
return (USBD_OK);
/* USER CODE END 7 */
}
这里补充一下,直接使用STM32CubeMx生成U盘模式,如果U盘里没有任何文件,接上PC端会提示,格式化该U盘,想解决这个问题,只需在U盘添加一下文件即可,按照上面代码所示,同时把代码的bin文件备份一份在U盘中。
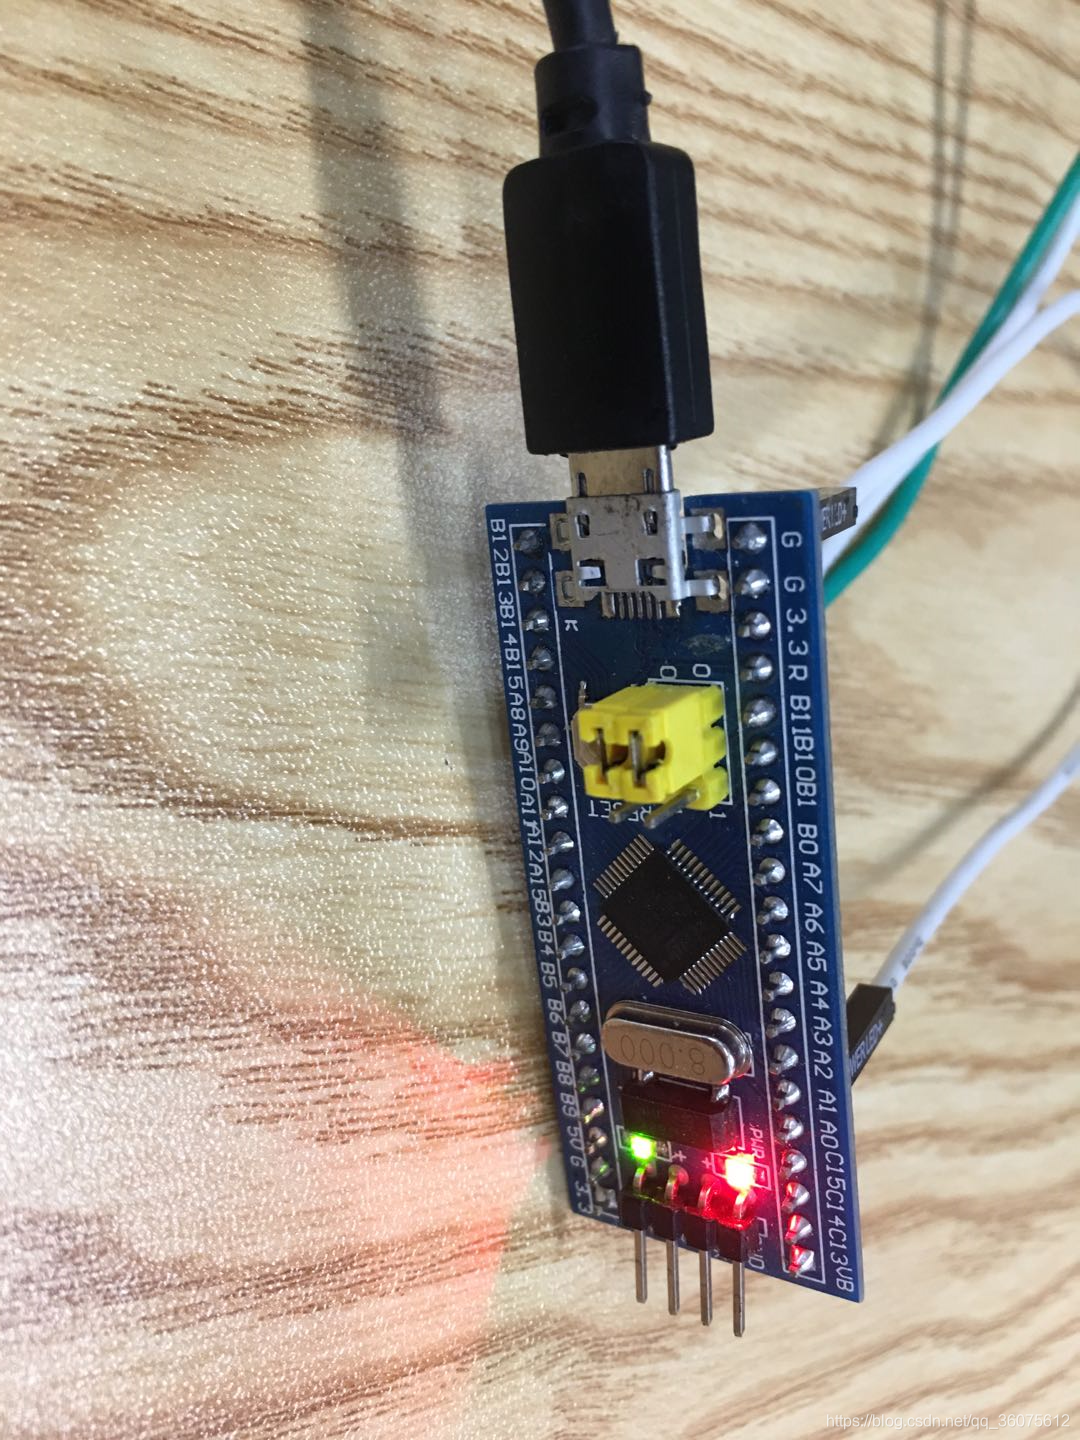
烧录bootloader程序后,需要一条杜邦线把PA0拉低,然后再使用USB数据线连接最小系统板,才能在PC中看到识别U盘。
如下所示:


main.c文件
/* USER CODE BEGIN Header */
/**
******************************************************************************
* @file : main.c
* @brief : Main program body
******************************************************************************
* @attention
*
*
© Copyright (c) 2021 STMicroelectronics.
* All rights reserved.
*
* This software component is licensed by ST under Ultimate Liberty license
* SLA0044, the "License"; You may not use this file except in compliance with
* the License. You may obtain a copy of the License at:
* www.st.com/SLA0044
*
******************************************************************************
*/
/* USER CODE END Header */
/* Includes ------------------------------------------------------------------*/
#include "main.h"
#include "usart.h"
#include "u***_device.h"
#include "gpio.h"
/* Private includes ----------------------------------------------------------*/
/* USER CODE BEGIN Includes */
#include "stdio.h"
#include
#include
#include "btldr_config.h"
/* USER CODE END Includes */
/* Private typedef -----------------------------------------------------------*/
/* USER CODE BEGIN PTD */
/* USER CODE END PTD */
/* Private define ------------------------------------------------------------*/
/* USER CODE BEGIN PD */
/* USER CODE END PD */
/* Private macro -------------------------------------------------------------*/
/* USER CODE BEGIN PM */
extern USBD_HandleTypeDef hU***DeviceFS;
/* USER CODE END PM */
/* Private variables ---------------------------------------------------------*/
/* USER CODE BEGIN PV */
/* USER CODE END PV */
/* Private function prototypes -----------------------------------------------*/
void SystemClock_Config(void);
/* USER CODE BEGIN PFP */
/* USER CODE END PFP */
/* Private user code ---------------------------------------------------------*/
/* USER CODE BEGIN 0 */
int fputc(int ch, FILE* FILE)
{
HAL_UART_Transmit(&huart1, (uint8_t*)&ch, 1, HAL_MAX_DELAY);
return ch;
}
bool is_appcode_exist()
{
uint32_t *mem = (uint32_t*)APP_ADDR;
if ((mem[0] == 0x00000000 || mem[0] == 0xFFFFFFFF) &&
(mem[1] == 0x00000000 || mem[1] == 0xFFFFFFFF) &&
(mem[2] == 0x00000000 || mem[2] == 0xFFFFFFFF) &&
(mem[3] == 0x00000000 || mem[3] == 0xFFFFFFFF))
{
return false;
}
else
{
return true;
}
}
static void JumpToApp(void)
{
typedef void (*pFunction)(void);
static pFunction JumpToApplication;
static uint32_t JumpAddress;
/* Test if user code is programmed starting from USBD_DFU_APP_DEFAULT_ADD * address */
if (((*(__IO uint32_t *) APP_ADDR) & 0x2FFE0000) == 0x20000000)
{
/* Jump to user application */
JumpAddress = *(__IO uint32_t *) (APP_ADDR + 4u);
//HAL_DeInit();
JumpToApplication = (pFunction) JumpAddress;
/* Initialize user application's Stack Pointer */
__set_MSP((*(__IO uint32_t *) APP_ADDR));
JumpToApplication();
}
}
bool is_button_down()
{
return (HAL_GPIO_ReadPin(KEY_GPIO_Port, KEY_Pin) == GPIO_PIN_RESET);
}
/* USER CODE END 0 */
/**
* @brief The application entry point.
* @retval int
*/
int main(void)
{
/* USER CODE BEGIN 1 */
uint8_t u***_current_state = 0;
uint8_t u***_input_state = 0;
uint32_t overTime = 0;
/* USER CODE END 1 */
/* MCU Configuration--------------------------------------------------------*/
/* Reset of all peripherals, Initializes the Flash interface and the Systick. */
HAL_Init();
/* USER CODE BEGIN Init */
/* USER CODE END Init */
/* Configure the system clock */
SystemClock_Config();
/* USER CODE BEGIN SysInit */
/* USER CODE END SysInit */
/* Initialize all configured peripherals */
MX_GPIO_Init();
MX_USART1_UART_Init();
MX_USB_DEVICE_Init();
/* USER CODE BEGIN 2 */
printf("heihei !!!rn");
#if 0
if(!is_appcode_exist() || is_button_down())
{
MX_USB_DEVICE_Init(); //注意,这里初始化,上面就要注释掉才行。
printf("Jump failed, USB firmware upgrade mode!!!rn");
while(1)
{
}
}
else
{
printf("Jump succeed!!!rn");
JumpToApp();
}
#endif
/* USER CODE END 2 */
/* Infinite loop */
/* USER CODE BEGIN WHILE */
while (1)
{
#if 1
if(hU***DeviceFS.dev_state != u***_current_state){
if(hU***DeviceFS.dev_state== USBD_STATE_CONFIGURED){
u***_input_state = 1;
printf("u*** is connected!!!rn");
}else if(hU***DeviceFS.dev_state== USBD_STATE_SUSPENDED){
printf("u*** Disconnect!!!rn");
}else{
//
}
u***_current_state = hU***DeviceFS.dev_state;
}
//
if(overTime++ > 3000){
//
if(u***_input_state == 0 && (is_appcode_exist() == 1)){
printf("---system run -apprn");
JumpToApp();
printf("---system run -app error!!!!rn");
}
}
HAL_Delay(1000);
HAL_GPIO_TogglePin(LED_GPIO_Port, LED_Pin);
#endif
/* USER CODE END WHILE */
/* USER CODE BEGIN 3 */
}
/* USER CODE END 3 */
}
/**
* @brief System Clock Configuration
* @retval None
*/
void SystemClock_Config(void)
{
RCC_OscInitTypeDef RCC_OscInitStruct = {0};
RCC_ClkInitTypeDef RCC_ClkInitStruct = {0};
RCC_PeriphCLKInitTypeDef PeriphClkInit = {0};
/** Initializes the RCC Oscillators according to the specified parameters
* in the RCC_OscInitTypeDef structure.
*/
RCC_OscInitStruct.OscillatorType = RCC_OSCILLATORTYPE_HSE;
RCC_OscInitStruct.HSEState = RCC_HSE_ON;
RCC_OscInitStruct.HSEPredivValue = RCC_HSE_PREDIV_DIV1;
RCC_OscInitStruct.HSIState = RCC_HSI_ON;
RCC_OscInitStruct.PLL.PLLState = RCC_PLL_ON;
RCC_OscInitStruct.PLL.PLLSource = RCC_PLLSOURCE_HSE;
RCC_OscInitStruct.PLL.PLLMUL = RCC_PLL_MUL9;
if (HAL_RCC_OscConfig(&RCC_OscInitStruct) != HAL_OK)
{
Error_Handler();
}
/** Initializes the CPU, AHB and APB buses clocks
*/
RCC_ClkInitStruct.ClockType = RCC_CLOCKTYPE_HCLK|RCC_CLOCKTYPE_SYSCLK
|RCC_CLOCKTYPE_PCLK1|RCC_CLOCKTYPE_PCLK2;
RCC_ClkInitStruct.SYSCLKSource = RCC_SYSCLKSOURCE_PLLCLK;
RCC_ClkInitStruct.AHBCLKDivider = RCC_SYSCLK_DIV1;
RCC_ClkInitStruct.APB1CLKDivider = RCC_HCLK_DIV2;
RCC_ClkInitStruct.APB2CLKDivider = RCC_HCLK_DIV1;
if (HAL_RCC_ClockConfig(&RCC_ClkInitStruct, FLASH_LATENCY_2) != HAL_OK)
{
Error_Handler();
}
PeriphClkInit.PeriphClockSelection = RCC_PERIPHCLK_USB;
PeriphClkInit.U***ClockSelection = RCC_USBCLKSOURCE_PLL_DIV1_5;
if (HAL_RCCEx_PeriphCLKConfig(&PeriphClkInit) != HAL_OK)
{
Error_Handler();
}
}
/* USER CODE BEGIN 4 */
/* USER CODE END 4 */
/**
* @brief This function is executed in case of error occurrence.
* @retval None
*/
void Error_Handler(void)
{
/* USER CODE BEGIN Error_Handler_Debug */
/* User can add his own implementation to report the HAL error return state */
/* USER CODE END Error_Handler_Debug */
}
#ifdef USE_FULL_ASSERT
/**
* @brief Reports the name of the source file and the source line number
* where the assert_param error has occurred.
* @param file: pointer to the source file name
* @param line: assert_param error line source number
* @retval None
*/
void assert_failed(uint8_t *file, uint32_t line)
{
/* USER CODE BEGIN 6 */
/* User can add his own implementation to report the file name and line number,
tex: printf("Wrong parameters value: file %s on line %drn", file, line) */
/* USER CODE END 6 */
}
#endif /* USE_FULL_ASSERT */
/************************ (C) COPYRIGHT STMicroelectronics *****END OF FILE****/
————————————————

2) app工程
该工程STM32CubeMX配置基本跟BootLoder一样,只是使用了LED与串口功能。
main.c文件
/* USER CODE BEGIN Header */
/**
******************************************************************************
* @file : main.c
* @brief : Main program body
******************************************************************************
* @attention
*
* © Copyright (c) 2021 STMicroelectronics.
* All rights reserved.
*
* This software component is licensed by ST under BSD 3-Clause license,
* the "License"; You may not use this file except in compliance with the
* License. You may obtain a copy of the License at:
* opensource.org/licenses/BSD-3-Clause
*
******************************************************************************
*/
/* USER CODE END Header */
/* Includes ------------------------------------------------------------------*/
#include "main.h"
#include "usart.h"
#include "gpio.h"
/* Private includes ----------------------------------------------------------*/
/* USER CODE BEGIN Includes */
#include "stdio.h"
/* USER CODE END Includes */
/* Private typedef -----------------------------------------------------------*/
/* USER CODE BEGIN PTD */
/* USER CODE END PTD */
/* Private define ------------------------------------------------------------*/
/* USER CODE BEGIN PD */
/* USER CODE END PD */
/* Private macro -------------------------------------------------------------*/
/* USER CODE BEGIN PM */
/* USER CODE END PM */
/* Private variables ---------------------------------------------------------*/
/* USER CODE BEGIN PV */
/* USER CODE END PV */
/* Private function prototypes -----------------------------------------------*/
void SystemClock_Config(void);
/* USER CODE BEGIN PFP */
/* USER CODE END PFP */
/* Private user code ---------------------------------------------------------*/
/* USER CODE BEGIN 0 */
int fputc(int ch, FILE* FILE)
{
HAL_UART_Transmit(&huart1, (uint8_t*)&ch, 1, HAL_MAX_DELAY);
return ch;
}
/* USER CODE END 0 */
/**
* @brief The application entry point.
* @retval int
*/
int main(void)
{
/* USER CODE BEGIN 1 */
/* USER CODE END 1 */
/* MCU Configuration--------------------------------------------------------*/
/* Reset of all peripherals, Initializes the Flash interface and the Systick. */
HAL_Init();
/* USER CODE BEGIN Init */
SCB->VTOR = FLASH_BASE | 0x8000;
__ASM("CPSIE I");//
/* USER CODE END Init */
/* Configure the system clock */
SystemClock_Config();
/* USER CODE BEGIN SysInit */
/* USER CODE END SysInit */
/* Initialize all configured peripherals */
MX_GPIO_Init();
MX_USART1_UART_Init();
/* USER CODE BEGIN 2 */
/* USER CODE END 2 */
/* Infinite loop */
/* USER CODE BEGIN WHILE */
while (1)
{
HAL_GPIO_TogglePin(LED_GPIO_Port, LED_Pin);
printf("runing app!!! rn");
HAL_Delay(500);
/* USER CODE END WHILE */
/* USER CODE BEGIN 3 */
}
/* USER CODE END 3 */
}
/**
* @brief System Clock Configuration
* @retval None
*/
void SystemClock_Config(void)
{
RCC_OscInitTypeDef RCC_OscInitStruct = {0};
RCC_ClkInitTypeDef RCC_ClkInitStruct = {0};
/** Initializes the RCC Oscillators according to the specified parameters
* in the RCC_OscInitTypeDef structure.
*/
RCC_OscInitStruct.OscillatorType = RCC_OSCILLATORTYPE_HSE;
RCC_OscInitStruct.HSEState = RCC_HSE_ON;
RCC_OscInitStruct.HSEPredivValue = RCC_HSE_PREDIV_DIV1;
RCC_OscInitStruct.HSIState = RCC_HSI_ON;
RCC_OscInitStruct.PLL.PLLState = RCC_PLL_ON;
RCC_OscInitStruct.PLL.PLLSource = RCC_PLLSOURCE_HSE;
RCC_OscInitStruct.PLL.PLLMUL = RCC_PLL_MUL9;
if (HAL_RCC_OscConfig(&RCC_OscInitStruct) != HAL_OK)
{
Error_Handler();
}
/** Initializes the CPU, AHB and APB buses clocks
*/
RCC_ClkInitStruct.ClockType = RCC_CLOCKTYPE_HCLK|RCC_CLOCKTYPE_SYSCLK
|RCC_CLOCKTYPE_PCLK1|RCC_CLOCKTYPE_PCLK2;
RCC_ClkInitStruct.SYSCLKSource = RCC_SYSCLKSOURCE_PLLCLK;
RCC_ClkInitStruct.AHBCLKDivider = RCC_SYSCLK_DIV1;
RCC_ClkInitStruct.APB1CLKDivider = RCC_HCLK_DIV2;
RCC_ClkInitStruct.APB2CLKDivider = RCC_HCLK_DIV1;
if (HAL_RCC_ClockConfig(&RCC_ClkInitStruct, FLASH_LATENCY_2) != HAL_OK)
{
Error_Handler();
}
}
/* USER CODE BEGIN 4 */
/* USER CODE END 4 */
/**
* @brief This function is executed in case of error occurrence.
* @retval None
*/
void Error_Handler(void)
{
/* USER CODE BEGIN Error_Handler_Debug */
/* User can add his own implementation to report the HAL error return state */
/* USER CODE END Error_Handler_Debug */
}
#ifdef USE_FULL_ASSERT
/**
* @brief Reports the name of the source file and the source line number
* where the assert_param error has occurred.
* @param file: pointer to the source file name
* @param line: assert_param error line source number
* @retval None
*/
void assert_failed(uint8_t *file, uint32_t line)
{
/* USER CODE BEGIN 6 */
/* User can add his own implementation to report the file name and line number,
tex: printf("Wrong parameters value: file %s on line %drn", file, line) */
/* USER CODE END 6 */
}
#endif /* USE_FULL_ASSERT */
/************************ (C) COPYRIGHT STMicroelectronics *****END OF FILE****/
需要生成.bin文件

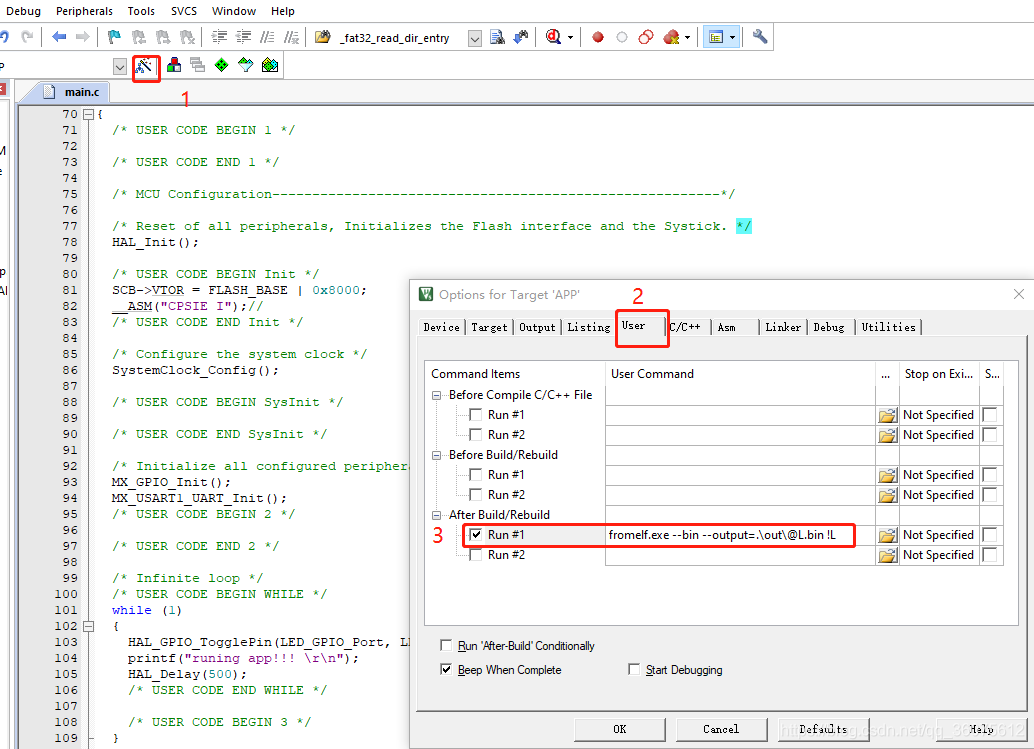
fromelf.exe --bin --output=.out@L.bin !L
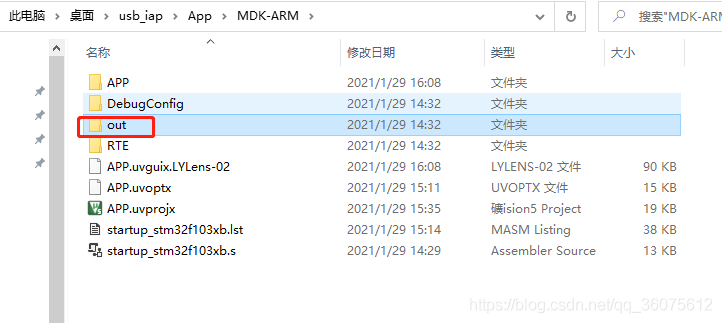
以上步骤,只需编译,无需使用ST-Link下载,生成.bin文件如下:
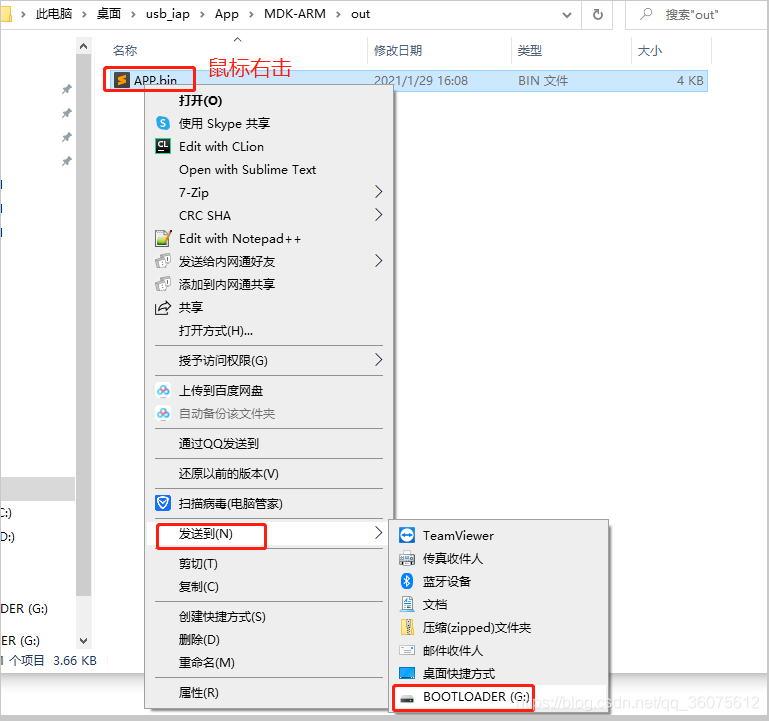
烧录固件顺序,先烧录bootloader,再使用拷贝文件方式进行固件升级。操作如下:
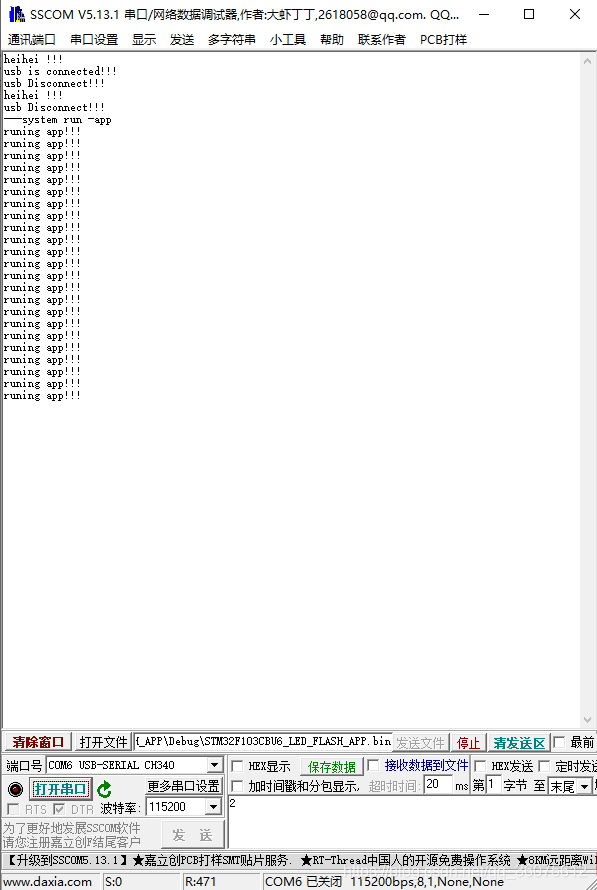
运行结果:

该文章源码:链接
参考文章:链接
(注:csdn下载的源码需要更改以下地方)


总结:在此做下笔录,方便后期参阅,同时也给嵌入式一些同仁们参考吧!加油!!!


 1
1
 举报
举报

