[文章]【HarmonyOS HiSpark Wi-Fi IoT 套件试用连载】用代码和AT命令连接Wifi
1
0
1. 代码连接wifi
1.1 相关API
(1)WifiErrorCode EnableWifi(void)打开Wi-Fi设备的STA 模式,可以理解为开启设备的Wi-Fi功能,使其可以扫描,并且连接到某个接入点。
(2)WifiErrorCode DisableWifi(void)该函数禁用设备的STA模式。在调用该函数之后,设备不能进行扫描、联网等操作。
(3)int IsWifiActive(void)该函数用于判断Wi-Fi设备的STA模式是否已经打开。
(4)WifiErrorCode AddDeviceConfig(constWifiDeviceConfig*config,int*result)该函数用于增加设备的 Wi-Fi 配置。
(5)WifiErrorCode GetDeviceConfigs(WifiDeviceConfig*result,unsignedint*size)该函数用于获取所有有效的Wi-Fi 配置,结果保存在result 中。size 指定可获取的最大的配置数,为result 的长度。
(6)WifiErrorCode RemoveDevice(int networkId)该函数用于根据net id 删除一个Wi-Fi 配置。
(7)WifiErrorCode Disconnect(void)该函数用于断开Wi-Fi连接。
(8)WifiErrorCode GetLinkedInfo(WifiLinkedInfo*result)该函数用于获取 Wi-Fi 设备客户端当前连接的接入点的信息。
(9)WifiErrorCode RegisterWifiEvent(WifiEvent*event)该函数用于注册Wi-Fi事件的回调函数,可用于开发者在自己开发的应用中注册相应的回调函数,监听Wi-Fi状态的变化,根据不同的状态,做相应的处理。
(10)WifiErrorCode UnRegisterWifiEvent(const WifiEvent*event)该函数用于注销Wi-Fi事件。
(11)WifiErrorCode GetDeviceMacAddress(unsigned char*result)该函数用于获取设置的 MAC 地址。
1.2 具体代码
- int ConnectToHotspot(void)
- {
- WifiDeviceConfig config = {0};
- // 准备AP的配置参数
- strcpy_s(config.ssid, SSID_LEN, PARAM_HOTSPOT_SSID);
- strcpy_s(config.preSharedKey, PSK_LEN, PARAM_HOTSPOT_PSK);
- config.securityType = PARAM_HOTSPOT_TYPE;
- osDelay(10); /* 延时10ms */
- WifiErrorCode errCode;
- int netId = -1;
- errCode = RegisterWifiEvent(&g_defaultWifiEventListener);
- printf("RegisterWifiEvent: %drn", errCode);
- errCode = EnableWifi();
- printf("EnableWifi: %drn", errCode);
- errCode = AddDeviceConfig(&config, &netId);
- printf("AddDeviceConfig: %drn", errCode);
- g_connected = 0;
- errCode = ConnectTo(netId);
- printf("ConnectTo(%d): %drn", netId, errCode);
- while (!g_connected) { // wait until connect to AP
- osDelay(10); /* 持续10ms去连接AP */
- printf("continue connecting");
- }
- printf("g_connected: %drn", g_connected);
- g_iface = netifapi_netif_find("wlan0");
- if (g_iface) {
- char* hostname = "hispark";
- err_t ret = netifapi_set_hostname(g_iface, hostname, strlen(hostname));
- printf("netifapi_set_hostname: %drn", ret);
- ret = netifapi_dhcp_start(g_iface);
- printf("netifapi_dhcp_start: %drn", ret);
- osDelay(100); // wait DHCP server give me IP 100
- #if 1
- ret = netifapi_netif_common(g_iface, dhcp_clients_info_show, NULL);
- printf("netifapi_netif_common: %drn", ret);
- #else
- #endif
- }
- return netId;
- }
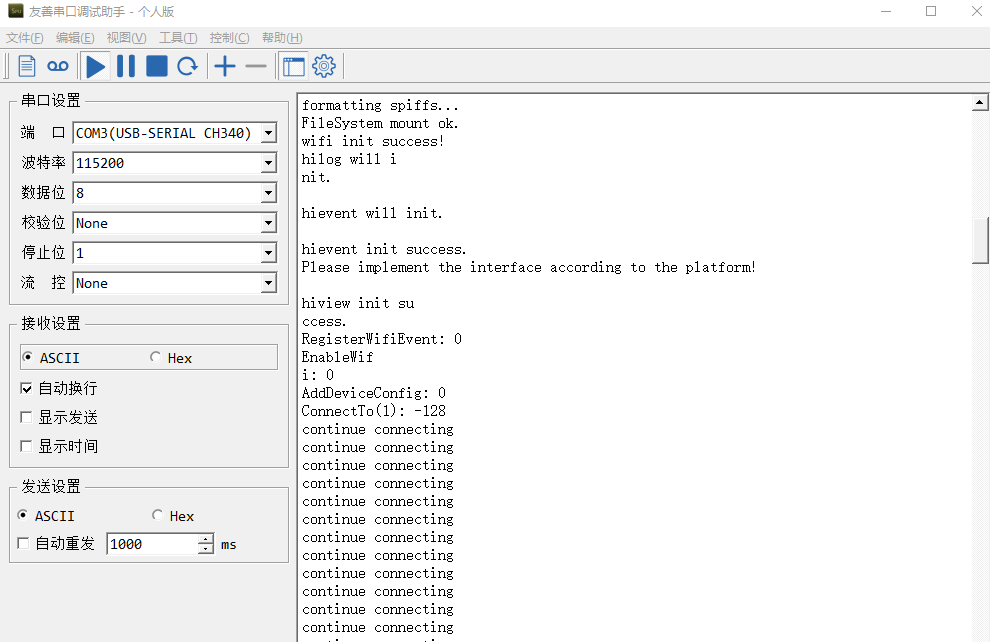
用串口助手连上去,发现到connect那一步就返回错误了,我在代码里加了尝试连接输出信息,依然还是连不上,需要进一步排查问题原因,如果有大佬能知道下就更好了。
2. AT命令连接wifi
AT命令也可以连接wifi,跟api调用顺序是一样的。
AT+CONN这一步中填的是我的wifi的ssid和密码,所以隐藏掉了,加密方式选择的是WPA2_PSK。
AT+PING这一步后面的是我的PC机器IP地址,可以测试能否能ping通。
- AT+RST
- AT+STARTSTA
- AT+SCAN
- AT+SCANRESULT
- AT+CONN="360JDCWiFi-701",,2,"XXXXX"
- AT+DHCP=wlan0,1
- AT+IFCFG
- AT+PING=192.168.0.14 //我的PC机器IP地址
- AT+DISCONN
这次实验有个遗憾就是用代码没能成功连接我的wifi,需要进一步排查问题原因,如果有大佬能指点迷津不吝赐教就好了。
用代码操作灵活性更好,因为可以用RegisterWifiEvent进行设置自定义事件。
回帖高级模式
声明:本文内容及配图由入驻作者撰写或者入驻合作网站授权转载。文章观点仅代表作者本人,不代表电子发烧友网立场。文章及其配图仅供工程师学习之用,如有内容图片侵权或者其他问题,请联系本站作侵删。 侵权投诉

