[文章]【木棉花】学习笔记--分布式数字华容道(上)

1
5
前言
不知不觉的又浑浑噩噩的过了一个星期了吧,没事这就看我的学习笔记来你补一下这星期在学习上的亏空。经过了前几个星期的学习,有没有很好的掌握了前面的那种内容呢,有没有觉得自己的能力上升了一大截了。嗯那就对了,那我们今天就拿我们前面学的知识拿来运用一下,来写出第一个属于自己的分布式游戏。我也挑了一个比较简单的数字华容道的游戏,来方便大家上手。
那为了大家更好地熟练掌握鸿蒙手机应用开发,为了供大家更方便的学习鸿蒙手机的应用开发,我会将所有的笔记都整理到Awesome-HarmonyOS_木棉花,更多详细学习资料请查看Awesome-HarmonyOS_木棉花。也请关注我们这个项目,我们会持续更新的,会帮大家把资料都整理好更便于大家的学习。
那现在就先开始我们这星期的西之旅吧!

那为了大家更好地熟练掌握鸿蒙手机应用开发,为了供大家更方便的学习鸿蒙手机的应用开发,我会将所有的笔记都整理到Awesome-HarmonyOS_木棉花,更多详细学习资料请查看Awesome-HarmonyOS_木棉花。也请关注我们这个项目,我们会持续更新的,会帮大家把资料都整理好更便于大家的学习。
那现在就先开始我们这星期的西之旅吧!
正文
那这个游戏也需要写的代码是比较多了,为了不让文章太冗长了,我就打算把这游戏拆成三篇来写,也方便大家循序渐进的学习。那我们今天这一篇呢主要是来实现页面的布局,把主要的框架给写出来。
创建工程同样的我们还是先选择一个empty Ability,建一个java的工程。

添加权限那我们第一步就来添加一个数据交互的权限了。同样的还是先到config.json文件中添加一些非敏感权限,再在MainAbility中动态申请敏感权限。
我们在abilities前面添加如下代码:
我们在abilities前面添加如下代码:
- "reqPermissions": [
- {
- "name": "ohos.permission.GET_DISTRIBUTED_DEVICE_INFO"
- },
- {
- "name": "ohos.permission.DISTRIBUTED_DATASYNC"
- },
- {
- "name": "ohos.permission.DISTRIBUTED_DEVICE_STATE_CHANGE"
- },
- {
- "name": "ohos.permission.READ_USER_STORAGE"
- },
- {
- "name": "ohos.permission.WRITE_USER_STORAGE"
- },
- {
- "name": "ohos.permission.GET_BUNDLE_INFO"
- }
- ],
那接下来就是在MainAbility类文件夹编写代码完成通过弹窗的形式来动态申请数据交互的权限。
在onStart中添加如下代码:
在onStart中添加如下代码:
- requestPermissionsFromUser(new String[]{"ohos.permission.DISTRIBUTED_DATASYNC"},0);

一看这个运行的页面就很不爽对吧,因为一打开就在顶部有一个黑边,正经的游戏界面哪能有这样的瑕疵对吧,那我们为了界面的美观,我们就来把这黑边给去除了。
那我们就接下来还是在config.josn文件中的abilities之后添加如下代码:
- "metaData": {
- "customizeData": [
- {
- "name": "hwc-theme",
- "value": "androidhwext:style/Theme.Emui.Light.NoTitleBar",
- "extra": ""
- }
- ]
- }

换游戏名字和换游戏图标
在运行程序之后,是不是总能在桌面找到自己的程序,但是那程序的名字和图标却不是自己理想中的样子,那我们这个这么完美的游戏这么能被这个老鼠屎给坏了呢,我们接下来就把那名字和图标改成下面这样子吧。

那我们先在zn.element文件夹下的config.josn的文件找到entry_MainAbility,然后将其对应的value改为数字华容道就可以把桌面的名字给改了。
那接下来我们就把那图标给改了,先是在base文件夹下的media文件夹添加封面的图片,然后把图片命名为cover。那我们还是在config.json文件里面,把abilities的icon改为引用我们的刚刚添加的图片。

abilities代码如下:
- "abilities": [
- {
- "skills": [
- {
- "entities": [
- "entity.system.home"
- ],
- "actions": [
- "action.system.home"
- ]
- }
- ],
- "orientation": "unspecified",
- "name": "com.example.myklotski.MainAbility",
- "icon": "$media:cover",
- "description": "$string:mainability_description",
- "label": "$string:entry_MainAbility",
- "type": "page",
- "launchType": "standard"
- }
- ],
设置UI界面
我们先是把graphic文件中添加一个background_button的背景文件,添加一个圆角半径还有更改一个背景颜色。
- <?xml version="1.0" encoding="UTF-8" ?>
- <shape xmlns:ohos="http://schemas.huawei.com/res/ohos"
- ohos:shape="rectangle">
- <solid
- ohos:color="#8A4632"/>
- <corners
- ohos:radius="100"/>
- </shape>
- <?xml version="1.0" encoding="utf-8"?>
- <DirectionalLayout
- xmlns:ohos="http://schemas.huawei.com/res/ohos"
- ohos:height="match_parent"
- ohos:width="match_parent"
- ohos:alignment="center"
- ohos:orientation="vertical"
- ohos:background_element="#EFE5D3">
- <Image
- ohos:height="match_content"
- ohos:width="match_content"
- ohos:image_src="$media:logo"
- ohos:top_margin="-100vp"
- ohos:layout_alignment="center"/>
- <Button
- ohos:id="$+id:button_singlegame"
- ohos:height="50vp"
- ohos:width="match_parent"
- ohos:text="单人模式"
- ohos:text_size="28vp"
- ohos:text_color="#FFFFFF"
- ohos:text_alignment="center"
- ohos:background_element="$graphic:background_button"/>
- <Button
- ohos:id="$+id:button_doublegame"
- ohos:height="50vp"
- ohos:width="match_parent"
- ohos:text="双人模式"
- ohos:text_size="28vp"
- ohos:top_margin="30vp"
- ohos:text_color="#FFFFFF"
- ohos:text_alignment="center"
- ohos:background_element="$graphic:background_button"/>
- <Button
- ohos:id="$+id:button_author"
- ohos:height="50vp"
- ohos:width="match_parent"
- ohos:top_margin="30vp"
- ohos:text="关于"
- ohos:text_size="28vp"
- ohos:text_color="#FFFFFF"
- ohos:text_alignment="center"
- ohos:background_element="$graphic:background_button"/>
- </DirectionalLayout>
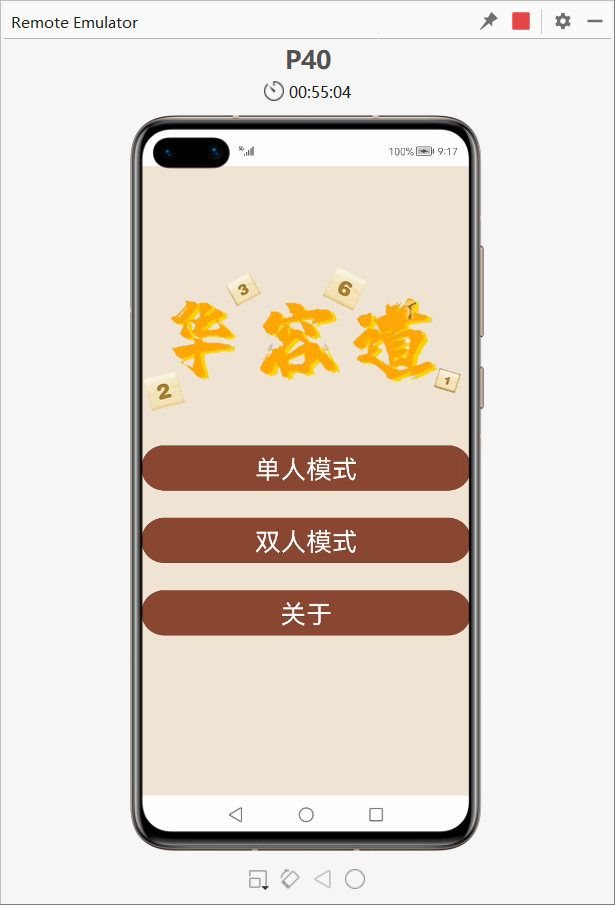
这效果是不是还不错,颜色搭配还挺好看的对吧。那接下来我们就要利用到前面的知识了,我们需要添加一个关于页面出来,完成页面的布局设置还有给主页面中的关于按钮添加一个点击事件。那忘记这方面知识的同学可以回去复习一下:页面间跳转。那我们就先在Slice文件中添加一个名为ExplainSlice的类,接下来在layout文件中添加一个ability_explain文件用于该页面的界面设置。那我们在这个页面中就添加了木棉花的logo还有一些text用于说明,还有一个返回的按钮,当然了我们还需要在media文件中添加木棉花的logo。
ability_explain文件代码如下:
- <?xml version="1.0" encoding="utf-8"?>
- <DirectionalLayout
- xmlns:ohos="http://schemas.huawei.com/res/ohos"
- ohos:height="match_parent"
- ohos:width="match_parent"
- ohos:orientation="vertical"
- ohos:background_element="#EFE5D3">
- <Text
- ohos:height="match_content"
- ohos:width="match_content"
- ohos:text="程序:数字华容道"
- ohos:text_size="25vp"
- ohos:text_color="#000000"
- ohos:top_margin="20vp"
- ohos:left_margin="5vp"/>
- <Text
- ohos:height="match_content"
- ohos:width="match_content"
- ohos:text="团队:木棉花"
- ohos:text_size="28vp"
- ohos:text_color="#000000"
- ohos:top_margin="20vp"
- ohos:left_margin="5vp"/>
- <Text
- ohos:height="match_content"
- ohos:width="match_content"
- ohos:text="作者:张诏添、沈泳鑫"
- ohos:text_size="28vp"
- ohos:text_color="#000000"
- ohos:top_margin="20vp"
- ohos:left_margin="5vp"/>
- <Text
- ohos:height="match_content"
- ohos:width="match_content"
- ohos:text="版本:v2.1.0"
- ohos:text_size="28vp"
- ohos:text_color="#000000"
- ohos:top_margin="20vp"
- ohos:left_margin="5vp"/>
- <Image
- ohos:height="match_content"
- ohos:width="match_content"
- ohos:image_src="$media:kapok"
- ohos:layout_alignment="center"/>
- <Button
- ohos:id="$+id:button_back"
- ohos:height="50vp"
- ohos:width="match_parent"
- ohos:top_margin="30vp"
- ohos:text="返回"
- ohos:text_size="28vp"
- ohos:text_color="#FFFFFF"
- ohos:text_alignment="center"
- ohos:background_element="$graphic:background_button"/>
- </DirectionalLayout>
ExplainSlice文件代码如下:
- package com.example.myklotski.slice;
- import com.example.myklotski.ResourceTable;
- import ohos.aafwk.ability.AbilitySlice;
- import ohos.aafwk.content.Intent;
- import ohos.agp.components.Button;
- import ohos.agp.components.Component;
- public class ExplainSlice extends AbilitySlice {
- @Override
- protected void onStart(Intent intent) {
- super.onStart(intent);
- super.setUIContent(ResourceTable.Layout_ability_explain);
- Button button = (Button) findComponentById(ResourceTable.Id_button_back);
- button.setClickedListener(new Component.ClickedListener() {
- @Override
- public void onClick(Component component) {
- terminate();
- }
- });
- }
- @Override
- protected void onActive() {
- super.onActive();
- }
- @Override
- protected void onForeground(Intent intent) {
- super.onForeground(intent);
- }
- }
- Button button_explain = (Button) findComponentById(ResourceTable.Id_button_explain);
- button_explain.setClickedListener(new Component.ClickedListener() {
- @Override
- public void onClick(Component component) {
- present(new ExplainSlice(),intent);
- }
- });
- <?xml version="1.0" encoding="utf-8"?>
- <DirectionalLayout
- xmlns:ohos="http://schemas.huawei.com/res/ohos"
- ohos:height="match_parent"
- ohos:width="match_parent"
- ohos:alignment="center"
- ohos:orientation="vertical"
- ohos:background_element="#EFE5D3">
- <DirectionalLayout
- ohos:height="match_content"
- ohos:width="match_content"
- ohos:orientation="horizontal">
- <Button
- ohos:id="$+id:button_threegame"
- ohos:height="50vp"
- ohos:width="400px"
- ohos:text="3 x 3"
- ohos:text_size="28vp"
- ohos:text_color="#FFFFFF"
- ohos:text_alignment="center"
- ohos:right_margin="50px"
- ohos:background_element="$graphic:background_button"/>
- <Button
- ohos:id="$+id:button_fourgame"
- ohos:height="50vp"
- ohos:width="400px"
- ohos:text="4 x 4"
- ohos:text_size="28vp"
- ohos:text_color="#FFFFFF"
- ohos:text_alignment="center"
- ohos:left_margin="50px"
- ohos:background_element="$graphic:background_button"/>
- </DirectionalLayout>
- <DirectionalLayout
- ohos:height="match_content"
- ohos:width="match_content"
- ohos:top_margin="30vp"
- ohos:orientation="horizontal">
- <Button
- ohos:id="$+id:button_fivegame"
- ohos:height="50vp"
- ohos:width="400px"
- ohos:text="5 x 5"
- ohos:text_size="28vp"
- ohos:text_color="#FFFFFF"
- ohos:text_alignment="center"
- ohos:right_margin="50px"
- ohos:background_element="$graphic:background_button"/>
- <Button
- ohos:id="$+id:button_sixgame"
- ohos:height="50vp"
- ohos:width="400px"
- ohos:text="6 x 6"
- ohos:text_size="28vp"
- ohos:text_color="#FFFFFF"
- ohos:text_alignment="center"
- ohos:left_margin="50px"
- ohos:background_element="$graphic:background_button"/>
- </DirectionalLayout>
- <DirectionalLayout
- ohos:height="match_content"
- ohos:width="match_content"
- ohos:top_margin="30vp"
- ohos:orientation="horizontal">
- <Button
- ohos:id="$+id:button_sevengame"
- ohos:height="50vp"
- ohos:width="400px"
- ohos:text="7 x 7"
- ohos:text_size="28vp"
- ohos:text_color="#FFFFFF"
- ohos:text_alignment="center"
- ohos:right_margin="50px"
- ohos:background_element="$graphic:background_button"/>
- <Button
- ohos:id="$+id:button_eightgame"
- ohos:height="50vp"
- ohos:width="400px"
- ohos:text="8 x 8"
- ohos:text_size="28vp"
- ohos:text_color="#FFFFFF"
- ohos:text_alignment="center"
- ohos:left_margin="50px"
- ohos:background_element="$graphic:background_button"/>
- </DirectionalLayout>
- <Button
- ohos:id="$+id:button_singleback"
- ohos:height="50vp"
- ohos:width="match_parent"
- ohos:top_margin="30vp"
- ohos:text="返回"
- ohos:text_size="28vp"
- ohos:text_color="#FFFFFF"
- ohos:text_alignment="center"
- ohos:background_element="$graphic:background_button"/>
- </DirectionalLayout>
- package com.example.myklotski.slice;
- import com.example.myklotski.ResourceTable;
- import ohos.aafwk.ability.AbilitySlice;
- import ohos.aafwk.content.Intent;
- import ohos.agp.components.Button;
- import ohos.agp.components.Component;
- public class SelectSingleGameAbilitySlice extends AbilitySlice {
- @Override
- protected void onStart(Intent intent) {
- super.onStart(intent);
- super.setUIContent(ResourceTable.Layout_ability_selectsinglegame);
- Button button_back = (Button)findComponentById(ResourceTable.Id_button_singleback);
- button_back.setClickedListener(new Component.ClickedListener() {
- @Override
- public void onClick(Component component) {
- terminate();
- }
- });
- }
- @Override
- protected void onActive() {
- super.onActive();
- }
- @Override
- protected void onForeground(Intent intent) {
- super.onForeground(intent);
- }
- }
- Button button_single = (Button)findComponentById(ResourceTable.Id_button_singlegame);
- button_single.setClickedListener(new Component.ClickedListener() {
- @Override
- public void onClick(Component component) {
- present(new SelectSingleGameAbilitySlice(),intent);
- }
- });
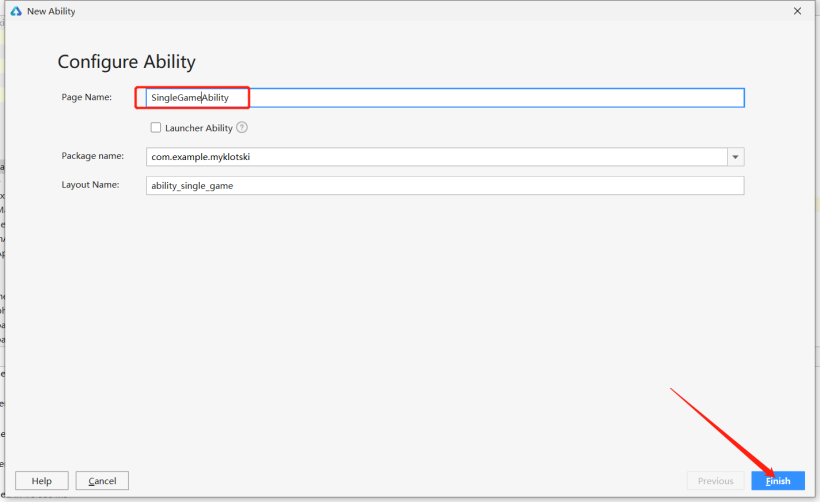
然后在SelectSingleGameSlice中,添加阶数按钮的点击事件,完成页面的跳转还有传一个阶数到SingleGameSlice中。
- Button button_three = (Button)findComponentById(ResourceTable.Id_button_threegame);
- button_three.setClickedListener(new Component.ClickedListener() {
- @Override
- public void onClick(Component component) {
- Intent intent = new Intent();
- intent.setParam("single",3);
- Operation operation = new Intent.OperationBuilder()
- .withDeviceId("")
- .withBundleName(getBundleName())
- .withAbilityName(SingleGameAbility.class.getName())
- .build();
- intent.setOperation(operation);
- startAbility(intent);
- }
- });
- Button button_four = (Button)findComponentById(ResourceTable.Id_button_fourgame);
- button_four.setClickedListener(new Component.ClickedListener() {
- @Override
- public void onClick(Component component) {
- Intent intent = new Intent();
- intent.setParam("single",4);
- Operation operation = new Intent.OperationBuilder()
- .withDeviceId("")
- .withBundleName(getBundleName())
- .withAbilityName(SingleGameAbility.class.getName())
- .build();
- intent.setOperation(operation);
- startAbility(intent);
- }
- });
- Button button_five = (Button) findComponentById(ResourceTable.Id_button_fivegame);
- button_four.setClickedListener(new Component.ClickedListener() {
- @Override
- public void onClick(Component component) {
- Intent intent = new Intent();
- intent.setParam("single",5);
- Operation operation = new Intent.OperationBuilder()
- .withDeviceId("")
- .withBundleName(getBundleName())
- .withAbilityName(SingleGameAbility.class.getName())
- .build();
- intent.setOperation(operation);
- startAbility(intent);
- }
- });
- Button button_six = (Button)findComponentById(ResourceTable.Id_button_sixgame);
- button_six.setClickedListener(new Component.ClickedListener() {
- @Override
- public void onClick(Component component) {
- Intent intent = new Intent();
- intent.setParam("single",6);
- Operation operation = new Intent.OperationBuilder()
- .withDeviceId("")
- .withBundleName(getBundleName())
- .withAbilityName(SingleGameAbility.class.getName())
- .build();
- intent.setOperation(operation);
- startAbility(intent);
- }
- });
- Button button_seven = (Button) findComponentById(ResourceTable.Id_button_sevengame);
- button_seven.setClickedListener(new Component.ClickedListener() {
- @Override
- public void onClick(Component component) {
- Intent intent = new Intent();
- intent.setParam("single",7);
- Operation operation = new Intent.OperationBuilder()
- .withDeviceId("")
- .withBundleName(getBundleName())
- .withAbilityName(SingleGameAbility.class.getName())
- .build();
- intent.setOperation(operation);
- startAbility(intent);
- }
- });
- Button button_eight = (Button)findComponentById(ResourceTable.Id_button_eightgame);
- button_eight.setClickedListener(new Component.ClickedListener() {
- @Override
- public void onClick(Component component) {
- Intent intent = new Intent();
- intent.setParam("single",8);
- Operation operation = new Intent.OperationBuilder()
- .withDeviceId("")
- .withBundleName(getBundleName())
- .withAbilityName(SingleGameAbility.class.getName())
- .build();
- intent.setOperation(operation);
- startAbility(intent);
- }
- });
- <?xml version="1.0" encoding="utf-8"?>
- <DirectionalLayout
- xmlns:ohos="http://schemas.huawei.com/res/ohos"
- ohos:height="match_parent"
- ohos:width="match_parent"
- ohos:alignment="center"
- ohos:orientation="vertical"
- ohos:background_element="#EFE5D3">
- <Button
- ohos:id="$+id:button_threedoublegame"
- ohos:height="50vp"
- ohos:width="match_parent"
- ohos:text="3 x 3"
- ohos:text_size="28vp"
- ohos:text_color="#FFFFFF"
- ohos:text_alignment="center"
- ohos:background_element="$graphic:background_button"/>
- <Button
- ohos:id="$+id:button_fourdoublegame"
- ohos:height="50vp"
- ohos:width="match_parent"
- ohos:text="4 x 4"
- ohos:text_size="28vp"
- ohos:top_margin="30vp"
- ohos:text_color="#FFFFFF"
- ohos:text_alignment="center"
- ohos:background_element="$graphic:background_button"/>
- <Button
- ohos:id="$+id:button_fivedoublegame"
- ohos:height="50vp"
- ohos:width="match_parent"
- ohos:top_margin="30vp"
- ohos:text="5 x 5"
- ohos:text_size="28vp"
- ohos:text_color="#FFFFFF"
- ohos:text_alignment="center"
- ohos:background_element="$graphic:background_button"/>
- <Button
- ohos:id="$+id:button_doubleback"
- ohos:height="50vp"
- ohos:width="match_parent"
- ohos:top_margin="30vp"
- ohos:text="返回"
- ohos:text_size="28vp"
- ohos:text_color="#FFFFFF"
- ohos:text_alignment="center"
- ohos:background_element="$graphic:background_button"/>
- </DirectionalLayout>
- package com.example.myklotski.slice;
- import com.example.myklotski.DoubleGameAbility;
- import com.example.myklotski.ResourceTable;
- import ohos.aafwk.ability.AbilitySlice;
- import ohos.aafwk.content.Intent;
- import ohos.aafwk.content.Operation;
- import ohos.agp.components.Button;
- import ohos.agp.components.Component;
- import ohos.bundle.AbilityInfo;
- import ohos.distributedschedule.interwork.DeviceInfo;
- import ohos.distributedschedule.interwork.DeviceManager;
- import ohos.hiviewdfx.HiLog;
- import ohos.hiviewdfx.HiLogLabel;
- import ohos.rpc.RemoteException;
- import java.util.List;
- public class SelectDoubleGameSlice extends AbilitySlice {
- private static final HiLogLabel TAG = new HiLogLabel(HiLog.LOG_APP, 0x12345, "signal");
- @Override
- protected void onStart(Intent intent) {
- super.onStart(intent);
- super.setUIContent(ResourceTable.Layout_ability_selectdoublegame);
- Button button_three = (Button)findComponentById(ResourceTable.Id_button_threedoublegame);
- button_three.setClickedListener(new Component.ClickedListener() {
- @Override
- public void onClick(Component component) {
- Intent intent = new Intent();
- intent.setParam("single",3);
- dispatch(intent);
- intent.setParam("isLocal",true);
- present(new DoubleGameAbilitySlice(),intent);
- }
- });
- Button button_four = (Button)findComponentById(ResourceTable.Id_button_fourdoublegame);
- button_four.setClickedListener(new Component.ClickedListener() {
- @Override
- public void onClick(Component component) {
- Intent intent = new Intent();
- intent.setParam("single",4);
- dispatch(intent);
- intent.setParam("isLocal",true);
- present(new DoubleGameAbilitySlice(),intent);
- }
- });
- Button button_five = (Button)findComponentById(ResourceTable.Id_button_fivedoublegame);
- button_five.setClickedListener(new Component.ClickedListener() {
- @Override
- public void onClick(Component component) {
- Intent intent = new Intent();
- intent.setParam("single",5);
- dispatch(intent);
- intent.setParam("isLocal",true);
- present(new DoubleGameAbilitySlice(),intent);
- }
- });
- Button button_back = (Button)findComponentById(ResourceTable.Id_button_doubleback);
- button_back.setClickedListener(new Component.ClickedListener() {
- @Override
- public void onClick(Component component) {
- terminate();
- }
- });
- }
- private void dispatch(Intent intent) {
- List<DeviceInfo> deviceInfoList = DeviceManager.getDeviceList(DeviceInfo.FLAG_GET_ONLINE_DEVICE);
- for (DeviceInfo deviceInfo : deviceInfoList) {
- Operation operation = new Intent.OperationBuilder()
- .withDeviceId(deviceInfo.getDeviceId())
- .withBundleName(getBundleName())
- .withAbilityName(DoubleGameAbility.class.getName())
- .withFlags(Intent.FLAG_ABILITYSLICE_MULTI_DEVICE)
- .build();
- intent.setOperation(operation);
- try {
- List<AbilityInfo> abilityInfoList = getBundleManager().queryAbilityByIntent(intent,0,0);
- if (abilityInfoList != null && !abilityInfoList.isEmpty()) {
- intent.setParam("isLocal",false);
- startAbility(intent);
- }
- } catch (RemoteException remoteException) {
- HiLog.info(TAG,"error");
- }
- }
- }
- @Override
- protected void onActive() {
- super.onActive();
- }
- @Override
- protected void onForeground(Intent intent) {
- super.onForeground(intent);
- }
- }
预告 那到这我们今天的学习的结束啦,就这是为了后面做游戏做的一个外壳,那我们下一篇学习笔记就来实现单人游戏的游戏程序把,我们将在那里面实现游戏功能、暂停开始、重新开始游戏、返回和迁移。你们也可以试着看能不能实现出来。
结语 源码我会放到附件中的,有需求的可以自行下载自行学习,大家有什么看不懂的地方可以私信问我或者对照源码进行学习。
更多资料请关注我们的项目 : Awesome-Harmony_木棉花 本项目会长期更新 ,希望继续关注,我们也会加油做得更好的。明年3月,深大校园内的木棉花会盛开,那时,鸿蒙也会变的更好,愿这花开,有你我的一份。

回帖高级模式
声明:本文内容及配图由入驻作者撰写或者入驻合作网站授权转载。文章观点仅代表作者本人,不代表电子发烧友网立场。文章及其配图仅供工程师学习之用,如有内容图片侵权或者其他问题,请联系本站作侵删。 侵权投诉